Netgear WNDAP350 WNDAP350 User Manual - Page 101
Configuring a WNDAP350 as a Point-to-Point Bridge, Segment 1
 |
UPC - 606449064643
View all Netgear WNDAP350 manuals
Add to My Manuals
Save this manual to your list of manuals |
Page 101 highlights
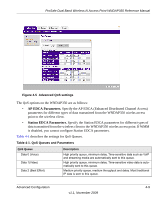
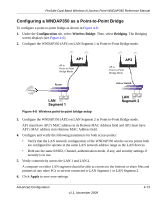
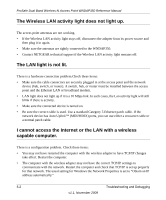
ProSafe Dual Band Wireless-N Access Point WNDAP350 Reference Manual Configuring a WNDAP350 as a Point-to-Point Bridge To configure a point-to-point bridge as shown in Figure 4-8: 1. Under the Configuration tab, select Wireless Bridge. Then, select Bridging. The Bridging screen displays (see Figure 4-6). 2. Configure the WNDAP350 (AP1) on LAN Segment 1 in Point-to-Point Bridge mode. AP1 AP in R ESET ETHER N ET 5 -1 2 V DC Point-to-Point Bridge Mode Router AP2 AP in R ESET ETHER N ET 5 -1 2 V DC Point-to-Point Bridge Mode Hub or Switch LAN Segment 1 Figure 4-8 Wireless point-to-point bridge setup LAN Segment 2 3. Configure the WNDAP350 (AP2) on LAN Segment 2 in Point-to-Point Bridge mode. AP1 must have AP2's MAC address in its Remote MAC Address field and AP2 must have AP1's MAC address in its Remote MAC Address field. 4. Configure and verify the following parameters for both access points: • Verify that the LAN network configuration of the WNDAP350 wirelss access points both are configured to operate in the same LAN network address range as the LAN devices • Both use the same ESSID, Channel, authentication mode, if any, and security settings if security is in use. 5. Verify connectivity across the LAN 1 and LAN 2. A computer on either LAN segment should be able to connect to the Internet or share files and printers of any other PCs or servers connected to LAN Segment 1 or LAN Segment 2. 6. Click Apply to save your settings. Advanced Configuration v1.1, November 2009 4-13
-
 1
1 -
2
-
3
-
4
-
5
-
6
-
7
-
8
-
9
-
10
-
11
-
12
-
13
-
14
-
15
-
16
-
17
-
18
-
19
-
20
-
21
-
22
-
23
-
24
-
25
-
26
-
27
-
28
-
29
-
30
-
31
-
32
-
33
-
34
-
35
-
36
-
37
-
38
-
39
-
40
-
41
-
42
-
43
-
44
-
45
-
46
-
47
-
48
-
49
-
50
-
51
-
52
-
53
-
54
-
55
-
56
-
57
-
58
-
59
-
60
-
61
-
62
-
63
-
64
-
65
-
66
-
67
-
68
-
69
-
70
-
71
-
72
-
73
-
74
-
75
-
76
-
77
-
78
-
79
-
80
-
81
-
82
-
83
-
84
-
85
-
86
-
87
-
88
-
89
-
90
-
91
-
92
-
93
-
94
-
95
-
 96
96 -
 97
97 -
 98
98 -
 99
99 -
 100
100 -
 101
101 -
 102
102 -
 103
103 -
 104
104 -
 105
105 -
 106
106 -
107
-
108
-
109
-
110
-
111
-
112
-
113
-
114
-
115
-
116
-
117
-
118
-
119
-
120
-
121
-
122
-
123
-
124
-
125
-
126
-
127
-
128
-
129
-
130
-
131
-
132
-
133
-
134
-
135
-
136
 |
 |