Netgear WNDAP350 WNDAP350 User Manual - Page 22
Wireless Equipment Placement and Range Guidelines, Appendix - specifications
 |
UPC - 606449064643
View all Netgear WNDAP350 manuals
Add to My Manuals
Save this manual to your list of manuals |
Page 22 highlights
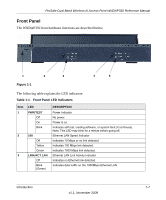
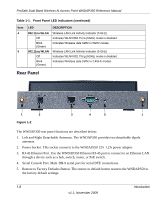
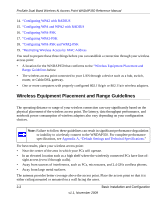
ProSafe Dual Band Wireless-N Access Point WNDAP350 Reference Manual 14. "Configuring WPA2 with RADIUS 15. "Configuring WPA and WPA2 with RADIUS 16. "Configuring WPA-PSK 17. "Configuring WPA2-PSK 18. "Configuring WPA-PSK and WPA2-PSK 19. "Restricting Wireless Access by MAC Address You need to prepare these three things before you can establish a connection through your wireless access point: • A location for the WNDAP350 that conforms to the "Wireless Equipment Placement and Range Guidelines below. • The wireless access point connected to your LAN through a device such as a hub, switch, router, or Cable/DSL gateway. • One or more computers with properly configured 802.11b/g/n or 802.11a/n wireless adapters. Wireless Equipment Placement and Range Guidelines The operating distance or range of your wireless connection can vary significantly based on the physical placement of the wireless access point. The latency, data throughput performance, and notebook power consumption of wireless adapters also vary depending on your configuration choices. Note: Failure to follow these guidelines can result in significant performance degradation or inability to wirelessly connect to the WNDAP350. For complete performance specifications, see Appendix A, "Default Settings and Technical Specifications." For best results, place your wireless access point: • Near the center of the area in which your PCs will operate. • In an elevated location such as a high shelf where the wirelessly connected PCs have line-of- sight access (even if through walls). • Away from sources of interference, such as PCs, microwaves, and 2.4 GHz cordless phones. • Away from large metal surfaces. The antenna provides better coverage above the access point. Place the access point so that it is either ceiling mounted or mounted on a wall facing the users. 2-2 Basic Installation and Configuration v1.1, November 2009
-
 1
1 -
2
-
3
-
4
-
5
-
6
-
7
-
8
-
9
-
10
-
11
-
12
-
13
-
14
-
15
-
16
-
 17
17 -
 18
18 -
 19
19 -
 20
20 -
 21
21 -
 22
22 -
 23
23 -
 24
24 -
 25
25 -
 26
26 -
 27
27 -
28
-
29
-
30
-
31
-
32
-
33
-
34
-
35
-
36
-
37
-
38
-
39
-
40
-
41
-
42
-
43
-
44
-
45
-
46
-
47
-
48
-
49
-
50
-
51
-
52
-
53
-
54
-
55
-
56
-
57
-
58
-
59
-
60
-
61
-
62
-
63
-
64
-
65
-
66
-
67
-
68
-
69
-
70
-
71
-
72
-
73
-
74
-
75
-
76
-
77
-
78
-
79
-
80
-
81
-
82
-
83
-
84
-
85
-
86
-
87
-
88
-
89
-
90
-
91
-
92
-
93
-
94
-
95
-
96
-
97
-
98
-
99
-
100
-
101
-
102
-
103
-
104
-
105
-
106
-
107
-
108
-
109
-
110
-
111
-
112
-
113
-
114
-
115
-
116
-
117
-
118
-
119
-
120
-
121
-
122
-
123
-
124
-
125
-
126
-
127
-
128
-
129
-
130
-
131
-
132
-
133
-
134
-
135
-
136
 |
 |
