Nikon 25446B D90 User's Manual - Page 54
“Point-and-Shoot” Photography (AUTO and AUTO (flash off ) Modes), Step 1: Turn the Camera
 |
UPC - 689466140132
View all Nikon 25446B manuals
Add to My Manuals
Save this manual to your list of manuals |
Page 54 highlights
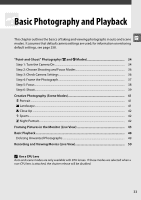
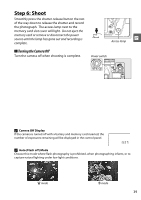
"Point-and-Shoot" Photography (i and j Modes) This section describes how to take photographs in i (auto) mode, an automatic "point-and-shoot" mode in which the majority of settings are controlled by the camera in response to shooting conditions, and s in which the flash will fire automatically if the subject is poorly lit. To take photographs with the flash off while leaving the camera in control of other settings, rotate the mode dial to j to select auto (flash off ) mode. Step 1: Turn the Camera On 1 Turn the camera on. Remove the lens cap and turn the camera on. The control panel and viewfinder displays will light. Power switch 2 Check the battery level. Check the battery level in the viewfinder or control panel. Control panel Viewfinder Description L - Battery fully charged. K J - Battery partially discharged. I H d Low battery. Ready fully-charged spare battery or prepare to charge battery. H d Battery exhausted; shutter release disabled. Charge or (blinks) (blinks) exchange battery. Note: When camera is powered by optional EH-5a or EH-5 AC adapter, battery level is not displayed; instead, a 9 icon appears in the shooting information display (pg. 10). 34
-
 1
1 -
2
-
3
-
4
-
5
-
6
-
7
-
8
-
9
-
10
-
11
-
12
-
13
-
14
-
15
-
16
-
17
-
18
-
19
-
20
-
21
-
22
-
23
-
24
-
25
-
26
-
27
-
28
-
29
-
30
-
31
-
32
-
33
-
34
-
35
-
36
-
37
-
38
-
39
-
40
-
41
-
42
-
43
-
44
-
45
-
46
-
47
-
48
-
 49
49 -
 50
50 -
 51
51 -
 52
52 -
 53
53 -
 54
54 -
 55
55 -
 56
56 -
 57
57 -
 58
58 -
 59
59 -
60
-
61
-
62
-
63
-
64
-
65
-
66
-
67
-
68
-
69
-
70
-
71
-
72
-
73
-
74
-
75
-
76
-
77
-
78
-
79
-
80
-
81
-
82
-
83
-
84
-
85
-
86
-
87
-
88
-
89
-
90
-
91
-
92
-
93
-
94
-
95
-
96
-
97
-
98
-
99
-
100
-
101
-
102
-
103
-
104
-
105
-
106
-
107
-
108
-
109
-
110
-
111
-
112
-
113
-
114
-
115
-
116
-
117
-
118
-
119
-
120
-
121
-
122
-
123
-
124
-
125
-
126
-
127
-
128
-
129
-
130
-
131
-
132
-
133
-
134
-
135
-
136
-
137
-
138
-
139
-
140
-
141
-
142
-
143
-
144
-
145
-
146
-
147
-
148
-
149
-
150
-
151
-
152
-
153
-
154
-
155
-
156
-
157
-
158
-
159
-
160
-
161
-
162
-
163
-
164
-
165
-
166
-
167
-
168
-
169
-
170
-
171
-
172
-
173
-
174
-
175
-
176
-
177
-
178
-
179
-
180
-
181
-
182
-
183
-
184
-
185
-
186
-
187
-
188
-
189
-
190
-
191
-
192
-
193
-
194
-
195
-
196
-
197
-
198
-
199
-
200
-
201
-
202
-
203
-
204
-
205
-
206
-
207
-
208
-
209
-
210
-
211
-
212
-
213
-
214
-
215
-
216
-
217
-
218
-
219
-
220
-
221
-
222
-
223
-
224
-
225
-
226
-
227
-
228
-
229
-
230
-
231
-
232
-
233
-
234
-
235
-
236
-
237
-
238
-
239
-
240
-
241
-
242
-
243
-
244
-
245
-
246
-
247
-
248
-
249
-
250
-
251
-
252
-
253
-
254
-
255
-
256
-
257
-
258
-
259
-
260
-
261
-
262
-
263
-
264
-
265
-
266
-
267
-
268
-
269
-
270
-
271
-
272
-
273
-
274
-
275
-
276
-
277
-
278
-
279
-
280
-
281
-
282
-
283
-
284
-
285
-
286
-
287
-
288
-
289
-
290
-
291
-
292
-
293
-
294
-
295
-
296
-
297
-
298
-
299
-
300
 |
 |
