Onkyo HT-S6300 Owner Manual - Page 17
Connecting the Speaker Cables, Using Banana Plugs - receiver 680
 |
View all Onkyo HT-S6300 manuals
Add to My Manuals
Save this manual to your list of manuals |
Page 17 highlights
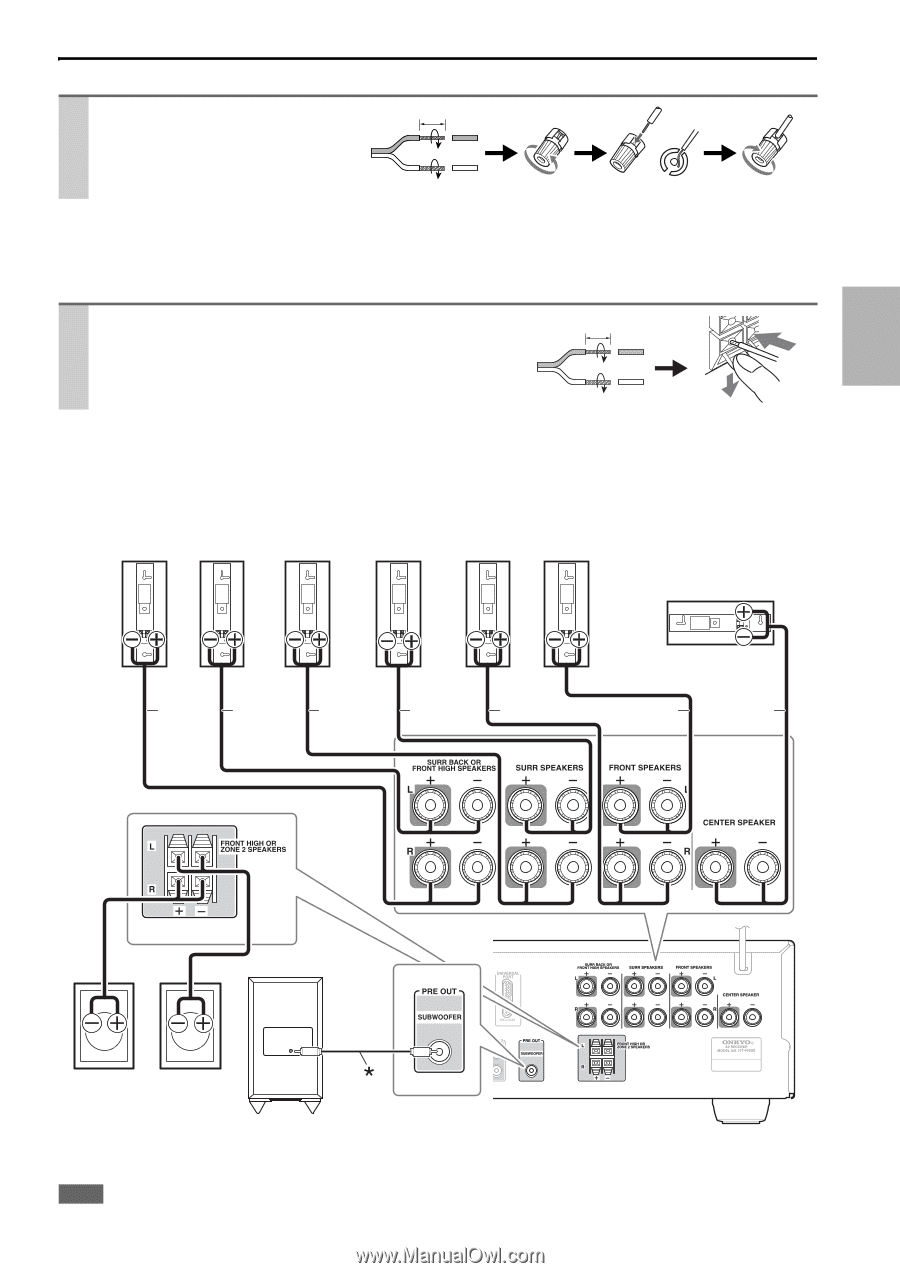
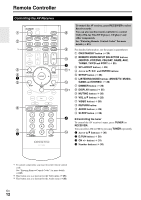
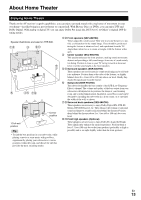
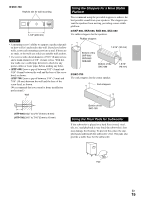
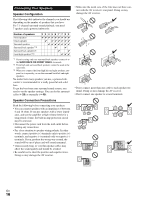
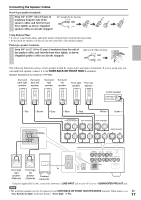
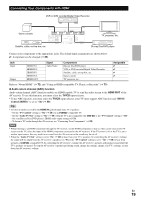
Connecting the Speaker Cables Screw-type speaker terminals Strip 1/2" to 5/8" (12 to 15 mm) of insulation from the ends of the speaker cables, and twist the bare wires tightly, as shown. (Supplied speaker cables are already stripped.) 1/2" to 5/8"(12 to 15 mm) Using Banana Plugs • If you are using banana plugs, tighten the speaker terminal before inserting the banana plug. • Do not insert the speaker code directly into the center hole of the speaker terminal. Push-type speaker terminals Strip 3/8" to 1/2" (10 to 12 mm) of insulation from the ends of the speaker cables, and twist the bare wires tightly, as shown. (Supplied speaker cables are already stripped.) 3/8" to 1/2"(10 to 12 mm) The following illustration shows which speaker should be connected to each pair of terminals. If you're using only one surround back speaker, connect it to the SURR BACK OR FRONT HIGH L terminals. Speaker illustrations are based on HTP-680. Surround back right speaker Surround back left speaker Surround right speaker Surround left speaker Front right Front left speaker speaker Center speaker Tan Brown Gray Blue Red White Green Front high right speaker (Optional) Front high left speaker (Optional) Powered subwoofer * Using the supplied RCA cable, connect the subwoofer's LINE INPUT jack to your AV receiver's SUBWOOFER PRE OUT jack. Note • The front high speakers can also be connected to the SURR BACK OR FRONT HIGH SPEAKERS terminals. When doing so, set En "Surr Back/Front High" in Speaker Setup to "Front High" (➔ 40). 17
-
 1
1 -
2
-
3
-
4
-
5
-
6
-
7
-
8
-
9
-
10
-
11
-
 12
12 -
 13
13 -
 14
14 -
 15
15 -
 16
16 -
 17
17 -
 18
18 -
 19
19 -
 20
20 -
 21
21 -
 22
22 -
23
-
24
-
25
-
26
-
27
-
28
-
29
-
30
-
31
-
32
-
33
-
34
-
35
-
36
-
37
-
38
-
39
-
40
-
41
-
42
-
43
-
44
-
45
-
46
-
47
-
48
-
49
-
50
-
51
-
52
-
53
-
54
-
55
-
56
-
57
-
58
-
59
-
60
-
61
-
62
-
63
-
64
-
65
-
66
-
67
-
68
-
69
-
70
-
71
-
72
-
73
-
74
-
75
-
76
 |
 |