Panasonic SABT300 Blu-ray Disc Home Theater Sound System - Page 27
TV, Enjoying TV, etc. with this unit’s speakers
 |
View all Panasonic SABT300 manuals
Add to My Manuals
Save this manual to your list of manuals |
Page 27 highlights
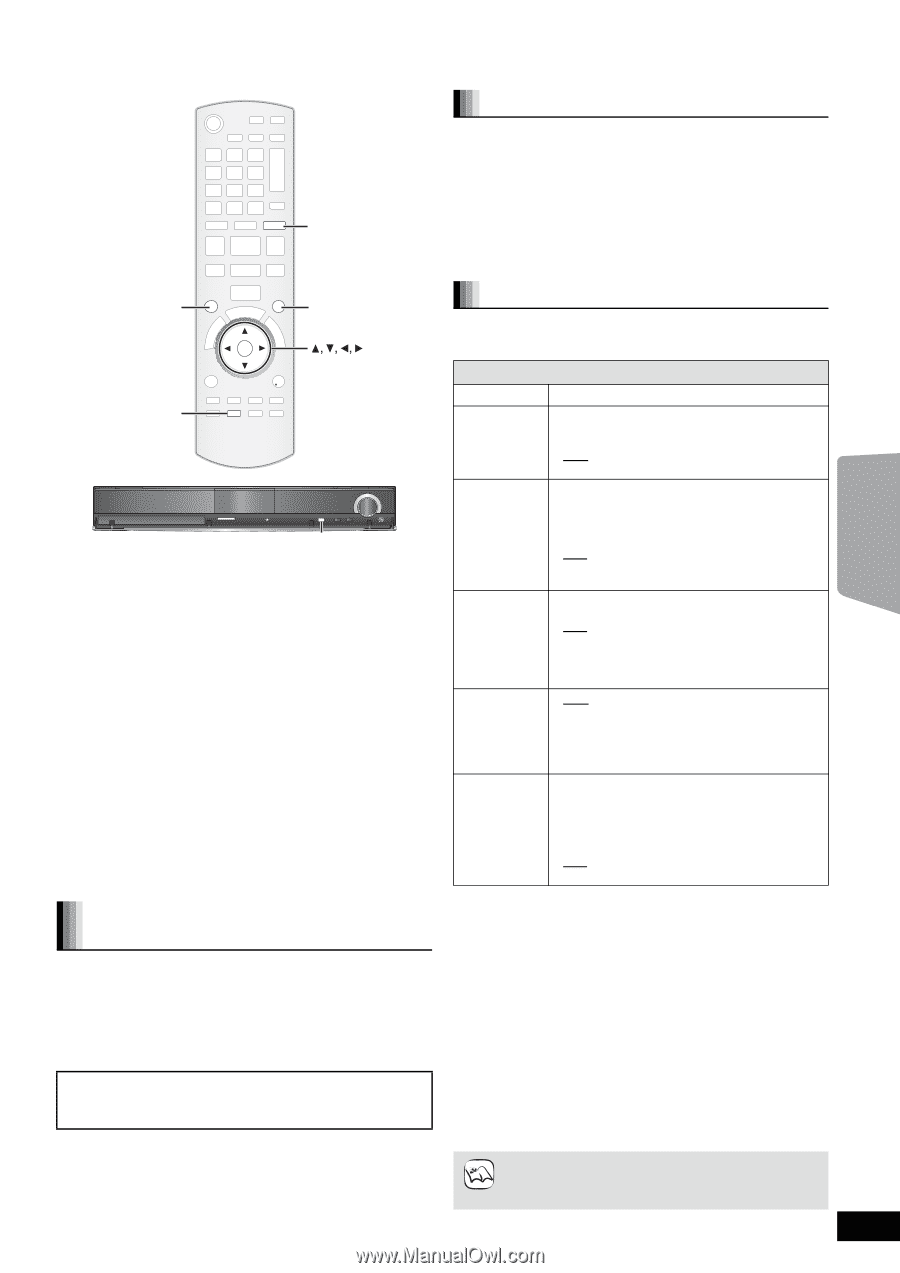
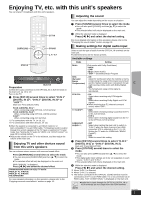
Enjoying TV, etc. with this unit's speakers You can enjoy TV broadcasts with this unit's speakers. Adjusting the sound EXT-IN EXT-IN SURROUND SURROUND SOUND SOUND OK STATUS STATUS SD CARD SETUP MIC SSEELLEECCTTOORR TUNE SELECTOR Preparation Confirm the audio connection to the OPTICAL IN or AUX terminal on the main unit. (> 10 to 12) Turn on the TV. 1 Press [EXT-IN] several times to select "D-IN 1" (DIGITAL IN 1)*1, "D-IN 2" (DIGITAL IN 2)*2 or "AUX"*1. Main unit: Press [SELECTOR]. ≥D-IN 1 (DIGITAL IN 1)*1: When connecting using OPTICAL 1(TV) terminal. ≥D-IN 2 (DIGITAL IN 2)*2: When connecting using OPTICAL 2(STB) terminal. ≥AUX*1: When connecting using AUX terminal. *1 For connections with the TV. (> 10, 11) *2 For connections with other devices. (> 12) ≥When the system is connected to an HDAVI Control 2 or later-compatible TV via an HDMI cable, TV broadcast audio is output through the system speakers if the TV input is switched to TV tuner mode. See "Setting the TV audio for VIERA Link "HDAVI Control"" on page 28 for setting method. ≥Reduce the volume on the TV to its minimum, and then adjust the volume of the main unit. Enjoying TV and other devices sound from this unit's speakers You can enhance stereo sources with surround sound effect. Press [SURROUND] several times to select the mode. ≥You can also press [SURROUND] and then [3, 4] to select the mode. ≥The selected effect will only be displayed on the main unit. While "MANUAL" is displayed Press [2, 1] and select the desired effect. Recommended modes to enjoy TV audio: ≥DOLBY PL II MOVIE ≥DOLBY PL II MUSIC ≥S.SURROUND For more detailed information on this operation, please refer to the "Enjoying surround sound effects" section on page 18. You can adjust the mode depending on the source or situation. 1 Press [SOUND] several times to select the mode. ≥You can also press [SOUND] and then [3, 4] to select the mode. ≥The selected effect will only be displayed on the main unit. 2 While the selected mode is displayed Press [2, 1] and select the desired setting. For more detailed information on this operation, please refer to the "Changing the sound modes" section on page 18. Making settings for digital audio input Select to suit the type of audio from the OPTICAL IN terminals on the main unit. ≥Underlined items are the factory presets. Available settings Mode Setting DUAL: (Only works with Dolby Dual Mono) - MAIN - SAP* - M+S* (stereo audio) * "SAP" = Secondary Audio Program TV DRC: (Dynamic Range Compression) - ON Adjust for clarity even when the volume is low by compressing the range of the lowest sound level and the highest sound level. Convenient for late night viewing. (Only works with Dolby Digital) - OFF The full dynamic range of the signal is reproduced. PCM FIX: - ON Select when receiving only PCM signals. - OFF Select when receiving Dolby Digital and PCM signals. ≥When receiving true 5.1-channel surround sound, select "OFF". TV AUDIO*3: - AUX Select when receiving analog sound from the TV to the AUX terminal. - D-IN 1 Select when receiving digital sound from the TV to the OPTICAL 1(TV) terminal. CABLE/SAT AUDIO*4, 5: - SET Select when setting the main unit to switch to "D-IN 2" when the input channel of an HDMI connected STB is selected on the TV (B 28, Setting the TV audio for VIERA Link "HDAVI Control"). - OFF Select to cancel this setting. 1 Press [EXT-IN] several times to select "D-IN 1" (DIGITAL IN 1) or "D-IN 2" (DIGITAL IN 2). Main unit: Press [SELECTOR]. 2 Press [STATUS] several times to select the mode. ≥You can also press [STATUS] and then [3, 4] to select the mode. ≥The digital audio input settings are to be set separately to each source, "D-IN 1" and "D-IN 2". ≥The selected effect will only be displayed on the main unit. 3 While the selected mode is displayed Press [2, 1] and select the desired setting. *3 When "D-IN 1" is selected. *4 When "D-IN 2" is selected. *5 The device connected to the OPTICAL 2(STB) terminal must be connected to the TV via an HDMI cable. If it is not connected via an HDMI cable, "NOT CONDITIONAL" is displayed on the main unit. ≥Audio that is input through the OPTICAL DIGITAL IN or AUX terminals are not output from the HDMI terminal. NOTE RQT9508 27
-
 1
1 -
2
-
3
-
4
-
5
-
6
-
7
-
8
-
9
-
10
-
11
-
12
-
13
-
14
-
15
-
16
-
17
-
18
-
19
-
20
-
21
-
 22
22 -
 23
23 -
 24
24 -
 25
25 -
 26
26 -
 27
27 -
 28
28 -
 29
29 -
 30
30 -
 31
31 -
 32
32 -
33
-
34
-
35
-
36
-
37
-
38
-
39
-
40
-
41
-
42
-
43
-
44
-
45
-
46
-
47
-
48
-
49
-
50
-
51
-
52
-
53
-
54
-
55
-
56
-
57
-
58
-
59
-
60
 |
 |