Pfaff tipmatic 1151 Owner's Manual - Page 38
Pfaff tipmatic 1151 Manual
 |
View all Pfaff tipmatic 1151 manuals
Add to My Manuals
Save this manual to your list of manuals |
Page 38 highlights
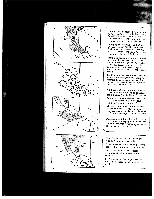
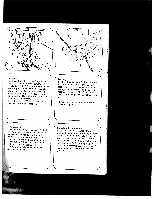
Verwandlungsnähfläche und Zubehör: Nähfläche kann herausgenommen werden N. Nähfläche öffnen, Zubehbrkästchen P herausnehmen. Unter dem Zubehörkäst chen ist em Zubehärfach 0. Abbildung Q zeigt, wie NähfüRe, Nadeln und Spulen eingeordnet werden müssen. o Normalndhful 1 Zierstichfu6 für Obertransport 2 Zierstichful?, nicht für Obertransport 3 Blindstich- und 0verlockful? 4 Reilverschlul- und Kantenful 5 KnopflochfuR 6 Stopffu1, 7 Säumer 8 Lineal j Detachable work support and accessories: The work support can be lifted out (N). Open its lid and take out accessory box R Underneath the box is an accessory com partment 0. Illustration Q shows how to arrange sewing feet, needles and bobbins in the accessory box. O Ordinary sewing foot 1 Fancy-stitch foot for top feed 2 Fancy-stitch foot (without top feed) 3 Blindstitch and overlock foot 4 Zip foot 5 Buttonhole foot 6 Darning foot 7 Hemmer 8 Edge guide BoIte de rangement et accessoires: Enlever Ia boite de rangement N, I'ouvrir et enlever Ia bolte d'accessoires P Sous celle-ci se trouve le casier 0. Figure Q vous montre comment ranger Ies pieds presseurs, les aigullles et les canettes. 0 pied presseur normal 1 pied pour points décoratifs, avec entralnement supérieur 2 pied pour points décoratifs, sans entrainement supérieur 3 pied a point invisible et pour surjet 4 pied pour poser es fermetures a glissière et pour piqüres au bord 5 pied a boutonnières 6 pied a repriser 7 pied ourleur 8 guide-bord II piano di lavoro variabile e gli acces son: II piano di lavoro pub essere to[to (N). Aprire ii piano di lavoro, togliere II casset tine degli accessori R Sotto ii cassettino degli accessori si trova uno scomparto per accessori 0. Figura Q mostra come siste mare piedini, aghi e spoline. o piedino normale 1 piedino per ricamo per doppio trasporto 2 piedino per ricamo (senza doppio trasporto) 3 piedino per punto invisibile e per Overlock 4 piedino per cerniere lampo 5 piedino per occhielli 6 piedino per rammendo 7 piedino orlatore 8 lineale 35
-
 1
1 -
2
-
3
-
4
-
5
-
6
-
7
-
8
-
9
-
10
-
11
-
12
-
13
-
14
-
15
-
16
-
17
-
18
-
19
-
20
-
21
-
22
-
23
-
24
-
25
-
26
-
27
-
28
-
29
-
30
-
31
-
32
-
 33
33 -
 34
34 -
 35
35 -
 36
36 -
 37
37 -
 38
38 -
 39
39 -
 40
40 -
 41
41 -
 42
42 -
 43
43 -
44
-
45
-
46
-
47
-
48
-
49
-
50
-
51
-
52
-
53
-
54
-
55
-
56
-
57
-
58
-
59
-
60
-
61
-
62
-
63
-
64
-
65
-
66
-
67
-
68
-
69
-
70
-
71
-
72
-
73
-
74
-
75
-
76
-
77
-
78
-
79
-
80
-
81
-
82
-
83
-
84
-
85
-
86
-
87
-
88
-
89
-
90
 |
 |
