Pfaff tipmatic 1151 Owner's Manual - Page 39
Hauptsch.it
 |
View all Pfaff tipmatic 1151 manuals
Add to My Manuals
Save this manual to your list of manuals |
Page 39 highlights
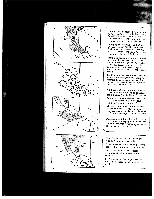
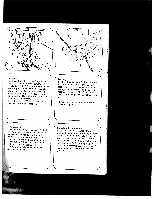
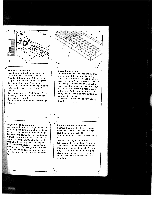
J Nahful auswechseln: • Hauptsch.it 104 ausscha!ten. Die Nadel hoch. lli. Den Nähful hinten nach unten drückn und vorne etwas anheben. Den Knopt.. lochful vorne nach unten drücken. Changing the sewing foot: Switch off master switch 104. Raise the needle. Push down the sewing foot at the rear and lift it lightly at the front. Push down the buttonhole foot at the front. Remplacement de Ia semelle du pied presseur: Mettre cuit a I7nterrupteur Ia machine hors cir gênóra/ 104. Relever l'aiguille. Abaisser Ia semelle du pied a I'arrière et Ia lever a 'avant. Le pied a boutonnières est a pousser vers le bas a 'avant. Sostituzione del piedino: Disinserire I'interruttore principale 104. Alzare l'ago. Premere il piedino verso basso e aizarlo leggermente davanti. Premere ii piedino per occhielli verso basso. Nähful anbringen: Stoffdrückerhebel senken und den Fu1 dabei so schieben, dal! die Stege N in die Nuten 0 einrasten. Replacing the sewing foot: lower the presser bar lifter and move the foot so that pins N snap into grooves 0. Mise en place de Ia semelle du pied presseur: Abaisser le levier du pied pres seur, déplacer Ia semelle de manière que es étriers N s'engagent dans es rainures 0. Applicazione del piedino: abbassare Is eva premistoffa e spingere il piedino con temporaneamente in maniera che II perno N si innesti nella scanalatura 0. 4 P und Q sind zum Zubehör befestigen. R st die NähfulThalterschraube. Screws P and Q are for securing accesso ries. R is the Sewing foot retaining screw. P et ci servent a fixer les accessoires. R est Ia vis de fixation du support de semelle. P e ci servono per fissare gli accessori. R è Ia vite di fissaggio del supporto per piedino. 36 )
-
 1
1 -
2
-
3
-
4
-
5
-
6
-
7
-
8
-
9
-
10
-
11
-
12
-
13
-
14
-
15
-
16
-
17
-
18
-
19
-
20
-
21
-
22
-
23
-
24
-
25
-
26
-
27
-
28
-
29
-
30
-
31
-
32
-
33
-
 34
34 -
 35
35 -
 36
36 -
 37
37 -
 38
38 -
 39
39 -
 40
40 -
 41
41 -
 42
42 -
 43
43 -
 44
44 -
45
-
46
-
47
-
48
-
49
-
50
-
51
-
52
-
53
-
54
-
55
-
56
-
57
-
58
-
59
-
60
-
61
-
62
-
63
-
64
-
65
-
66
-
67
-
68
-
69
-
70
-
71
-
72
-
73
-
74
-
75
-
76
-
77
-
78
-
79
-
80
-
81
-
82
-
83
-
84
-
85
-
86
-
87
-
88
-
89
-
90
 |
 |
