Philips CDR800 User manual - Page 30
Troubleshooting - cdr 800 service manual
 |
View all Philips CDR800 manuals
Add to My Manuals
Save this manual to your list of manuals |
Page 30 highlights
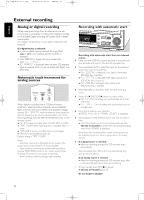
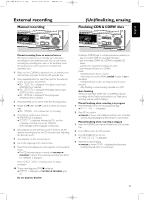
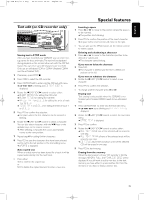
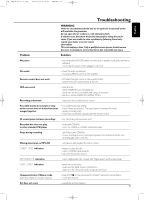
xp CDR 800/17.1 eng. 25-07-2001 15:12 Pagina 27 English Troubleshooting WARNING Under no circumstances should you try to repair the set yourself as this will invalidate the guarantee. Do not open the set as there is a risk of electric shock. If a fault occurs, first check the points listed, before taking the set for repair. If you are unable to solve a problem by following these hints, consult your dealer or service center. Laser safety This unit employs a laser. Only a qualified service person should remove the cover or attempt to service this device, due to possible eye injury. Problem Solution: No power - ensure that the ON/OFF button is on: the set is in standby mode, press any key to activate it - ensure that the power cord is plugged in correctly No sound - check the audio connections - try using a different source on the amplifier Remote control does not work - first select the right source on the remote control - point the remote control directly at the set Will not record - clean the disc - check if CDR(W) is an unfinalized disc - check that the disc is recordable and replace if necessary - the disc is not an AUDIO disc (WRONG DISC) Recording is distorted - make sure the recording level is correct Recorded tracks do not start or stop at the correct time or tracks have been merged together - try another auto track setting - check if there are at least 2.7 seconds silence in between the tracks (analog recording only) - insert track increments manually with the remote control 20 second pause between recordings - see "Recording with automatic start" Recorded disc does not play in other standard CD player - finalize the CDR(W) - insert the CDRW in a CDRW compatible player Stops during recording - use Philips audio CDR(W)s - in case recording process is interrupted (power loss, mechanical shock), start recording again with a new disc Missing directories on MP3-CD - only albums with playable files will be shown INSERT DISC indication - replace or clean the disc - insert a CD(RW), label upwards - wait until the lens has cleared USE AUDIO CD indication - insert a digital audio disc marked with "Digital audio" and the special logo CHECK INPUT indication - select the correct input - make sure the digital source is switched on - make sure the connection cord is properly connected Unexpected start of Demo mode (automatic display of recorder features) - Keep STOP 9 on the set pressed for at least 5 seconds to cancel Demo mode permanently Set does not react - unplug the set, then replug it 27
-
 1
1 -
2
-
3
-
4
-
5
-
6
-
7
-
8
-
9
-
10
-
11
-
12
-
13
-
14
-
15
-
16
-
17
-
18
-
19
-
20
-
21
-
22
-
23
-
24
-
 25
25 -
 26
26 -
 27
27 -
 28
28 -
 29
29 -
 30
30 -
 31
31 -
 32
32 -
 33
33 -
 34
34 -
 35
35 -
36
-
37
-
38
-
39
-
40
-
41
-
42
-
43
-
44
-
45
-
46
-
47
-
48
-
49
-
50
-
51
-
52
-
53
-
54
-
55
-
56
-
57
-
58
-
59
-
60
-
61
-
62
-
63
-
64
-
65
-
66
-
67
-
68
-
69
-
70
-
71
-
72
-
73
-
74
-
75
-
76
-
77
-
78
-
79
-
80
-
81
-
82
-
83
 |
 |
