Pioneer P90HDD Owner's Manual
Pioneer P90HDD - DEH Radio / CD Manual
 |
UPC - 012562575896
View all Pioneer P90HDD manuals
Add to My Manuals
Save this manual to your list of manuals |
Pioneer P90HDD manual content summary:
- Pioneer P90HDD | Owner's Manual - Page 1
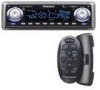
ENGLISH FRANÇAIS DEUTSCH High power HDD/CD player with "Memory Stick" and FM/AM tuner Lecteur de disque dur/CD, "Puissance élevée", avec "Memory Stick" et syntoniseur FM/AM Operation Manual OperaDtioEnHM-aPnu9a1l 00R DEHM-aPn9ua0l HdeDODperación Mode d'emploi FRANÇAIS ITALIANO NEDERLANDS - Pioneer P90HDD | Owner's Manual - Page 2
Features 6 About this product 7 About this manual 7 Important 7 Precaution 7 After-sales service for Pioneer products 8 About the XM READY mark 8 18 Built-in CD Player 19 Display and indicators 19 Basic operation 19 Switching and scrolling the title 20 Built-in CD player function menu 20 - Pioneer P90HDD | Owner's Manual - Page 3
tracks from the "Memory Stick 42 Multi-CD Player 43 Display and indicators 43 50-disc multi-CD player 43 Basic operation 43 Selecting a disc the announcement support interruption 52 Selecting services from the preset service list 52 Selecting services from the available service list 52 - Pioneer P90HDD | Owner's Manual - Page 4
54 Audio Adjustments 55 Adjusting the audio easily 55 Adjusting the audio finely 55 Extra functions 55 Recalling equalizer curves 55 Audio CD player and care 70 MP3 files 71 "Memory Stick" player and care 72 Understanding auto-equalizing error messages 73 Understanding built-in CD player - Pioneer P90HDD | Owner's Manual - Page 5
audio equipment such as the unit you've just purchased is only the start of your musical enjoyment. Now it's time to consider how you can maximize the fun and excitement your equipment offers. This manufacturer and the Electronic Rock band concert in front of speakers, thunderclap 140 Gunshot blast, - Pioneer P90HDD | Owner's Manual - Page 6
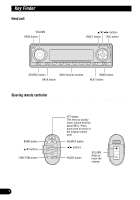
as when using buttons on the head unit. BAND button 5/∞ buttons FUNCTION button ATT button This lets you quickly lower volume level (by about 90%). Press once more to return to the original volume level. SOURCE button 2/3 buttons AUDIO button VOLUME Raise or lower the volume. 5 - Pioneer P90HDD | Owner's Manual - Page 7
ENGLISH ESPAÑOL DEUTSCH Before Using This Product Features Music server You can record music from the built-in CD player or from other audio devices and play them back on the music server. You can also organize and edit favorite tracks, etc. Automatic title retrieval function using Gracenote - Pioneer P90HDD | Owner's Manual - Page 8
have no voice control functions. Tracks recorded on the music server can not be called up by means of voice recognition. About this manual This product features a number of sophisticated functions ensuring superior reception and operation. All are designed for the easiest possible use, but many are - Pioneer P90HDD | Owner's Manual - Page 9
Pioneer Electronics (USA) Inc. CUSTOMER SUPPORT DIVISION P.O. Box 1760 Long Beach, CA 90801-1760 800-421-1404 CANADA Pioneer Electronics Pioneer service station regarding the XM tuner that can be connected to this product. For operation of the XM tuner, refer to the XM tuner owner's manual. - Pioneer P90HDD | Owner's Manual - Page 10
recorded contents of the music server are erased when the RESET button is pressed. About the demo modes This product features two demonstration modes. One demo mode. Press the button 6 again to start the feature demo mode. Remember that if the feature demo continues operating when the car engine is - Pioneer P90HDD | Owner's Manual - Page 11
ENGLISH ESPAÑOL Remote controller and care Installing the lithium battery • Remove the cover on the back of the steering remote controller and insert the battery with the (+) and (-) poles pointing in the proper direction. Replacing the lithium battery • Remove the lithium battery. WARNING: • - Pioneer P90HDD | Owner's Manual - Page 12
problems car stops or turns a curve, the unit might drop on the floor. If the unit rolls under the brake pedal, it might prevent the driver from braking properly, causing serious trouble CD player function menu" on page 20. AUDIO button operation • Press AUDIO to select the desired mode. Press AUDIO - Pioneer P90HDD | Owner's Manual - Page 13
You can turn the time display on or off and set the time. Setting the time display on or off 1. Press NEXT to display "CLK". Press NEXT until "CLK" appears. 2. Press CLK and then press ON/OFF to turn the time display on. The light illuminates. When the time display is turned on, "TIME - Pioneer P90HDD | Owner's Manual - Page 14
panel. • Avoid subjecting the front panel to excessive shocks. • Keep the front panel out of direct sunlight and high temperatures. Detaching the front panel 1. Press OPEN to open the front panel. 2. Slide the front panel toward you and remove it. Take care not to grip the front panel tightly or - Pioneer P90HDD | Owner's Manual - Page 15
CD player (MP3) = TV tuner = Tuner = DAB tuner = Music server = "Memory Stick" player = Multi-CD player = External unit 1 = External unit 2 = AUX 2. Press VOLUME to extend the VOLUME outward. • When you press Multi-function buttons The explanations given in this manual are based on FORM 1 display. If - Pioneer P90HDD | Owner's Manual - Page 16
button operation Here the "random play" function of the built-in CD player is used as an example to illustrate operation of the multi-function buttons. 1. Press NEXT to display "FUNC". Press NEXT repeatedly until "FUNC" appears. 2. Press FUNC to enter the function menu. With the switch to the - Pioneer P90HDD | Owner's Manual - Page 17
ENGLISH ESPAÑOL DEUTSCH Display example (e.g., built-in CD player) Key guidance indicator This product's display features key guidance indicators. These light to indicate which of the 5/∞/2/3 buttons you can use. When you're in the function menu, audio menu or the other menus, they also make it - Pioneer P90HDD | Owner's Manual - Page 18
you can perform seek tuning. Seek tuning lets you skip broadcasting stations until a broadcast strong enough for good reception is found. • If you press and hold 2 or 3, you can skip broadcasting stations. Seek tuning starts as soon as you release the button. Note: • The stereo indicator "" lights - Pioneer P90HDD | Owner's Manual - Page 19
The preset channel list lets you see the list of preset stations and select one of them to receive. 1. Press FUNC and then press chLIST to select the preset channel list mode. 2. Press any of the buttons 1 - 6 to recall the desired station. Note: • If you do not operate the function within about - Pioneer P90HDD | Owner's Manual - Page 20
tTrack title Basic operation The built-in CD player plays one standard 12 cm or 8 cm (single) CD at a time. Do not use an adapter when playing an 8 cm CD. 1. Press OPEN to open the front panel. 2. Insert a CD into the CD loading slot. CD loading slot 4. Press VOLUME to extend the VOLUME outward - Pioneer P90HDD | Owner's Manual - Page 21
artist name. SCROLL Scrolls the displayed title. Built-in CD player function menu The built-in CD player function menu has the following functions: Note: • If light illuminates. The track currently playing will play and then repeat. • Press RPT again to turn repeat play off. • When the repeat mode - Pioneer P90HDD | Owner's Manual - Page 22
Built-in CD Player Playing tracks in random order Random play lets you play back tracks on the CD in random order. 1. Press FUNC and then press RDM to select the random mode. 2. Press RDM to turn random play on. The light illuminates. Tracks will play in random order. • Press RDM again to turn - Pioneer P90HDD | Owner's Manual - Page 23
pressing PAUSE in the following display. Entering disc titles Disc title input lets you input up to 48 CD titles up to 10 letters long into the built-in CD player. If you input a CD multi-CD player, you can input disc titles for up to 100 discs. • When a multi-CD player that does not support disc - Pioneer P90HDD | Owner's Manual - Page 24
name Basic operation The built-in CD player can playback MP3 files recorded on CD-ROM discs. (See page 71.) 1. Press OPEN to open the front panel. 2. Insert a CD-ROM into the CD loading slot. CD loading slot 3. Close the front panel. CD EJECT button 4. Press VOLUME to extend the VOLUME outward - Pioneer P90HDD | Owner's Manual - Page 25
scroll to see the rest of the text. 1. Press TITLE to switch the title mode. 2. Press the corresponding button to display the desired title. FORM input mode (TTLin), the display is not returned automatically.) • When playing a CD-ROM disc, if you switch to the disc title input mode (TTLin), "No - Pioneer P90HDD | Owner's Manual - Page 26
. • When the scan mode is exited while scan play is on, "SCAN" appears on the basic display. 4. When you find the desired track (or folder), press SCAN to turn scan play off. The light goes off. The track (or folder) will continue to play. • If the scan mode is automatically canceled - Pioneer P90HDD | Owner's Manual - Page 27
see the list of track (or folder) titles on a CD-ROM disc and select one of them for playback. 1. Press FUNC and then press T.LIST to select the track title list mode. 2. Press NEXT to display the desired track (or folder) title. Press NEXT until the desired track (or folder) title appears. Pausing - Pioneer P90HDD | Owner's Manual - Page 28
in the following cases: * When the power is switched off. * On ignition of the car engine. * When the recording source is changed. * When BAND is pressed. * When a CD is inserted into the built-in CD player during recording from other device. * When a record source device is disconnected (such as - Pioneer P90HDD | Owner's Manual - Page 29
recording from the built-in CD or multi-CD player is selectable. (See page 30.) Recording from the built-in CD Recording from CD-ROM is not possible. Not all recordings may be made from CD-R, CD-RW and other formats for reasons of copyright protection. (SCMS) (See page 80.) 1. Press OPEN to open the - Pioneer P90HDD | Owner's Manual - Page 30
below a certain level, a track number will be added automatically. By pressing 5 during recording, it is possible to add a track number manually (up to 400). • Depending on the recording source CD, the unit may determine a track ends in the middle or may not be able to determine the end of a track - Pioneer P90HDD | Owner's Manual - Page 31
the recording range It is possible to select the recording range when recording from a CD. 1. In record standby, press FUNC to select the recording mode setting mode. 2. Press R.MODE to select the recording range. Press R.MODE repeatedly to switch between the following recording ranges: Built-in - Pioneer P90HDD | Owner's Manual - Page 32
2 once skips to the start of the current track. Pressing again will skip to the previous track. • If you press and hold 2 or 3, you can per- form fast forward or reverse. Note: • If no music is recorded on the music server, "No audio" is displayed. • If the music server cannot operate properly - Pioneer P90HDD | Owner's Manual - Page 33
. The track is stored in memory under the selected button. • When a track has been selected from custom playlist files and the button shown reversed is pressed for two seconds or longer, the track being played will be deleted. Note: • You can record up to 99 tracks in a playlist file. • The tracks - Pioneer P90HDD | Owner's Manual - Page 34
if there is no information on the CD in the database.) 1. Press TITLE to switch the title mode. 2. Press the corresponding button to display the desired the displayed title. Note: • Pioneer is not responsible for data provided by Gracenote and the Gracenote CDDB service. Note: • If you do not - Pioneer P90HDD | Owner's Manual - Page 35
seconds of the first track in each playlist file. 1. Select the repeat range. Refer to "Repeating play" on this page. 2. Press FUNC and then press SCAN to select the scan mode. 3. Press SCAN to turn scan play on. The light illuminates. The first 10 seconds of each track in the current playlist file - Pioneer P90HDD | Owner's Manual - Page 36
Press FUNC and then press T.LIST to select the track title list mode. 2. Press NEXT to display the desired track title. Press NEXT until the desired track title appears. 3. Press the music server, "No audio" is displayed. Pausing music server playback Pause lets you temporarily stop playback of the - Pioneer P90HDD | Owner's Manual - Page 37
pause mode is exited while pause is on, "PAUSE" is displayed in the basic display. Note: • You can also turn pause on or off by pressing PAUSE in the following display. Entering titles The playlist file title, track title and track artist's name can each be up to 20 characters for - Pioneer P90HDD | Owner's Manual - Page 38
playlist mode. Press P.MODE repeatedly to switch between the following mode: All (each recording date) = Digital (digital recordings) = Analog (analog recordings) = Artist (artist) = Custom (custom) Note: • If you switch to playlist mode when nothing has been recorded, "No PlayList" or "No audio" is - Pioneer P90HDD | Owner's Manual - Page 39
the playlist file you want to erase from playlist mode. 2. Press FUNC and then press NEXT twice. 3. Press ERSpl to select the playlist file erase mode. 4. Press 5 to erase the selected playlist file from playlist mode. 5. Press 2 and then press 5 to select "YES". • To prevent erasure of the playlist - Pioneer P90HDD | Owner's Manual - Page 40
wBit rate indicator eTrack number rTrack title tPlay time yTrack artist name Basic operation The "Memory Stick" player plays one "MagicGate Memory Stick (MG Memory Stick)" at a time. (See page 72.) 1. Press OPEN to open the front panel. 2. Insert a "Memory Stick" into the MS loading slot until it - Pioneer P90HDD | Owner's Manual - Page 41
function menu The "Memory Stick" player function menu has the following functions: Repeating play Repeat play lets you hear the same track over again. 1. Press FUNC to select the repeat mode. 2. Press RPT to turn the repeat play on. The light illuminates. The track currently playing will play - Pioneer P90HDD | Owner's Manual - Page 42
"Memory Stick" Player Scanning tracks of a "Memory Stick" Scan play lets you hear the first 10 seconds of each track on the "Memory Stick". 1. Press FUNC and then press SCAN to select the scan mode. 2. Press SCAN to turn scan play on. The light illuminates. The first 10 seconds of each track are - Pioneer P90HDD | Owner's Manual - Page 43
to select "YES". When the tracks have been erased, the function menu is cancelled and "No audio" is displayed. • To prevent erasure of all tracks, press 3 and 5 and select "NO". Note: • You can not adjust the volume while "YES" is selected and during erasing. DEUTSCH FRANÇAIS ITALIANO NEDERLANDS - Pioneer P90HDD | Owner's Manual - Page 44
multi-CD player Only those functions described in this manual are supported for 50-disc multi-CD players. Basic operation This product can control a multi-CD player, which is sold separately. 1. Press SOURCE to select the multi-CD player. Press SOURCE until "Multi-CD" appears. 2. Press VOLUME - Pioneer P90HDD | Owner's Manual - Page 45
is displayed only when playing a CD TEXT disc on a CD TEXT compatible multi-CD player. Repeating play There are three repeat play ranges for the multi-CD player: one-track repeat, disc repeat and multi-CD player repeat. 1. Press FUNC to select the repeat mode. 2. Press RPT to select the repeat range - Pioneer P90HDD | Owner's Manual - Page 46
you play back tracks in random order within the repeat range: multi-CD player repeat and disc repeat. 1. Select the repeat range. Refer to "Repeating play" on page 44. 2. Press FUNC and then press RDM to select the random mode. 3. Press RDM to turn random play on. The light illuminates. Tracks will - Pioneer P90HDD | Owner's Manual - Page 47
set in the magazine. • You cannot display "7" - "12" when a 6-disc multi- CD player is connected. Pausing CD playback Pause lets you temporarily stop playback of the CD. 1. Press FUNC and then press PAUSE to select the pause mode. 2. Press PAUSE to turn pause on. The light illuminates. Play of the - Pioneer P90HDD | Owner's Manual - Page 48
the desired setting. Press COMP repeatedly to switch between the following settings: COMP OFF = COMP 1 = COMP 2 = COMP OFF = DBE 1 = DBE 2 • When this mode is exited except for "COMP OFF" is selected, "COMP" appears on the basic display. Note: • If the multi-CD player does not support these func - Pioneer P90HDD | Owner's Manual - Page 49
.P to turn ITS play on. The light illuminates. Playback begins of those tracks from ITS memory within the selected repeat range: multi-CD player repeat or disc repeat. • Press ITS.P again to turn ITS play off. • When the ITS play mode is exited while ITS play is on, "ITS" appears on the basic - Pioneer P90HDD | Owner's Manual - Page 50
, see your DAB tuner's manual. • This product does not have the language filter function. • With this product, you can operate three addi- tional functions: available service list, available PTY search, storing and recalling dynamic label. • DAB (digital audio broadcasting) refers to digital radio - Pioneer P90HDD | Owner's Manual - Page 51
TA again to turn the road traffic flash and transport flash off. Canceling road traffic flash and transport flash interruptions part way through 1. Press NEXT to display "TA". Press NEXT until "TA" appears. 2. To cancel a road traffic flash or transport flash interruption and return to the original - Pioneer P90HDD | Owner's Manual - Page 52
support) For operation of the announcement support, refer to "Setting the announcement support interruption" on page 52. w chLIST (preset service list) For operation of the preset service list, refer to "Selecting services from the preset service Press P/2ND repeatedly to switch to the next service - Pioneer P90HDD | Owner's Manual - Page 53
the desired announcement support on. Button NEWS WTHR ANNC Announcement News flash Area weather flash Announcement Note: • You can also use 2, 3 and 5 to select and turn on the desired announcement. Selecting services from the pre- set service list 1. Press FUNC and then press chLIST to select - Pioneer P90HDD | Owner's Manual - Page 54
separately. For details of TV tuner-specific operation/features, see your TV tuner's manual. • With this product, you can operate preset chan- nel list as one To retract VOLUME, press it again. 3. Turn VOLUME to adjust the volume. 4. Press 2 or 3 to tune in to a station. • If you press and hold 2 or - Pioneer P90HDD | Owner's Manual - Page 55
recall the desired channel. Note: • You can also use 2, 3 and 5 to select and recall the desired channel. qw q BSSM (best stations sequential memory) Press BSSM repeatedly to turn BSSM on or off. When finished, the display switches to the preset channel list mode. w chLIST (preset channel list) For - Pioneer P90HDD | Owner's Manual - Page 56
you easily adjust your audio system to match the car interior acoustic characteristics which vary depending on the type of car. • Recalling equalizer • Setting the high pass filter for front speakers (HPF F) • Setting the high pass filter for rear speakers (HPF R) • Using balance adjustment (F/B) • - Pioneer P90HDD | Owner's Manual - Page 57
Press AUDIO to select the fader/balance mode. 2. Press 5 or ∞ to adjust front/rear speaker balance. Each press of 5 or ∞ moves the front/rear speaker possible to reproduce the realistic sound fields of the four programs in your car. Octaver makes the bass sound louder. Playback very close to the - Pioneer P90HDD | Owner's Manual - Page 58
level of BBE. 1. Press AUDIO and SFC and then press BBE to select BBE. 2. Press 5 or ∞ to adjust the level of BBE. Each press of 5 or ∞ can be created for each source. (The built-in CD (MP3) and the multi-CD players are set to the same equalizer adjustment setting automatically.) will be updated. 57 - Pioneer P90HDD | Owner's Manual - Page 59
selector function lets you automatically adjust the speakers' output levels and inserts a delay time to match the number and position of occupied seats. The result is a natural sound regardless of where you are seated. 1. Press AUDIO and NEXT and then press POSI to select the position selector mode - Pioneer P90HDD | Owner's Manual - Page 60
you adjust the distance between each speaker and the listening position to match the type of car. There are five types of car stored which you can easily recall at any time. 1. Press AUDIO and NEXT and then press T.AL1 to select the time alignment mode. 2. Press the corresponding button to select - Pioneer P90HDD | Owner's Manual - Page 61
or 3 selects frequencies in the following order: 50 Ô 63 Ô 80 Ô 100 Ô 125 (Hz) Setting the high pass filter for rear speakers 1. Press AUDIO and then press NEXT twice. 2. Press HPF R to select the high pass filter mode. 3. Press HPF R to turn the high pass filter on. "HPF ON" appears in the display - Pioneer P90HDD | Owner's Manual - Page 62
CD player). 2. Press AUDIO and then press NEXT twice. 3. Press SLA to select the SLA mode. 4. Press 5 or ∞ to adjust the source volume. Each press CD (MP3) and the multi-CD players Press AUDIO and then press NEXT twice. 2. Press D.ATT to select the digital attenuator mode. 3. Press the car interior - Pioneer P90HDD | Owner's Manual - Page 63
in incorrect measurement of car interior acoustic characteristics. • Neither front nor rear speaker is connected, auto-equalizing power amp's input level to the standard position. • Auto-equalizing changes the audio settings as below: - The fader/balance settings return to the center position. - Pioneer P90HDD | Owner's Manual - Page 64
, and auto-equalizing (acoustic characteristics measurement and compensation) begins. • When all speakers are connected, auto- equalizing is completed in about four minutes. • To cancel auto-equalizing part way through, press any button. 10.When auto-equalizing is completed, "Complete" is displayed - Pioneer P90HDD | Owner's Manual - Page 65
hold settings menu. 1 to enter the initial • When the source is off, you can check the location of " 1" by turning on the feature demo. Note: • Press BAND to cancel the initial settings menu. Using reverse mode If you do not carry out an operation within about 30 seconds, screen indications will - Pioneer P90HDD | Owner's Manual - Page 66
product can be set to either mute or attenuate the audio output. 1. With the source turned off, press and hold 1. 2. Press MUTE.S to select the telephone muting/attenuation mode. 3. Press MUTE.S to select the desired setting. Press MUTE.S repeatedly to switch between the following settings: TEL mute - Pioneer P90HDD | Owner's Manual - Page 67
the warning tone function on or off. 1. With the source turned off, press and hold 1. 2. Press NEXT and then press DT-WRN to select the warning tone mode. 3. Press DT-WRN to turn the warning tone on. "ON" appears in the display. • Press DT-WRN again to turn the warning tone off. 66 FRANÇAIS - Pioneer P90HDD | Owner's Manual - Page 68
at night, the display is automatically dimmed when the car's headlights are turned on. You can switch the dimmer on or off. 1. Press NEXT to display "C.MENU". Press NEXT until "C.MENU" appears. 2. Press C.MENU and then press DMMER to select the dimmer mode. 3. Press DMMER to turn the dimmer on. "ON - Pioneer P90HDD | Owner's Manual - Page 69
will be displayed again after three seconds. Setting the ASL display You can display the ASL effect level. (Refer to page 58.) • Press ENT and then press ASL to select the ASL display. Note: • The ASL display will disappear temporarily when you perform other operations, but will be displayed again - Pioneer P90HDD | Owner's Manual - Page 70
CD-RB20 or CD-RB10 (sold separately) lets you connect this product to auxiliary equipment featuring RCA output. For more details, refer to the IP-BUS-RCA interconnector's owner's manual. Selecting AUX as the source • Press " is displayed and no audio adjustments, except volume control, are possible. - Pioneer P90HDD | Owner's Manual - Page 71
properly. If you think that condensation is a problem, turn off the CD player for an hour or so to allow the CD player to dry out and wipe any damp discs with a soft cloth to remove the moisture. • Road shocks may interrupt CD playback. • SACD (Super Audio CD) refers to the ability to play back only - Pioneer P90HDD | Owner's Manual - Page 72
Additional Information MP3 files • MP3 is short for MPEG Audio Layer 3 and refers to an audio compression technology standard. • This product allows playback of MP3 files on CD-ROM, CD-R and CD-RW discs. Disc recordings compatible with ISO9660 level 1 and level 2 can be played back. Correspondence - Pioneer P90HDD | Owner's Manual - Page 73
ENGLISH ESPAÑOL DEUTSCH "Memory Stick" player and care • Use only "Memory Stick" ("MagicGate Memory Stick . • Keep the "Memory Stick" away from the source of magnetic interference, such as TVs or audio speakers. • Keep the "Memory Stick" in its case. • Paste each "Memory Stick" label to - Pioneer P90HDD | Owner's Manual - Page 74
the problem is and the suggested method of correcting the problem. After checking, try again. Display ERROR CHECK MIC ERROR CHECK SPEAKER ERROR speakers are connected correctly. Correct the input level setting of the power amp connected to the speakers. Set the microphone correctly. Stop your car - Pioneer P90HDD | Owner's Manual - Page 75
disc. Scratched disc. Unrecorded disc. Electrical or mechanical problem. ERROR- 23 Can't play HEAT The CD format cannot be played back. MP3 file cannot be played back. CD player overheated. No audio Nothing has been recorded or the CD format cannot be played back. Remedy Replace disc. Clean - Pioneer P90HDD | Owner's Manual - Page 76
B0 Electrical or mechanical probSERVER ERROR- 30, A0, lem. A1, B0 Turn the car iginition ON and OFF, or switch to a different source, then switch back to time or number of plays). Switch to other music data. No audio No recording on music server. Record tracks on music server. No PlayList - Pioneer P90HDD | Owner's Manual - Page 77
to record more playlist files than the music server can manage. The CD skips. Somehow track information was not read in correctly. Somehow track information (a regular CD). Replace a music CD. Clean disc. Erase unwanted tracks. Insert disc. Turn the car ignition OFF and then ON, or press RESET button - Pioneer P90HDD | Owner's Manual - Page 78
) consists of information other than the audio signal-such as the number of recorded tracks, playing time and title-on CD and MD discs, etc. • The A1, lem. B0 Turn the car ignition ON and OFF, or switch to a different source, then switch back to the "Memory Stick" player. ERROR- 55 STICK WRITE - Pioneer P90HDD | Owner's Manual - Page 79
ENGLISH ESPAÑOL Display MS Locked Protected No audio No Stick Stick full STICK READ ERROR WARNING- wrong with the "Memory Stick". There is no playback permission for music data procured by electronic distribution, such as over the Internet. Remedy Cancel the erasure prevention switch. Insert a " - Pioneer P90HDD | Owner's Manual - Page 80
audio compression technology for high-quality and high compression. It is possible to compress music data to about 1/10th the level of a CD back. ISO9660 format This is the international standard for the format logic of CD-ROM folders and files. For the ISO9660 format, there are regulations for the - Pioneer P90HDD | Owner's Manual - Page 81
can be used to record image and audio data, etc. with "Memory Stick" later. When recording data on a CD-ROM, CD-R or CD-RW, etc., all data from beginning computer and consumer electronics industries have created a development of legitimate music distribution services. The "MagicGate" copyright - Pioneer P90HDD | Owner's Manual - Page 82
dB - +6 dB (1 dB) Phase Normal/Reverse CD player System Compact disc audio system Usable discs Compact disc Signal format Sampling frequency: kHz) (IHF-A network) Dynamic range 92 dB (1 kHz) MP3 decoding MPEG 1 Audio Layer 3 Number of channels 2 (stereo) HDD HDD quantity 10 GB Codec ATRAC3 - Pioneer P90HDD | Owner's Manual - Page 83
ENGLISH ESPAÑOL DEUTSCH FM tuner Frequency range 87.9 - 107.9 MHz Usable sensitivity 9 dBf (0.8 µV/75 Ω, mono, S/N: 30 dB) 50 dB quieting sensitivity ...... 15 dBf (1.5 µV/75 Ω, mono) Signal-to-noise ratio 70 dB (IHF-A network) Distortion 0.3% (at 65 dBf, 1 kHz, stereo) Frequency response 30 - Pioneer P90HDD | Owner's Manual - Page 84
Quelques mots sur ce mode d'emploi 7 Précaution 7 Service après-vente des produits PIONEER ........ 8 À propos de la marque XM READY 8 en mémoire 18 Accord sur les seules stations puissantes ........ 18 Lecteur de CD intégr 19 Affichages et témoins 19 Opérations de base 19 Affichage et - Pioneer P90HDD | Owner's Manual - Page 85
par son titre sur la liste des disques 46 Pause de la lecture d'un CD 46 Frappe du titre d'un disque 46 Utilisation de la compression et de l'accentuation de support d'annonce 52 Choix d'un service sur la liste prédéfinie des services 52 Choix d'un service sur la liste des services disponibles - Pioneer P90HDD | Owner's Manual - Page 86
du niveau des sources 61 Utilisation de l'égalisation automatique 61 Mise en service de l'atténuateur numérique .... 61 Création de la courbe Utilisation de la sourdine audio/atténuation téléphonique 69 Informations complémentaires ...... 70 Soins à apporter au lecteur de CD 70 Les fichiers MP3 - Pioneer P90HDD | Owner's Manual - Page 87
lection d'un équipement audio de qualité comme l'unité que vous venez d'acheter n'est que le début de votre plaisir musical. Maintenant, il est temps de penser à la manière de profiter au maximum des plaisirs que vous offre votre équipement. Ce fabricant et le Groupe "Consumer Electronics Group" de - Pioneer P90HDD | Owner's Manual - Page 88
pour atténuer rapidement le niveau sonore (environ 90%). Appuyez une nouvelle fois sur cette touche pour rétablir le niveau initial. Touche SOURCE Touches 2/3 Touche AUDIO VOLUME Pour augmenter ou diminuer le niveau sonore. 5 - Pioneer P90HDD | Owner's Manual - Page 89
Avant d'utiliser cet appareil ENGLISH FRANÇAIS DEUTSCH Caractéristiques Serveur musical Vous pouvez enregistrer la musique du lecteur de CD intégré ou d'autres appareils audio et la reproduire sur le serveur musical. Vous pouvez également organiser et modifier vos plages musicales favorites, etc - Pioneer P90HDD | Owner's Manual - Page 90
Avant d'utiliser cet appareil Quelques mots sur cet appareil Les fréquences d'accord de cet appareil sont attribuées pour une utilisation en Amérique du Nord. Il s'ensuit que l'utilisation de l'appareil dans d'autres régions peut donner lieu à des anomalies de réception. Appareils avec fonctions de - Pioneer P90HDD | Owner's Manual - Page 91
avoir, au préalable, contacté nos bureaux. U.S.A. Pioneer Electronics (USA) Inc. CUSTOMER SUPPORT DIVISION P.O. Box 1760 Long Beach, CA 90801-1760 800 Veuillez vous renseigner auprès de votre revendeur ou du centre de service autorisé Pioneer le plus proche en ce qui concerne le tuner XM pouvant - Pioneer P90HDD | Owner's Manual - Page 92
ées sur l'écran s'inversent, et continuent de s'inverser toutes les 10 secondes. Si vous appuyez sur la touche 5 alors que l'appareil n'est pas en service et que le contacteur d'allumage est sur la position ACC ou ON, a pour effet d'annuler le mode inverse. Appuyez une nouvelle fois sur la touche - Pioneer P90HDD | Owner's Manual - Page 93
ENGLISH FRANÇAIS Présentation et soin du boîtier de télécommande Installation de la pile au lithium • Retirez le couvercle au dois du boîtier de télécommande de volant et mettez en place la pile en respectant les polarités (+) et (-) indiquées. Remplacement de la pile au lithium • Retirez la pile - Pioneer P90HDD | Owner's Manual - Page 94
boîtier de télécom- mande tandis que vous tournez le volant car cela peut entraîner un accident. • Si vous devez absolument de CD intégré". Utilisation de la touche AUDIO • Appuyez sur la touche AUDIO pour choisir le mode de fonctionnement. Appuyez de manière répétée sur la touche AUDIO pour passer - Pioneer P90HDD | Owner's Manual - Page 95
de la date La date réglée de la manière ci-dessous n'apparaît que si les sources et la démonstration sont hors service. 1. Appuyez sur la touche NEXT pour afficher "CLK". Appuyez sur la touche NEXT jusqu'à ce que "CLK" apparaisse sur l'écran. 2. Appuyez sur la touche CLK - Pioneer P90HDD | Owner's Manual - Page 96
AVERTISSEMENT: • N'utilisez pas le lecteur de CD, face avant ouverte. En cas d'accident retirez jamais la face avant pendant que le voyant d'accès est allumé, car vous pourriez détruire les données. (Reportezvous à la page 39.) pouvez mettre hors service ce signal sonore d'avertissement. (Reportez-vous à la - Pioneer P90HDD | Owner's Manual - Page 97
la source que vous désirez écouter. Pour mettre en service le lecteur de CD intégré, introduisez un CD dans l'appareil. (Reportez-vous à la page 19.) le niveau sonore. Remarque: • "Appareil extérieur" désigne un appareil Pioneer (qui pourra être disponible dans le futur) qui n'est pas à proprement - Pioneer P90HDD | Owner's Manual - Page 98
touche NEXT pour afficher la fonction désirée (par exemple, le lecteur de CD intégré). Appuyez de manière répétée sur la touche NEXT pour passer d' trouve en mode de lecture au hasard, vous pouvez également mettre en service, ou hors service, la lecture au hasard au moyen des touches 5 et ∞. • Si - Pioneer P90HDD | Owner's Manual - Page 99
DEUTSCH Exemple d'écran (par exemple, le lecteur de CD intégré) Témoins d'utilisation des touches Cet appareil ou tout autre menu, et vous pouvez immédiatement connaître la touche qui met en service ou hors service une source, rappelle une sélection à répéter, ou exécute une autre opération. - Pioneer P90HDD | Owner's Manual - Page 100
ASyTnittoleni(sEenugrlish) Affichages et témoins FORM 1 (Ecran type 1) q we r FORM 2 (Ecran type 2) q e t wt r qGamme d'onde wTémoin LOC eNuméro de présélection rFréquence tTémoin de réception stéréophonique Opérations de base 1. Appuyez sur la touche SOURCE pour choisir le syntoniseur. - Pioneer P90HDD | Owner's Manual - Page 101
des stations les plus puissantes. 1. Appuyez sur la touche FUNC pour choisir la fonction BSM. 2. Appuyez sur la touche BSM pour mettre en service la fonction BSM. L'indication "Searching" s'éclaire. Les fréquences des six émetteurs les plus puissants sont mises en mémoire, par ordre décroissant - Pioneer P90HDD | Owner's Manual - Page 102
OPEN pour ouvrir la face avant. 2. Introduisez un CD dans la fente pour CD. Fente pour CD Touche CD EJECT 3. Refermez la face avant. 19 4. Appuyez que la face gravée soit bien tournée vers le bas. Appuyez sur CD EJECT pour éjecter le disque et avant de tenter une nouvelle introduction du disque - Pioneer P90HDD | Owner's Manual - Page 103
la lecture d'un disque CD TEXT, vous pouvez afficher diverses informations telles que le nom de l'interprète ou le titre de la plage musicale. Si le texte comporte plus de 32 caractères, vous pouvez le faire défiler. 1. Appuyez sur la touche TITLE pour mettre en service l'affichage des informations - Pioneer P90HDD | Owner's Manual - Page 104
les 10 premières secondes de chaque plage musicale gravée sur le CD. 1. Appuyez sur la touche FUNC puis sur la touche SCAN pour choisir le mode d'examen du disque. 2. Appuyez sur la touche SCAN pour mettre en service l'examen du disque. L'indication s'éclaire. Les 10 premières secondes de chaque - Pioneer P90HDD | Owner's Manual - Page 105
CD La pause est un arrêt momentané de la lecture du CD. 1. Appuyez sur la touche FUNC puis sur la touche PAUSE pour choisir la pause. 2. Appuyez sur la touche PAUSE pour mettre en service . Frappe du titre d'un disque La mémoire du lecteur de CD intégré peut contenir 48 titres de disque de 10 caractè - Pioneer P90HDD | Owner's Manual - Page 106
-vous que la face gravée soit bien tournée vers le bas. Appuyez sur CD EJECT pour éjecter le disque et avant de tenter une nouvelle introduction du disque, assurez-vous qu'il n'est pas endommagé. • Si le lecteur de CD intégré présente une anomalie, un message d'erreur (par exemple "ERROR- - Pioneer P90HDD | Owner's Manual - Page 107
faire défiler. 1. Appuyez sur la touche TITLE pour mettre en service l'affichage des informations. 2. Appuyez sur la touche correspondant à l'information au mode d'entrée de titre du disque (TTLin) pendant la lecture d'un CD-ROM, l'indication "No title input" apparaît sur l'écran et vous ne pouvez - Pioneer P90HDD | Owner's Manual - Page 108
la touche FUNC puis sur la touche SCAN pour choisir le mode d'examen du contenu des dossiers. 3. Appuyez sur la touche SCAN pour mettre en service l'examen du contenu du dossiers. L'indication s'éclaire. Les 10 premières secondes de chaque plage musicale du dossier concerné (ou de la première plage - Pioneer P90HDD | Owner's Manual - Page 109
musicale sur la liste des plages musicales (ou des dossiers) d'un CD-ROM que peut afficher l'appareil. 1. Appuyez sur la touche FUNC puis PAUSE pour choisir la pause. 2. Appuyez sur la touche PAUSE pour mettre en service la pause. L'indication s'éclaire. La lecture du disque marque une pause. • - Pioneer P90HDD | Owner's Manual - Page 110
à partir d'un autre appareil. * Vous débranchez la source d'enregistrement (par exemple pendant un enregistrement sur un lecteur de CD à chargeur.) • L'enregistrement se met hors service dans les cas suivants: * Vous mettez le contact sur la voiture. * Vous appuyez sur la touche REC. * Vous - Pioneer P90HDD | Owner's Manual - Page 111
OPEN pour ouvrir la face avant. 2. Insérez un CD dans la fente pour CD. Fente pour CD Touche CD EJECT 3. Refermez la face avant. 4. Maintenez la pression en train d'écouter. 7. Appuyez sur la touche BAND pour mettre hors service le mode de réglage du mode d'enregistrement. 8. Utilisez les touches - Pioneer P90HDD | Owner's Manual - Page 112
ès l'autre sur l'écran et l'appareil passe en état d'attente d'enregistrement. 5. Appuyez sur la touche BAND pour mettre hors service l'état d'attente d'enregistrement. Remarque: • Si le son du CD de la source tombe en-dessous d'un certain niveau, un numéro de plage est ajouté automatiquement. Vous - Pioneer P90HDD | Owner's Manual - Page 113
alterner entre les modes d'enregistrement suivants: Enregistrement du lecteur de CD intégré Disc (enregistrement de disque) = (Continue (enregistrement enregistrement. (Reportez-vous à la page 37.) Enregistrement de plusieurs CD All (enregistrement de toutes les plages musicales) = Track ( - Pioneer P90HDD | Owner's Manual - Page 114
pression d'un doigt sur la touche 2, ou sur la touche 3. Remarque: • S'il n'y a pas de musique enregistrée dans le serveur musical, l'indication "No audio" apparaît sur l'écran. • Si le serveur musical présente une anomalie, un message d'erreur tel que "ERROR-30" peut s'afficher. Reportez-vous à la - Pioneer P90HDD | Owner's Manual - Page 115
Fichiers de liste de lecture Les fichiers de liste de lecture sont des listes d'informations sur les groupes de plages musicales qui renferment des détails comme la date d'enregistrement, si l'enregistrement est numérique ou analogique, et la localisation. Pour chaque plage musicale, la liste de - Pioneer P90HDD | Owner's Manual - Page 116
titre s'il n'y a pas d'informations sur le CD dans la base de données.) 1. Appuyez sur la touche TITLE pour mettre en service l'affichage des informations. 2. Appuyez sur la le site www.gracenote.com. Remarque: • Pioneer ne peut être tenu responsable pour les don- nées fournies par Gracenote et le - Pioneer P90HDD | Owner's Manual - Page 117
Appuyez sur la touche FUNC puis sur la touche SCAN pour choisir le mode d'examen du fichier. 3. Appuyez sur la touche SCAN pour mettre en service l'examen du fichier. L'indication s'éclaire. Les 10 premières secondes de chaque plage musicale du fichier de liste de lecture actuel (ou de la premi - Pioneer P90HDD | Owner's Manual - Page 118
écouter se présente, appuyez sur la touche SCAN pour mettre hors service l'examen du contenu. L'indication s'éteint. La lecture de la plage musicale S'il n'y a rien d'enregistré dans le serveur musical, l'indication "No audio" apparaît sur l'écran. Pause de la lecture du serveur musical La pause - Pioneer P90HDD | Owner's Manual - Page 119
ENGLISH FRANÇAIS DEUTSCH 2. Appuyez sur la touche PAUSE pour mettre en service la pause. L'indication s'éclaire. La lecture du disque marque une pause. • Appuyez une nouvelle fois sur la touche PAUSE pour abandonner la pause. • Lorsque vous - Pioneer P90HDD | Owner's Manual - Page 120
) = Custom (personnalisé) Remarque: • Si vous passez au mode de liste de lecture alors que rien n'a été enregistré, l'indication "No PlayList" ou "No audio" s'affiche. Suppression des plages musicales et des informations de plage musicale En mode de liste de lecture, vous pouvez effacer les plages - Pioneer P90HDD | Owner's Manual - Page 121
ENGLISH FRANÇAIS DEUTSCH Effacement d'un fichier de liste de lecture du mode de liste de lecture Précaution: • Quand un fichier de liste de lecture est effacé, vous ne pouvez plus le récupérer. Vérifiez toujours l'écran de confirmation avant d'effacer un fichier. 1. Utilisez les touches 5 et ∞ - Pioneer P90HDD | Owner's Manual - Page 122
retirez jamais le "Memory Stick" quand le voyant d'accès est allumé, car vous pourriez détruire les données. • Refermez bien la face avant apr avoir retiré le "Memory Stick". AVERTISSEMENT: • N'utilisez pas le lecteur de CD, face avant ouverte. En cas d'accident, la face avant ouverte peut blesser - Pioneer P90HDD | Owner's Manual - Page 123
un nombre limité de lecture, le nombre de lecture est diminué d'une unité. Ce problème peut être évité en mettant au préalable hors service l'interruption (OFF). Affichage et défilement du titre Vous pouvez changer l'affichage du texte, par exemple avec le nom de l'artiste et le titre de la - Pioneer P90HDD | Owner's Manual - Page 124
Appuyez sur la touche FUNC puis sur la touche SCAN pour choisir le mode d'examen. 2. Appuyez sur la touche SCAN pour mettre en service l'examen. L'indication s'éclaire. Les 10 premières secondes de chaque plage musicale sont jouées. • Lorsque vous abandonnez l'examen pen- dant l'examen, l'indication - Pioneer P90HDD | Owner's Manual - Page 125
sur la touche 5 pour choisir "NO". Remarque: • Si vous effacez toutes les plages musicales, le menu des fonctions se met hors service et l'indication "No audio" s'affiche. • Vous ne pouvez pas régler le volume pendant que "YES" est choisi ni pendant l'effacement. Effacement de toutes les plages - Pioneer P90HDD | Owner's Manual - Page 126
à chargeur présente une anomalie, un message d'erreur tel que "ERROR-12" peut s'afficher. Reportez-vous au mode d'emploi du lecteur de CD à chargeur. • L'indication "No disc" apparaît sur l'écran si le chargeur du lecteur ne contient aucun disque. Sélection directe d'un disque Vous pouvez utiliser - Pioneer P90HDD | Owner's Manual - Page 127
grâce à un lecteur de CD compatible CD TEXT, vous pouvez afficher diverses informations telles que le nom de l'interprète ou le titre de la plage musicale. Si le texte comporte plus de 32 caractères, vous pouvez le faire défiler. 1. Appuyez sur la touche TITLE pour mettre en service l'affichage des - Pioneer P90HDD | Owner's Manual - Page 128
de lecture au hasard. 3. Appuyez sur la touche RDM pour mettre en service la lecture au hasard. L'indication s'éclaire. Les plages musicales sont lues au sont lues. Si vous avez choisi la répétition des disques d'un lecteur de CD à chargeur, les 10 premières secondes de la première plage musicale - Pioneer P90HDD | Owner's Manual - Page 129
La pause est un arrêt momentané de la lecture du CD. 1. Appuyez sur la touche FUNC puis sur la touche PAUSE pour choisir la pause. 2. Appuyez sur la touche PAUSE pour mettre en service la pause. L'indication s'éclaire. La lecture du disque marque une pause. • Appuyez une nouvelle fois sur la touche - Pioneer P90HDD | Owner's Manual - Page 130
la liste de vos plages musicales favorites parmi toutes celles que contiennent les disques du lecteur de CD à chargeur. Lorsque la liste est terminée, il vous suffit de mettre en service la fonction ITS pour n'écouter que les plages appartenant à cette liste. Création d'une liste par programmation - Pioneer P90HDD | Owner's Manual - Page 131
rence à une plage musicale de la liste que contient la mémoire ITS, il faut que la fonction ITS soit en service. 1. Mettez en service la fonction ITS pendant la lecture du CD dont la référence à une plage musicale doit être effacée de la mémoire ITS. Reportez-vous ci-dessus au paragraphe "Lecture - Pioneer P90HDD | Owner's Manual - Page 132
des services disponibles, recherche des PTY disponibles, mise en mémoire et rappel d'une étiquette dynamique. • DAB (Digital Audio Broadcasting routières ou bulletin d'informations sur les transports * Si le service du support d'annonce est reçu, les lettres entre parenthèses s'éclairent. - Pioneer P90HDD | Owner's Manual - Page 133
1. Appuyez sur la touche NEXT pour afficher "1" - "6". Appuyez sur la touche NEXT jusqu'à ce que "1" - "6" apparaisse sur l'écran. 2. Lorsque se présente un service que vous désirez mettre en mémoire, maintenez la pression d'un doigt sur une des touches 1 à 6 jusqu'à ce que le numéro de présélection - Pioneer P90HDD | Owner's Manual - Page 134
de l'interruption de support d'annonce". w chLIST (Liste prédéfinie des services) Pour de plus amples détails concernant l'usage de la liste prédéfinie des services, reportez-vous à la page 52, "Choix d'un service sur la liste prédéfinie des services". e S.LIST (Liste des services disponibles) Pour - Pioneer P90HDD | Owner's Manual - Page 135
d'annonce 1. Appuyez sur la touche FUNC puis sur la touche AS pour choisir le support d'annonce. 2. Appuyez sur la touche correspondant au support d'annonce que vous désirez mettre en service. Touche NEWS WTHR ANNC Annonce Bulletin d'informations Bulletin météo pour la région Annonce Remarque - Pioneer P90HDD | Owner's Manual - Page 136
Syntoniseur de télévision Les explications qui suivent permettent d'utiliser cet appareil pour commander un syntoniseur de télévision, vendu séparément. Pour de plus amples détails concernant le syntoniseur de télévision, reportez-vous au mode d'emploi du syntoniseur de télévision. • Cet appareil - Pioneer P90HDD | Owner's Manual - Page 137
ITALIANO NEDERLANDS qw q BSSM (Mémoire séquentielle des meilleures stations) Appuyez de manière répétée sur la touche BSSM pour mettre en service, ou hors service, la mémoire séquentielle des meilleures stations. Lorsque l'opération est terminée, la liste des canaux préréglés apparaît sur l'écran - Pioneer P90HDD | Owner's Manual - Page 138
de traitement (BBE) (SFC) • Utilisation de la commande automatique du niveau sonore (ASL) • Réglage du niveau des sources (SLA) • Mise en service de l'atténuateur numérique (D.ATT) Rappel des courbes d'égalisation L'égaliseur graphique vous donne la possibilité de corriger les caractéristiques - Pioneer P90HDD | Owner's Manual - Page 139
affichée que si la sortie vers le haut-parleur d'extrêmes graves est en service pour le mode de sortie vers haut-parleur d'extrêmes graves (SW1). • L'indication optimale quel que soit le siège occupé. 1. Appuyez sur la touche AUDIO pour choisir le mode permettant de régler l'équilibre avant-arrière ou - Pioneer P90HDD | Owner's Manual - Page 140
service du réducteur d'octave Vous pouvez mettre en service le réducteur d'octave. "OCTAVER2" a un effet plus prononcé que "OCTAVER1". 1. Appuyez sur la touche AUDIO tre créée pour chaque source. (Le lecteur de CD intégré (MP3) et le lecteur de CD à chargeur sont automatiquement placés dans les mêmes - Pioneer P90HDD | Owner's Manual - Page 141
du bruit. La sensibilité du circuit ASL (intensité du signal sonore par rapport au niveau du bruit) peut prendre cinq valeurs. 1. Appuyez sur la touche AUDIO puis sur la touche ASL pour choisir le mode permettant le réglage automatique du niveau sonore. 2. Appuyez sur la touche ASL pour préciser la - Pioneer P90HDD | Owner's Manual - Page 142
-parleur d'extrêmes graves est connecté à cet appareil, mettez en service la sortie vers le haut-parleur d'extrêmes graves. La phase de la sortie pour le haut-parleur d'extrêmes graves peut être normale ou inverse. 1. Appuyez sur la touche AUDIO puis sur la touche NEXT et enfin sur la touche - Pioneer P90HDD | Owner's Manual - Page 143
extrêmes graves est en service, vous pouvez en régler la fréquence de coupure et l'amplitude. 1. Appuyez sur la touche AUDIO puis sur la touche NEXT pas lorsque la sortie pour le haut-parleur d'extrêmes graves n'est pas en service et que le mode de sortie pour le haut-parleur d'extrêmes graves (SW1) - Pioneer P90HDD | Owner's Manual - Page 144
concernée par le réglage (par exemple, le lecteur de CD intégré). 2. Appuyez sur la touche AUDIO puis appuyez deux fois sur la touche NEXT. 3. Appuyez automatique".) Vous pouvez mettre en service, ou hors service, l'égalisation automatique. 1. Appuyez sur la touche AUDIO puis appuyez deux fois sur la - Pioneer P90HDD | Owner's Manual - Page 145
A Title (English) ENGLISH FRANÇAIS DEUTSCH PRÉCAUTION: • Procéder à l'égalisation automatique dans les conditions suivantes peut endommager les haut-parleurs. Vérifiez soigneusement les conditions d'installation avant d'effectuer l'égalisation automatique. - Les haut-parleurs ne sont pas - Pioneer P90HDD | Owner's Manual - Page 146
galisation automatique correcte. • Si l'appareil est hors service, appuyez sur la touche SOURCE pour le mettre en service. 4. Précisez la position du siège sûr. Ne conservez pas le microphone dans la lumière directe du soleil car cela peut le déformer, le décolorer ou interdire ultérieurement son bon - Pioneer P90HDD | Owner's Manual - Page 147
indications affichées sur l'écran s'inversent, et continuent de s'inverser toutes les 10 secondes. Vous pouvez mettre en service, ou hors service, le mode inverse. 1. La source étant hors service, maintenez la pression d'un doigt sur la touche 1 pour choisir le mode inverse. 2. Appuyez sur la touche - Pioneer P90HDD | Owner's Manual - Page 148
appel est fait ou reçu avec le téléphone portable connecté à cet appareil, vous pouvez choisir la sourdine audio ou l'atténuation téléphonique pour la sortie audio. 1. La source étant hors service, maintenez la pression d'un doigt sur la touche 1. 2. Appuyez sur la touche MUTE.S pour choisir le mode - Pioneer P90HDD | Owner's Manual - Page 149
vous rappelle de déposer la face avant. (Reportez-vous à la page 13.) Vous avez la possibilité de mettre en service, ou hors service, le signal d'avertissement. 1. La source étant hors service, maintenez la pression d'un doigt sur la touche 1. 2. Appuyez sur la touche NEXT puis sur la touche DT-WRN - Pioneer P90HDD | Owner's Manual - Page 150
l'afficheur ne soit trop lumineux la nuit, son éclairage est automatiquement atténué dès que les feux de route sont en service. Vous pouvez mettre en service, ou hors service, l'atténuateur de luminosité. 1. Appuyez sur la touche NEXT pour afficher "C.MENU". Appuyez sur la touche NEXT jusqu'à ce que - Pioneer P90HDD | Owner's Manual - Page 151
une des touches BGP1 à BGP6 (ou BGP7 à BGP12) pour choisir le fond pour image fixe. Abandon de la page de divertissement Vous pouvez mettre hors service la page de divertissement (page écran évoquant le cinéma, page d'analyse du spectre audible, etc.). • Appuyez sur la touche ENT puis sur la touche - Pioneer P90HDD | Owner's Manual - Page 152
Grâce à un interconnecteur IP-BUS-RCA tel que le modèle CD-RB20 ou le modèle CDRB10 (vendus séparément), vous pouvez la possibilité de changer le style des caractères. Utilisation de la sourdine audio/atténuation téléphonique L'appareil devient automatiquement silencieux quand vous appelez à l'aide - Pioneer P90HDD | Owner's Manual - Page 153
service pendant une heure environ, le temps nécessaire à son séchage, et essuyez le disque avec un chiffon doux pour supprimer l'humidité qui le recouvre. • Les cahots de la route peuvent interrompre la lecture des disques. • SACD (Super Audio CD) représente la capacité de ne lire que la couche CD - Pioneer P90HDD | Owner's Manual - Page 154
Audio Layer 3" et il représente une norme de technologie de compression audio. • Cet appareil permet la lecture des fichiers MP3 sur des CD-ROM, CD-R et CD-RW le cas indiqué, 01S est un sous-dossier du dossier 01.) Premier Deuxième Troisième niveau niveau niveau Remarque: • Le temps de lecture écoulé - Pioneer P90HDD | Owner's Manual - Page 155
l'électricité statique ou à du bruit électrique, car cela pourrait endommager les données. • Les " rence magnétique, par exemple un téléviseur ou des enceintes audio. • Rangez les "Memory Stick" dans leur étui. • • Si la surface du "Memory Stick" est sale, essuyez-la avec un chiffon doux et propre. - Pioneer P90HDD | Owner's Manual - Page 156
ration. Messages Causes possibles Actions correctives ERROR CHECK MIC Le microphone n'est pas branché. Branchez soigneusement le microphone fourni. ERROR CHECK SPEAKER Le microphone ne peut pas Assurez-vous que les haut-parleurs capter le signal émis par les sont correctement raccordés. haut - Pioneer P90HDD | Owner's Manual - Page 157
service d'entretien agréé par Pioneer. Messages ERROR- 00, 44 ERROR- 11, 12, 17, 30 ERROR- 11, 12, 17, 30 ERROR- 12, 17 ERROR- 10, 11, 12, 17, 30, A0, B0 ERROR- 23 Can't play HEAT No audio Causes possibles Toutes les plages musicales sont ignorées. Disque sale lecteur de CD en service. Utilisez un - Pioneer P90HDD | Owner's Manual - Page 158
B0 SERVER ERROR- 30, A0, A1, B0 Can't play Expired No audio No PlayList SERVER READ ERROR SERVER WRITE ERROR TEMP Causes possibles Actions correctives ou commutez sur une autre source, puis remettez le serveur musical en service. La lecture des données musi- Utilisez d'autres données musi- - Pioneer P90HDD | Owner's Manual - Page 159
du serveur musical pendant l'enregistrement ENGLISH FRANÇAIS DEUTSCH FRANÇAIS Messages ERROR- 56 ERROR- 59 ERROR- 5A ERROR- 5B ERROR- 5- Can't copy CD-ROM Defect M.Server full No disc NO SIGNAL PlayList full Retry SERVER READ ERR SERVER WRITE ERR TEMP Causes possibles Actions correctives - Pioneer P90HDD | Owner's Manual - Page 160
informations autres que les signaux audio-par exemple le nombre de plages musicales enregistrées, la durée de lecture et le titre-d'un CD ou d'un MD, etc autre source, puis remettez le lecteur de "Memory Stick" en service. ERROR- 55 STICK WRITE ERROR Certaines informations de Recommencez l'opé - Pioneer P90HDD | Owner's Manual - Page 161
FRANÇAIS Messages MS Locked Protected No audio No Stick Stick full STICK READ ERROR WARNING musicales fournies par distribution électronique, par exemple sur Internet. Actions correctives Mettez hors service le commutateur de prévention d'effacement. Insérez un "MG Memory Stick" renfermant - Pioneer P90HDD | Owner's Manual - Page 162
Transform Acoustic Coding 3". C'est une technologie de compression audio permettant une haute compression de haute qualité. Elle permet de compresser les données musicales à environ 1/10ème du niveau d'un CD, autorisant une miniaturisation des supports de stockage. Débit Le débit représente le - Pioneer P90HDD | Owner's Manual - Page 163
d'un support d'enregistrement des données d'image et des données audio, etc. sur les appareils compatibles avec les . Lors d'un enregistrement sur un CD-ROM, CD-R ou CD-RW, toutes les données, du musicales et de promouvoir le développement de services de distribution légitimes. La technologie de - Pioneer P90HDD | Owner's Manual - Page 164
Fréquence 50/63/80/100/125 Hz Pente 18 dB/octave Gain 24 dB - +6 dB (1 dB) Phase Normal ou inverse Lecteur de CD Système Système audio disque compact Disques utilisables Disques compacts Format du signal Fréquence d'échantillonnage: 44,1 kHz Nombre de bits de quantification: 16; linéaires - Pioneer P90HDD | Owner's Manual - Page 165
ENGLISH FRANÇAIS DEUTSCH Syntoniseur FM Gamme de fréquence 87,9 - 107,9 MHz Sensibilité utile 9 dBf (0,8 µV/75 Ω, mono, S/B: 30 dB) Seuil de sensibilité 50 dB ........ 15 dBf (1,5 µV/75 Ω, mono) Rapport signal/bruit 70 dB (Réseau IHF-A) Distorsion 0,3% (à 65 dBf, 1 kHz, stéréo) Réponse en fré - Pioneer P90HDD | Owner's Manual - Page 166
- Pioneer P90HDD | Owner's Manual - Page 167
- Pioneer P90HDD | Owner's Manual - Page 168
PTY. LTD. 178-184 Boundary Road, Braeside, Victoria 3195, Australia TEL: (03) 9586-6300 PIONEER ELECTRONICS OF CANADA, INC. 300 Allstate Parkway, Markham, Ontario L3R OP2, Canada TEL: (905) 479-4411 PIONEER ELECTRONICS DE MEXICO, S.A. de C.V. San Lorenzo 1009 3er. Piso Desp. 302 Col. Del Valle
-
 1
1 -
 2
2 -
 3
3 -
 4
4 -
 5
5 -
 6
6 -
 7
7 -
8
-
9
-
10
-
11
-
12
-
13
-
14
-
15
-
16
-
17
-
18
-
19
-
20
-
21
-
22
-
23
-
24
-
25
-
26
-
27
-
28
-
29
-
30
-
31
-
32
-
33
-
34
-
35
-
36
-
37
-
38
-
39
-
40
-
41
-
42
-
43
-
44
-
45
-
46
-
47
-
48
-
49
-
50
-
51
-
52
-
53
-
54
-
55
-
56
-
57
-
58
-
59
-
60
-
61
-
62
-
63
-
64
-
65
-
66
-
67
-
68
-
69
-
70
-
71
-
72
-
73
-
74
-
75
-
76
-
77
-
78
-
79
-
80
-
81
-
82
-
83
-
84
-
85
-
86
-
87
-
88
-
89
-
90
-
91
-
92
-
93
-
94
-
95
-
96
-
97
-
98
-
99
-
100
-
101
-
102
-
103
-
104
-
105
-
106
-
107
-
108
-
109
-
110
-
111
-
112
-
113
-
114
-
115
-
116
-
117
-
118
-
119
-
120
-
121
-
122
-
123
-
124
-
125
-
126
-
127
-
128
-
129
-
130
-
131
-
132
-
133
-
134
-
135
-
136
-
137
-
138
-
139
-
140
-
141
-
142
-
143
-
144
-
145
-
146
-
147
-
148
-
149
-
150
-
151
-
152
-
153
-
154
-
155
-
156
-
157
-
158
-
159
-
160
-
161
-
162
-
163
-
164
-
165
-
166
-
167
-
168
 |
 |

Operation Manual
DEH-P9100R
Manual de Operación
ENGLISH
FRANÇAIS
DEUTSCH
FRANÇAIS
ITALIANO
NEDERLANDS
High power HDD/CD player with “Memory Stick”
and FM/AM tuner
Lecteur de disque dur/CD, “Puissance élevée”, avec
“Memory Stick” et syntoniseur FM/AM
Operation Manual
DEH-P90HDD
Mode d’emploi