Pioneer P90HDD Owner's Manual - Page 29
Digital and analog recording, Bit rate, Recording range
 |
UPC - 012562575896
View all Pioneer P90HDD manuals
Add to My Manuals
Save this manual to your list of manuals |
Page 29 highlights
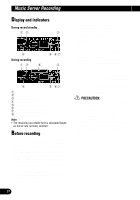
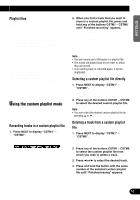
ENGLISH ESPAÑOL DEUTSCH Digital and analog recording This product is intended for digital recording from the built-in CD player to the music server. Recording from sources other than the built-in CD, such as multi-CD or AUX, will be recorded in analog. While digital recordings can be made with less loss of quality, we recommend recording from the built-in CD. • It is not possible to digitally copy music to the music server if it was digitally recorded from CDs (such as CD-R). This is set by SCMS, the Serial Copying Management System, which has been developed to prevent serial copies (copies of copies). (See page 80.) • Analog recordings are stopped automatically after two hours. To continue recording to the same playlist file, press REC and restart the recording. Bit rate The bit rate can be selected for each recording. This alters the sound quality and recording time. (See page 30.) Recording range The range of recording from the built-in CD or multi-CD player is selectable. (See page 30.) Recording from the built-in CD Recording from CD-ROM is not possible. Not all recordings may be made from CD-R, CD-RW and other formats for reasons of copyright protection. (SCMS) (See page 80.) 1. Press OPEN to open the front panel. 2. Insert a CD into the CD loading slot. CD loading slot 4. Press and hold REC until you have the record standby status. "Ready" and "M.Server pause" appear in sequence and the product goes into the record standby status. 5. Press FUNC to select the record mode setting mode. 6. Press R.MODE to select the recording range. Press R.MODE repeatedly to switch between the following ranges: Disc (disc recording) = Track (one-track recording) • Disc (disc recording) will record the disc you are listening to from the current track to the end of the disc. When disc recording has been interrupted, continued recording from the interrupted track is possible. (Refer to "Selecting the recording range" on page 30.) • With Track (one-track recording), you can only record the track you are currently listening to. 7. Press BAND to cancel the record mode setting mode. 8. Press 2 or 3 to select the desired track. 9. Press REC to start the recording. Recording starts automatically from the beginning of the track being listened to. • When the recording ends, "M.Server pause" is displayed and the product goes into the record standby status. 10.Press BAND to cancel the record standby status. Continued overleaf. FRANÇAIS ITALIANO NEDERLANDS CD EJECT button 3. Close the front panel. 28
-
 1
1 -
2
-
3
-
4
-
5
-
6
-
7
-
8
-
9
-
10
-
11
-
12
-
13
-
14
-
15
-
16
-
17
-
18
-
19
-
20
-
21
-
22
-
23
-
 24
24 -
 25
25 -
 26
26 -
 27
27 -
 28
28 -
 29
29 -
 30
30 -
 31
31 -
 32
32 -
 33
33 -
 34
34 -
35
-
36
-
37
-
38
-
39
-
40
-
41
-
42
-
43
-
44
-
45
-
46
-
47
-
48
-
49
-
50
-
51
-
52
-
53
-
54
-
55
-
56
-
57
-
58
-
59
-
60
-
61
-
62
-
63
-
64
-
65
-
66
-
67
-
68
-
69
-
70
-
71
-
72
-
73
-
74
-
75
-
76
-
77
-
78
-
79
-
80
-
81
-
82
-
83
-
84
-
85
-
86
-
87
-
88
-
89
-
90
-
91
-
92
-
93
-
94
-
95
-
96
-
97
-
98
-
99
-
100
-
101
-
102
-
103
-
104
-
105
-
106
-
107
-
108
-
109
-
110
-
111
-
112
-
113
-
114
-
115
-
116
-
117
-
118
-
119
-
120
-
121
-
122
-
123
-
124
-
125
-
126
-
127
-
128
-
129
-
130
-
131
-
132
-
133
-
134
-
135
-
136
-
137
-
138
-
139
-
140
-
141
-
142
-
143
-
144
-
145
-
146
-
147
-
148
-
149
-
150
-
151
-
152
-
153
-
154
-
155
-
156
-
157
-
158
-
159
-
160
-
161
-
162
-
163
-
164
-
165
-
166
-
167
-
168
 |
 |
