Pioneer VSX-35TX Owner's Manual - Page 34
Select EXIT Sp Set End on the front, panel with the, buttons and press, ENTER to go to the
 |
View all Pioneer VSX-35TX manuals
Add to My Manuals
Save this manual to your list of manuals |
Page 34 highlights
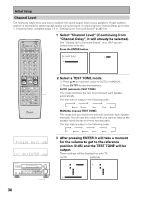
Initial Setup REMOTE SETUP INPUT ATT SYSTEM SETUP EFFECT/ CH SEL DIGITAL NR MENU + ENTER - MUTE FUNCTION SIGNAL SELECT MIDNIGHT LIGHT MULTI CH INPUT THX DSP /DTS ADVANCED STEREO/ DIRECT STANDARD AV PRE-PROGRAMMED AND LEARNING REMOTE CONTROL UNIT 5 Select EXIT ("Sp Set End" on the front panel) with the 5¥∞ buttons and press 5 ENTER to go to the "Channel Delay" setup. If you want to change a setting before proceeding simply use the arrow buttons to go back. Depending on your choices the sound will be routed differently, read below for detailed explanations. FRONT (default setting is LARGE) • Select SMALL to send bass frequencies to the subwoofer. • Select LARGE if your speakers will reproduce bass frequencies effectively or if you did not connect a subwoofer. (If you select SMALL for the front speakers the subwoofer will automatically be set to YES. Also, the center, surround and surround back speakers cannot be set to LARGE if the front speakers are set to SMALL. In this case, all bass frequencies are sent to the subwoofer.) CENTER (default setting is LARGE) • Select LARGE if your speaker will reproduce bass frequencies effectively. • Select SMALL to send bass frequencies to the other speakers or subwoofer. • If you did not connect a center speaker select NO. In this case, the center channel is output from the front speakers. • If the front speakers are set to SMALL, the CENTER speaker will automatically set to SMALL. SURROUND (default setting is LARGE) • Select LARGE if your speakers will reproduce bass frequencies effectively. • Select SMALL to send bass frequencies to the other speakers or subwoofer. • If you did not connect SURROUND speakers select NO. In this case, the sound of the surround channels is output from the front and center speakers. • If the FRONT speakers are set to SMALL, the SURROUND speakers will automatically be set to SMALL. SUBWOOFER (default setting is YES) • Selected YES you connected a subwoofer. • If you did not connect a subwoofer select NO. In this case, the bass frequencies are output from the front or surround speakers. • Choose the PLUS setting if you want stronger reproduction of deep bass sounds. • If you select PLUS the bass frequencies that would normally come out the front and center speakers are all routed to the subwoofer. SURROUND BACK (default setting is LARGE X2) NOTE: In order to use SURROUND BACK speakers you need to hook them up through an external amplifier (see p. 19 & 21 for more on this). • Select the number of SURROUND BACK speakers you have. You can choose one speaker, two or none. One speaker will be shown as just the size (for example, SMALL) in the display, while two speakers will be shown as "X2." • If the FRONT speakers or the SURROUND speakers are set to SMALL, the SURROUND BACK speakers will automatically be set to SMALL. • Select LARGE if your speakers will reproduce bass frequencies effectively. • Select SMALL to send bass frequencies to the other speakers or subwoofer. • If you did not connect surround back speakers select NO. In this case no sound will be output to the SURROUND BACK CHANNELS. • If you choose THX in step 2 then the SURROUND BACK speakers can only be set to SMALL (or NO). memo If you have a subwoofer and like lots of bass, it may seem logical to select LARGE for your FRONT speakers and leave the subwoofer selected. This may not, however, yield the best bass results. Depending on the size and shape of your room you may actually experience a decrease in the amount of bass due to what is called "low frequency cancellations." If you have a subwoofer, listen to the bass response with the FRONT speakers set to LARGE and SMALL alternatively and let your ears judge which sounds best. The safest option in this case is to route all the bass sounds to the subwoofer by selecting SMALL for the FRONT speakers. 34
-
 1
1 -
2
-
3
-
4
-
5
-
6
-
7
-
8
-
9
-
10
-
11
-
12
-
13
-
14
-
15
-
16
-
17
-
18
-
19
-
20
-
21
-
22
-
23
-
24
-
25
-
26
-
27
-
28
-
 29
29 -
 30
30 -
 31
31 -
 32
32 -
 33
33 -
 34
34 -
 35
35 -
 36
36 -
 37
37 -
 38
38 -
 39
39 -
40
-
41
-
42
-
43
-
44
-
45
-
46
-
47
-
48
-
49
-
50
-
51
-
52
-
53
-
54
-
55
-
56
-
57
-
58
-
59
-
60
-
61
-
62
-
63
-
64
-
65
-
66
-
67
-
68
-
69
-
70
-
71
-
72
-
73
-
74
-
75
-
76
-
77
-
78
-
79
-
80
-
81
-
82
-
83
-
84
-
85
-
86
-
87
-
88
-
89
-
90
-
91
-
92
-
93
-
94
-
95
-
96
 |
 |
