Ricoh 3300D User Guide - Page 54
Update, Add TCP/IP Port, Shared, Printer [UNC], Browse, Start, Control Panel, Set IP Address
 |
UPC - 026649062278
View all Ricoh 3300D manuals
Add to My Manuals
Save this manual to your list of manuals |
Page 54 highlights
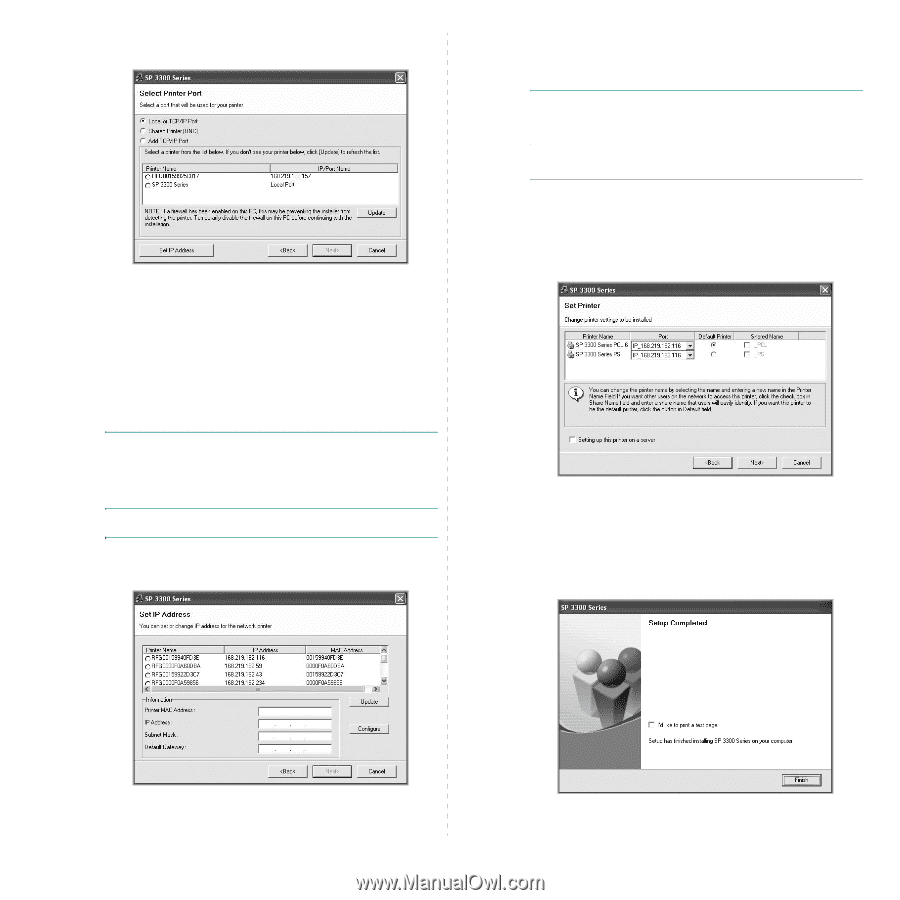
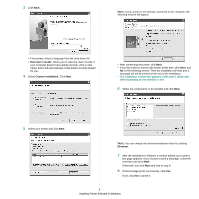
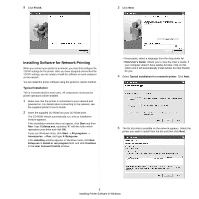
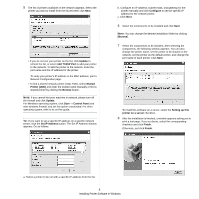
5 The list of printers available on the network appears. Select the printer you want to install from the list and then click Next. • If you do not see your printer on the list, click Update to refresh the list, or select Add TCP/IP Port to add your printer to the network. To add the printer to the network, enter the port name and the IP address for the printer. To verify your printer's IP address or the MAC address, print a Network Configuration page. • To find a shared network printer (UNC Path), select Shared Printer [UNC] and enter the shared name manually or find a shared printer by clicking the Browse button. NOTE: If you cannot find your machine in network, please turn off the firewall and click Update. For Windows operating system, click Start → Control Panel and start windows firewall, and set this option unactivated. For other operating system, refer to its on-line guide. TIP: If you want to set a specific IP address on a specific network printer, click the Set IP Address button. The Set IP Address window appears. Do as follows: b. Configure an IP address, subnet mask, and gateway for the printer manually and click Configure to set the specific IP address for the network printer. c. Click Next. 6 Select the components to be installed and click Next. NOTE: You can change the desired installation folder by clicking [Browse]. 7 Select the components to be installed. After selecting the components, the following window appears. You can also change the printer name, set the printer to be shared on the network, set the printer as the default printer, and change the port name of each printer. Click Next. To install this software on a server, select the Setting up this printer on a server checkbox. 8 After the installation is finished, a window appears asking you to print a test page. If you so desire, select the corresponding checkbox and click Finish. Otherwise, just click Finish. a. Select a printer to be set with a specific IP address from the list. 8 Installing Printer Software in Windows
-
 1
1 -
2
-
3
-
4
-
5
-
6
-
7
-
8
-
9
-
10
-
11
-
12
-
13
-
14
-
15
-
16
-
17
-
18
-
19
-
20
-
21
-
22
-
23
-
24
-
25
-
26
-
27
-
28
-
29
-
30
-
31
-
32
-
33
-
34
-
35
-
36
-
37
-
38
-
39
-
40
-
41
-
42
-
43
-
44
-
45
-
46
-
47
-
48
-
 49
49 -
 50
50 -
 51
51 -
 52
52 -
 53
53 -
 54
54 -
 55
55 -
 56
56 -
 57
57 -
 58
58 -
 59
59 -
60
-
61
-
62
-
63
-
64
-
65
-
66
-
67
-
68
-
69
-
70
-
71
-
72
-
73
-
74
-
75
-
76
-
77
-
78
-
79
-
80
-
81
-
82
-
83
-
84
-
85
-
86
-
87
-
88
-
89
-
90
-
91
-
92
-
93
-
94
-
95
-
96
-
97
-
98
-
99
-
100
-
101
 |
 |