Ricoh Epson Stylus Pro 7700 User Guide - Page 100
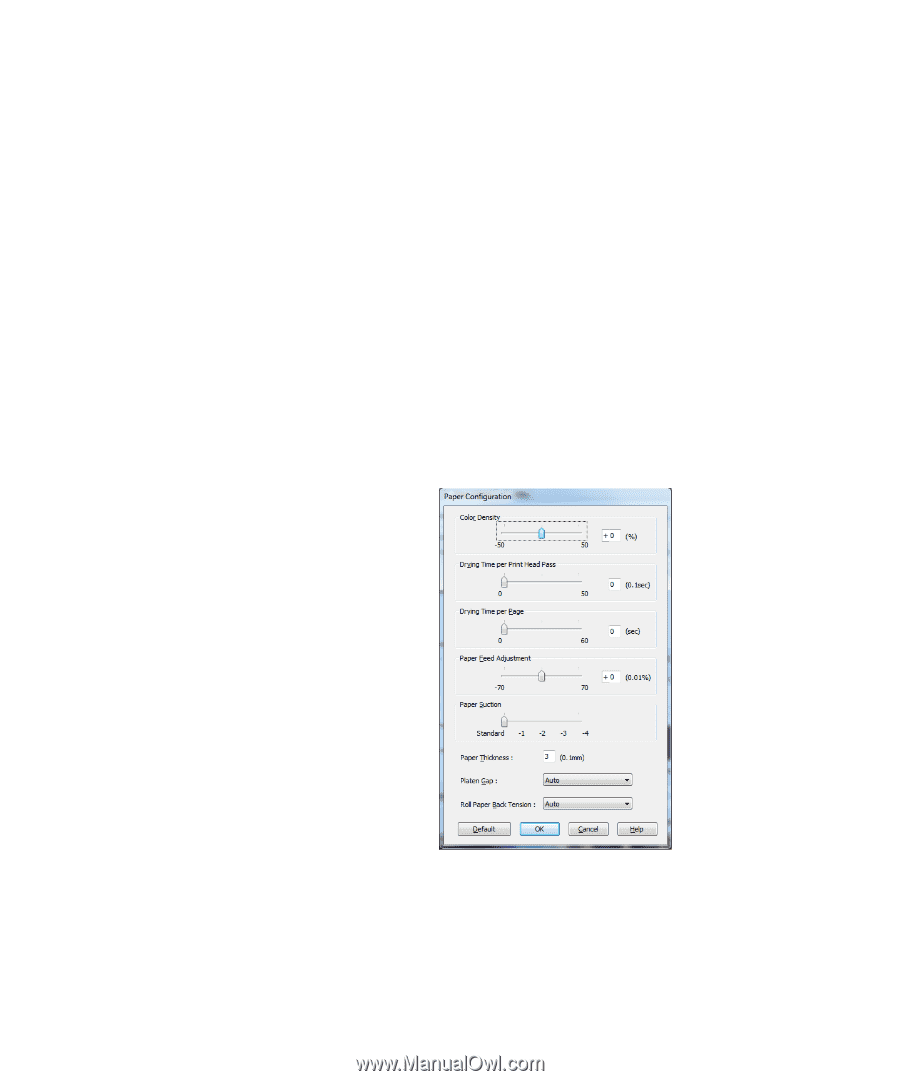
Choosing Paper Configuration Options, tab. You see this window
 |
View all Ricoh Epson Stylus Pro 7700 manuals
Add to My Manuals
Save this manual to your list of manuals |
Page 100 highlights
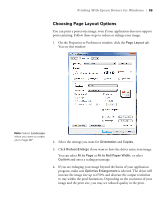
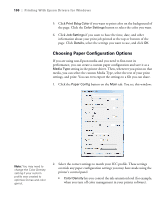
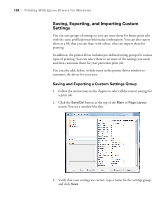
100 | Printing With Epson Drivers for Windows 5. Click Print Bckg Color if you want to print color on the background of the page. Click the Color Settings button to select the color you want. 6. Click Job Settings if you want to have the time, date, and other information about your print job printed at the top or bottom of the page. Click Details, select the settings you want to use, and click OK. Choosing Paper Configuration Options If you are using non-Epson media and you need to fine-tune its performance, you can create a custom paper configuration and save it as a Media Type setting in the printer driver. Then, whenever you print on that media, you can select the custom Media Type, select the rest of your print settings, and print. You can even export the settings to a file you can share. 1. Click the Paper Config button on the Main tab. You see this window: Note: You may need to change the Color Density setting if your custom profile was created to optimize D-max and color gamut. 2. Select the correct settings to match your ICC profile. These settings override any paper configuration settings you may have made using the printer's control panel. • Color Density lets you control the ink saturation level (for example, when you turn off color management in your printer software). 100
-
 1
1 -
2
-
3
-
4
-
5
-
6
-
7
-
8
-
9
-
10
-
11
-
12
-
13
-
14
-
15
-
16
-
17
-
18
-
19
-
20
-
21
-
22
-
23
-
24
-
25
-
26
-
27
-
28
-
29
-
30
-
31
-
32
-
33
-
34
-
35
-
36
-
37
-
38
-
39
-
40
-
41
-
42
-
43
-
44
-
45
-
46
-
47
-
48
-
49
-
50
-
51
-
52
-
53
-
54
-
55
-
56
-
57
-
58
-
59
-
60
-
61
-
62
-
63
-
64
-
65
-
66
-
67
-
68
-
69
-
70
-
71
-
72
-
73
-
74
-
75
-
76
-
77
-
78
-
79
-
80
-
81
-
82
-
83
-
84
-
85
-
86
-
87
-
88
-
89
-
90
-
91
-
92
-
93
-
94
-
 95
95 -
 96
96 -
 97
97 -
 98
98 -
 99
99 -
 100
100 -
 101
101 -
 102
102 -
 103
103 -
 104
104 -
 105
105 -
106
-
107
-
108
-
109
-
110
-
111
-
112
-
113
-
114
-
115
-
116
-
117
-
118
-
119
-
120
-
121
-
122
-
123
-
124
-
125
-
126
-
127
-
128
-
129
-
130
-
131
-
132
-
133
-
134
-
135
-
136
-
137
-
138
-
139
-
140
-
141
-
142
-
143
-
144
-
145
-
146
-
147
-
148
-
149
-
150
-
151
-
152
-
153
-
154
-
155
-
156
-
157
-
158
-
159
-
160
-
161
-
162
-
163
-
164
-
165
-
166
-
167
-
168
-
169
-
170
-
171
-
172
-
173
-
174
-
175
-
176
-
177
-
178
-
179
-
180
-
181
-
182
-
183
-
184
-
185
-
186
-
187
-
188
-
189
-
190
-
191
-
192
-
193
-
194
-
195
-
196
-
197
-
198
-
199
-
200
-
201
-
202
-
203
-
204
-
205
-
206
-
207
-
208
-
209
-
210
-
211
-
212
-
213
-
214
-
215
-
216
-
217
-
218
-
219
-
220
-
221
-
222
-
223
-
224
-
225
-
226
-
227
-
228
 |
 |