Ricoh Epson Stylus Pro 7700 User Guide - Page 131
not be accessible for certain media types., for fast, bidirectional printing. For higher quality
 |
View all Ricoh Epson Stylus Pro 7700 manuals
Add to My Manuals
Save this manual to your list of manuals |
Page 131 highlights
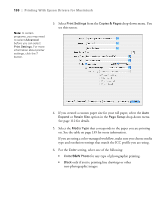
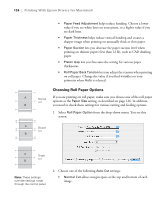
Printing With Epson Drivers for Macintosh | 131 Note: The Print Quality settings available depend on the Media Type you selected. Choose a lower print quality setting for faster printing or SuperFine - 1440 dpi for the best quality. 7. Set the Mode option as follows: • Click Automatic to have the printer driver analyze the contents of your image or file and make the appropriate printing adjustments. If a Quality/Speed slider appears, set it according to the priorities of your print job. You can choose one of the mode settings shown at the left in the drop-down menu: Charts and Graphs intensifies colors and lightens the midtones and highlights of an image. Use this setting for presentation graphics. EPSON Standard (sRGB) increases the contrast in images. Use this setting for color photographs. • Click Advanced Settings to access additional options, as described in the remaining steps. 8. Choose one of the following Print Quality settings: • Draft - 360 dpi • Fine - 720 dpi • Fine - 1440 dpi • SuperFine - 1440 dpi 9. Choose any of the following advanced options: • Super MicroWeave for maximum elimination of banding (may not be accessible for certain media types). • High Speed for fast, bidirectional printing. For higher quality, make sure you deselect this option. • Flip Horizontal for printing a mirror image of your file. • Finest Detail for sharper edges on vector-based data including text, graphics, and line art. (This setting does not affect photographs and is not recommended for large files.) Continue with the instructions on page 132 to select color management settings. If you are using the color management settings in Photoshop or another application, it is very important to turn off color management in the printer driver. 131
-
 1
1 -
2
-
3
-
4
-
5
-
6
-
7
-
8
-
9
-
10
-
11
-
12
-
13
-
14
-
15
-
16
-
17
-
18
-
19
-
20
-
21
-
22
-
23
-
24
-
25
-
26
-
27
-
28
-
29
-
30
-
31
-
32
-
33
-
34
-
35
-
36
-
37
-
38
-
39
-
40
-
41
-
42
-
43
-
44
-
45
-
46
-
47
-
48
-
49
-
50
-
51
-
52
-
53
-
54
-
55
-
56
-
57
-
58
-
59
-
60
-
61
-
62
-
63
-
64
-
65
-
66
-
67
-
68
-
69
-
70
-
71
-
72
-
73
-
74
-
75
-
76
-
77
-
78
-
79
-
80
-
81
-
82
-
83
-
84
-
85
-
86
-
87
-
88
-
89
-
90
-
91
-
92
-
93
-
94
-
95
-
96
-
97
-
98
-
99
-
100
-
101
-
102
-
103
-
104
-
105
-
106
-
107
-
108
-
109
-
110
-
111
-
112
-
113
-
114
-
115
-
116
-
117
-
118
-
119
-
120
-
121
-
122
-
123
-
124
-
125
-
 126
126 -
 127
127 -
 128
128 -
 129
129 -
 130
130 -
 131
131 -
 132
132 -
 133
133 -
 134
134 -
 135
135 -
 136
136 -
137
-
138
-
139
-
140
-
141
-
142
-
143
-
144
-
145
-
146
-
147
-
148
-
149
-
150
-
151
-
152
-
153
-
154
-
155
-
156
-
157
-
158
-
159
-
160
-
161
-
162
-
163
-
164
-
165
-
166
-
167
-
168
-
169
-
170
-
171
-
172
-
173
-
174
-
175
-
176
-
177
-
178
-
179
-
180
-
181
-
182
-
183
-
184
-
185
-
186
-
187
-
188
-
189
-
190
-
191
-
192
-
193
-
194
-
195
-
196
-
197
-
198
-
199
-
200
-
201
-
202
-
203
-
204
-
205
-
206
-
207
-
208
-
209
-
210
-
211
-
212
-
213
-
214
-
215
-
216
-
217
-
218
-
219
-
220
-
221
-
222
-
223
-
224
-
225
-
226
-
227
-
228
 |
 |