Samsung NX58K9500WG/AA User Manual - Page 55
Burner grates and components, English - 55, MAINTENANCE, Bottom
 |
View all Samsung NX58K9500WG/AA manuals
Add to My Manuals
Save this manual to your list of manuals |
Page 55 highlights
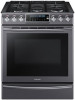
07 MAINTENANCE Burner grates and components Turn off all surface burners, and make sure they are all cooled down. 1. Remove the burner grates. 2. Remove the burner caps from the burner heads. 3. Remove the burner heads from the valve manifolds to reveal the starter electrodes. 21 4. Clean all removable grates and burner components in warm, soapy water. Do not use steel-wool pads or abrasive cleaners. 3 5. Rinse and dry grates with burner components thoroughly. 8 7 6 6. Return the burner heads to their positions on top of the manifold valves. Make sure a starter electrode is inserted through the hole in each burner head. 7. Return the burner caps to their positions on top of burner heads. To ensure proper and safe operation, make sure the burner caps lie flat on top of the burner heads. 8. Reinstall the burner gates in their respective positions. 9. Turn on each burner and check if it operates properly. After verifying that a burner operates normally, turn it off. The precise simmer burner (RR) cap and the inner dual burner (RF) cap are interchangeable. Top Bottom CAUTION • The starter electrodes are not removable. Do not attempt to remove them by force. • Make sure all burner components (heads and caps) are reinstalled properly. They are stable and rest flat when installed properly. • To avoid chipping, do not bang grates and caps against each other or hard surfaces such as cast iron cookware. • The burner spreader can be blocked by food or dust. Clean the spreader if it appears blocked. If you clean the spreader with water, assemble it only after it is completely dry. If the spreader is wet, it might prevent the burners from igniting. English - 55
-
 1
1 -
2
-
3
-
4
-
5
-
6
-
7
-
8
-
9
-
10
-
11
-
12
-
13
-
14
-
15
-
16
-
17
-
18
-
19
-
20
-
21
-
22
-
23
-
24
-
25
-
26
-
27
-
28
-
29
-
30
-
31
-
32
-
33
-
34
-
35
-
36
-
37
-
38
-
39
-
40
-
41
-
42
-
43
-
44
-
45
-
46
-
47
-
48
-
49
-
 50
50 -
 51
51 -
 52
52 -
 53
53 -
 54
54 -
 55
55 -
 56
56 -
 57
57 -
 58
58 -
 59
59 -
 60
60 -
61
-
62
-
63
-
64
-
65
-
66
-
67
-
68
-
69
-
70
-
71
-
72
-
73
-
74
-
75
-
76
-
77
-
78
-
79
-
80
-
81
-
82
-
83
-
84
-
85
-
86
-
87
-
88
-
89
-
90
-
91
-
92
-
93
-
94
-
95
-
96
-
97
-
98
-
99
-
100
-
101
-
102
-
103
-
104
-
105
-
106
-
107
-
108
-
109
-
110
-
111
-
112
-
113
-
114
-
115
-
116
-
117
-
118
-
119
-
120
-
121
-
122
-
123
-
124
-
125
-
126
-
127
-
128
-
129
-
130
-
131
-
132
-
133
-
134
-
135
-
136
-
137
-
138
-
139
-
140
-
141
-
142
-
143
-
144
-
145
-
146
-
147
-
148
-
149
-
150
-
151
-
152
-
153
-
154
-
155
-
156
-
157
-
158
-
159
-
160
-
161
-
162
-
163
-
164
-
165
-
166
-
167
-
168
-
169
-
170
-
171
-
172
-
173
-
174
-
175
-
176
-
177
-
178
-
179
-
180
-
181
-
182
-
183
-
184
-
185
-
186
-
187
-
188
-
189
-
190
-
191
-
192
-
193
-
194
-
195
-
196
-
197
-
198
-
199
-
200
-
201
-
202
-
203
-
204
-
205
-
206
-
207
-
208
-
209
-
210
-
211
-
212
-
213
-
214
-
215
-
216
 |
 |
