Sharp AR-M355U AR-M355 AR-M455 Operation Manual Suite
Sharp AR-M355U Manual
 |
View all Sharp AR-M355U manuals
Add to My Manuals
Save this manual to your list of manuals |
Sharp AR-M355U manual content summary:
- Sharp AR-M355U | AR-M355 | AR-M455 Operation Manual Suite - Page 1
MACHINE 2-1 • PERIPHERAL DEVICES 3-1 PART 2: COPIER OPERATION • MAKING COPIES 4-1 • CONVENIENT COPY FUNCTIONS 5-1 • MACHINE MAINTENANCE (FOR COPYING) 6-1 • DOCUMENT FILING FUNCTION 7-1 • SPECIFICATIONS 8-1 Be sure to become thoroughly familiar with this manual to gain the maximum - Sharp AR-M355U | AR-M355 | AR-M455 Operation Manual Suite - Page 2
interference in which case the user will be required to correct the interference at his own expense. Shielded cables must be used with this equipment to maintain compliance with standard. This operation manual is also used for the AR-355 / AR-455 / AR-355 J / AR-455 J / AR-M355N J / AR-M455N J. - Sharp AR-M355U | AR-M355 | AR-M455 Operation Manual Suite - Page 3
Part 1: General Information - Sharp AR-M355U | AR-M355 | AR-M455 Operation Manual Suite - Page 4
maintenance. The second half of the manual explains how to use the copy and document filing functions. ● Key operator's guide: This primarily explains key operator programs for machine management and copier related functions. Key operator programs for the fax, printer and network scanner functions - Sharp AR-M355U | AR-M355 | AR-M455 Operation Manual Suite - Page 5
or humidity changes, e.g., near an air conditioner or heater. 4.Be sure to allow the required space around the machine for servicing and proper ventilation. 31-1/2" (80cm) 11-13/16" (30cm) 23-5/8" (60cm) may have an objectionable odor, it is advisable to place the copier in a ventilated area. 0-2 - Sharp AR-M355U | AR-M355 | AR-M455 Operation Manual Suite - Page 6
● Driver's licenses Fusing unit Adjuster Lock Release The part indicated in the illustration is only to be handled by a service technician. Absolutely do not touch this part. The machine includes the document filing function, which stores document image data on the machine's hard disk - Sharp AR-M355U | AR-M355 | AR-M455 Operation Manual Suite - Page 7
± 5.7 ns)/7 mm 35 cpm model: (3.8 µs ± 3.8 ns)/7 mm 45 cpm model: (4.4 µs ± 4.4 ns)/7 mm At the production line, the output power of the scanner unit is adjusted to 0.4 MILLIWATT PLUS 8 % and is maintained constant by the operation of the Automatic Power Control (APC). Caution Use of controls or - Sharp AR-M355U | AR-M355 | AR-M455 Operation Manual Suite - Page 8
saddle stitch finisher 3-18 ● Staple cartridge replacement and staple jam removal 3-19 ● Misfeed in the saddle stitch finisher 3-22 ● Troubleshooting (concerning the saddle stitch finisher 3-24 CHAPTER 4 MAKING COPIES AUTOMATIC DOCUMENT FEEDER 4-2 ● Acceptable originals 4-2 PLACING ORIGINALS - Sharp AR-M355U | AR-M355 | AR-M455 Operation Manual Suite - Page 9
MAINTENANCE (FOR COPYING) USER MAINTENANCE 6-2 ● Cleaning the document glass and the automatic document feeder 6-2 ● Cleaning the main charger of the photoconductive drum 6-2 TROUBLESHOOTING 6-3 CHAPTER 7 DOCUMENT FILING FUNCTION OVERVIEW 7-2 ● Document filing function 7-2 TO USE THE DOCUMENT - Sharp AR-M355U | AR-M355 | AR-M455 Operation Manual Suite - Page 10
CHAPTER 1 BEFORE USING THE PRODUCT This chapter contains basic information that should be read before using the product. Page INTRODUCTION 1-2 MAIN FEATURES 1-3 PART NAMES AND FUNCTIONS 1-9 ● Exterior 1-9 ● Interior 1-10 ● Part names and functions of peripheral devices 1-11 ● Operation panel - Sharp AR-M355U | AR-M355 | AR-M455 Operation Manual Suite - Page 11
, such as routine maintenance and how to load paper and remove misfeeds. It also explains how to use the copier and document filing functions. Separate manuals have been provided for the fax function, printer function, and network scanner function. ■ Original and paper sizes This machine allows - Sharp AR-M355U | AR-M355 | AR-M455 Operation Manual Suite - Page 12
copier is capable of performing a variety of functions. This page shows features related to the copy function. ● Sort mode See page 1-3 ● Job programs See page 1-6 ● Group mode See page 1-3 ● Mirror Image 1-4 ● Staple sort mode paper using the document glass or the automatic document feeder - Sharp AR-M355U | AR-M355 | AR-M455 Operation Manual Suite - Page 13
Copy Margin Shift See page 5-3 Margins can be added to copies. One-sided copying Image shifted Image shifted Original to the right to the left Margin Two-sided copying Original Margin Image shifted Image shifted to the right to the left Or Margin Margin Pamphlet Copy See page 5-6 One - Sharp AR-M355U | AR-M355 | AR-M455 Operation Manual Suite - Page 14
have a very large number of originals, the pages can be scanned in sets. 100 sheets 50 sheets 50 sheets Transparency Insert See See page 5-23 Multiple original pages can be copied onto a single sheet of paper in a uniform layout. Originals (1-sided) Originals (2-sided) Copy 100 sets of - Sharp AR-M355U | AR-M355 | AR-M455 Operation Manual Suite - Page 15
paper. This function is convenient for making copies for certification purposes and helps save paper a program saves you the trouble of selecting those settings each image. Original Copy Date See page 5-32 The date can be added to copies. 2004/OCT/1 Mirror Image See page 5-28 A mirror image - Sharp AR-M355U | AR-M355 | AR-M455 Operation Manual Suite - Page 16
stitch finisher is installed. Saddle stitch See page 3-14 When a saddle stitch finisher is installed, copies can be automatically folded in half and stapled at the fold. (Use with the pamphlet function (see page 5-6) or book copy function (see page 5-25).) Saddle stitch binding 6 7 *When the - Sharp AR-M355U | AR-M355 | AR-M455 Operation Manual Suite - Page 17
Document Image Save to machine's hard disk HDD Printed Call up a Transmitted saved file to reuse As an ENERGY STAR® Partner, SHARP is placed for a copy, fax, or network scanner job, preheat mode automatically turns program. When this product is used as a printer, and either of the above modes is - Sharp AR-M355U | AR-M355 | AR-M455 Operation Manual Suite - Page 18
Bypass tray* (2) Exit tray* (3) Automatic document feeder (See page 4-2.) This automatically feeds and scans multiple sheet originals. Both sides of two-sided originals can be scanned at once. (4) Duplex module* Module for two-sided printing (5) Upper paper output area (Center tray) Finished sheets - Sharp AR-M355U | AR-M355 | AR-M455 Operation Manual Suite - Page 19
unit is hot. Take care in removing misfed paper. (18) Photoconductive drum Images are formed on the photoconductive drum. NOTE Do not touch or damage the photoconductive drum. (19) Cartridge lock lever When replacing the drum, toner or developer cartridge, turn down this lever and pull it out - Sharp AR-M355U | AR-M355 | AR-M455 Operation Manual Suite - Page 20
This extension is needed to support large size paper. (2) Finisher (AR-FN6) Output sheets can either be sorted in page order or grouped by page. Sorted sets or groups are offset stacked for easy separation when removed. Sorted sets can be delivered either stapled or unstapled. (3) Right output tray - Sharp AR-M355U | AR-M355 | AR-M455 Operation Manual Suite - Page 21
compatibility of PostScript level 3 to the printer. ●Facsimile expansion kit (AR-FX12) This kit is required to add fax function. ●Additional fax memory (8MB) (AR-MM9) ●Network scanner expansion kit (AR-NS3) This kit is required to add the network scanning feature. Some peripheral devices cannot be - Sharp AR-M355U | AR-M355 | AR-M455 Operation Manual Suite - Page 22
FILING] key Press to select the document filing mode. (See page 7-5.) [IMAGE SEND] key/LINE indicator/DATA indicator Press to change the display to network scanner mode*1 or fax mode*2. (See the "Operation manual (for network scanner)") and "Operation manual (for facsimile)".) [COPY] key Press to - Sharp AR-M355U | AR-M355 | AR-M455 Operation Manual Suite - Page 23
panel screens shown in this manual are printed images, and may appear different PAGE COPY TANDEM COPY Copier feature ● Dual page copy ● Job build ● Tandem copy ● Mirror image ● B/W Reverse A page 10 of the key operator's guide.) [Example 3] READY TO SCAN FOR COPY. A corresponding icon SPECIAL - Sharp AR-M355U | AR-M355 | AR-M455 Operation Manual Suite - Page 24
during retransmission of a fax/image transmission job. Print mode Copy mode E-MAIL/FTP mode Scan to e-mail job Scan to FTP job Scan to Desktop job Fax mode Fax send job Fax reception job PC-Fax send job Internet Fax mode i-Fax send job i-Fax reception job *1 "PAPER EMPTY" in the job - Sharp AR-M355U | AR-M355 | AR-M455 Operation Manual Suite - Page 25
scan mode (Scan to e-mail, Scan to FTP, and Scan to Desktop) when the network scanner option is installed. (5) [FAX JOB] key This displays the transmission/reception status and finished jobs of fax mode (fax and PC-Fax) when the fax the document filing function), the "JOB SETTINGS" menu screen appears to - Sharp AR-M355U | AR-M355 | AR-M455 Operation Manual Suite - Page 26
or unplugging the power cord while the lights are blinking may damage the hard disk and cause the data being stored or received to be lost. If the fax function has been added, always keep the fax power switch turned on. Faxes cannot be received if the fax power switch is turned off. (Faxes can be - Sharp AR-M355U | AR-M355 | AR-M455 Operation Manual Suite - Page 27
for the copy, printer, fax, Internet fax, network scanner, document filing functions. (Page 7 of the key operator's guide)> Using the scanning procedure. ● When the account counter is turned on for the printer function, you must enter your account number in the setting screen of the printer driver - Sharp AR-M355U | AR-M355 | AR-M455 Operation Manual Suite - Page 28
removal guidance 2-17 ● Misfeed in the transport area, fusing area, and exit area 2-18 ● Misfeed in the duplex module 2-19 ● Misfeed in the paper feed area 2-20 REMOVING AN ORIGINAL MISFEED 2-22 ● Removing a misfed original from the automatic document feeder .. 2-22 TROUBLESHOOTING 2-23 2-1 - Sharp AR-M355U | AR-M355 | AR-M455 Operation Manual Suite - Page 29
misfeed. ● For best results use paper supplied by SHARP. (See page 2-4.) ● When you change the paper type and size in paper tray 1, set the paper type and size referring to "Setting the paper type and paper size" (page 2-5). ● Do not place heavy objects or press hard on any tray which is pulled out - Sharp AR-M355U | AR-M355 | AR-M455 Operation Manual Suite - Page 30
LOADING PAPER Specifications of paper trays The specifications for types and sizes of paper that can be used in each tray are shown below. Tray Tray No. (tray name) Applicable paper types Applicable paper sizes Paper weight Paper tray 1 Tray 1 Plain paper (Refer to the next page ● 8-1/2" x - Sharp AR-M355U | AR-M355 | AR-M455 Operation Manual Suite - Page 31
in the machine. Please consult your retailer or your dealer when buying paper. ● The image quality and toner fusibility of special papers may change due to ambient conditions, operating conditions, and paper characteristics, resulting in image quality inferior to that of SHARP standard paper. 2-4 - Sharp AR-M355U | AR-M355 | AR-M455 Operation Manual Suite - Page 32
SETTINGS TRAY SETTINGS 4 Display the setting screen of the desired paper tray. CUSTOM SETTINGS PAPER TRAY SETTINGS TYPE / SIZE TRAY 1 PLAIN / 81/2x11 PRINT COPY DOC. FAX I-FAX FILING OK FIXED PAPER SIDE 1/4 DISABLE DUPLEX DISABLE STAPLE DISABLE PUNCH Touch the key or key to display the - Sharp AR-M355U | AR-M355 | AR-M455 Operation Manual Suite - Page 33
when you have loaded postcards. NOTE Sizes that can be selected vary depending on the selected paper type. 9 Select output functions that can be used with the selected tray. PRINT COPY DOC. FAX I-FAX FILING Touch the checkboxes under the desired items to select them. Checkboxes that can be - Sharp AR-M355U | AR-M355 | AR-M455 Operation Manual Suite - Page 34
. CUSTOM SETTINGS TRAY 2 TYPE/SIZE SETTING SELECT THE PAPER TYPE USER TYPE 1 USER TYPE 2 USE USER TYPE 5 USER TYPE 6 USE 4 Touch the [TYPE NAME] key. PAPER TYPE REGISTRATION No.01 TYPE NAME USER TYPE 1 FIXED PAPER SIDE DISABLE STAPLE A character entry screen appears. Enter a type name (maximum - Sharp AR-M355U | AR-M355 | AR-M455 Operation Manual Suite - Page 35
of loading paper into the multipurpose drawer is the same as for paper tray 1 described on page 2-2. For specifications of paper, see page use paper that has already been printed on by a thermal transfer or inkjet printer. In particular, paper that has been printed on by a thermal transfer printer ( - Sharp AR-M355U | AR-M355 | AR-M455 Operation Manual Suite - Page 36
LOADING PAPER Printing onto envelopes ● Do not use envelopes that have metal clasps, plastic snaps, string closures, windows, linings, self-adhesive patches or synthetic materials. Attempting to print on these may cause misfeeds, inadequate toner adherence or other trouble. ● Creases or smudging - Sharp AR-M355U | AR-M355 | AR-M455 Operation Manual Suite - Page 37
drawer. Use the upper tray according to the instructions for the multi-purpose drawer on page 2-8. Middle and lower paper trays: Up to 500 sheets of SHARP recommended plain paper can be loaded in these trays. The method of loading paper is the same as for paper tray 1 in the main unit. See the - Sharp AR-M355U | AR-M355 | AR-M455 Operation Manual Suite - Page 38
guide. 4 Set the paper type. If you have changed the paper size from the AB system to the inch system or vice versa, select the relevant type referring to "Setting the paper type and paper size" on page 2-5. 5 Loading paper in the stand/MPD & 2000 sheet paper drawer is now complete. Specifications - Sharp AR-M355U | AR-M355 | AR-M455 Operation Manual Suite - Page 39
at the destination. ● Fax data*1 receive/forward Faxes received to memory and received Internet faxes can be forwarded to another destination. ● Printer condition Used to configure default settings for the printer function (see the Operation manual (for printer)). ● Document filing control Used - Sharp AR-M355U | AR-M355 | AR-M455 Operation Manual Suite - Page 40
To exit the settings, touch the [EXIT] key. CUSTOM SETTINGS EXIT TOTAL COUNT DEFAULT SETTINGS LIST PRINT FAX DATA ADDRESS CONTROL SENDER CONTROL RECEIVE/FORWARD PAPER TRAY SETTINGS PRINTER CONDITION DOCUMENT FILING CONTROL KEY OPERATOR PROGRAMS More information on setting procedures In the - Sharp AR-M355U | AR-M355 | AR-M455 Operation Manual Suite - Page 41
in the event that the paper runs out during continuous printing. This requires that the trays be loaded with the same size of paper. The paper tray settings can be enabled or disabled for each tray, and for printer mode, copy mode, fax mode, Internet fax mode, and document filing mode. To enable any - Sharp AR-M355U | AR-M355 | AR-M455 Operation Manual Suite - Page 42
and will not stick to the inside of the cartridge. 8 Close the front cover. CAUTION ● Do not throw the toner cartridge into a fire. Toner may fly and cause burns. ● Store toner cartridges out of the reach of small children. NOTE Place the used toner cartridge in the plastic bag and store it. When - Sharp AR-M355U | AR-M355 | AR-M455 Operation Manual Suite - Page 43
STORAGE OF SUPPLIES Standard supplies for this product that can replaced by the user include paper, toner cartridges, and staple cartridges for the finisher. For best copying results, be sure to use only Sharp Genuine Supplies which are designed, engineered, and tested to maximize the life and - Sharp AR-M355U | AR-M355 | AR-M455 Operation Manual Suite - Page 44
on misfeed removal are also shown. Misfeed in the document feeder (page 2-22) Misfeed in the transport area, fusing paper drawer (page 2-21) Misfeed in the stand/MPD & 2000 sheet paper drawer (page 2-21) NOTE Printing is not possible when a misfeed occurs, and thus any faxes or Internet faxes - Sharp AR-M355U | AR-M355 | AR-M455 Operation Manual Suite - Page 45
drum Do not touch or damage the photoconductive drum. If the duplex module is equipped with an exit tray and paper is misfed in the exit area, remove the misfed paper as shown in the illustration. 3 Gently close the duplex module. If the machine is not equipped with a duplex module, close - Sharp AR-M355U | AR-M355 | AR-M455 Operation Manual Suite - Page 46
the left. Unlatch the unit and gently move the module away from the machine. 3 While holding the exit tray up, remove the misfed paper as shown in the illustrations below. If paper is misfed at the upper part of the duplex module, gently remove it while taking care not to tear the - Sharp AR-M355U | AR-M355 | AR-M455 Operation Manual Suite - Page 47
away from the machine. If the machine is not equipped with a duplex module, open the side cover similarly. 2 Remove the misfed paper. Be careful not to tear the misfed paper during removal. 5 Gently close the duplex module. If the machine is not equipped with a duplex module, close the side cover - Sharp AR-M355U | AR-M355 | AR-M455 Operation Manual Suite - Page 48
to grasp it, go to the next step. 4 Close the left cover of the stand/paper drawer. Raise the paper guide and remove the misfed paper. After removing the misfed paper, be sure to return the paper guide. 5 Gently close the duplex unit. If the machine is not equipped with a duplex module, close - Sharp AR-M355U | AR-M355 | AR-M455 Operation Manual Suite - Page 49
and gently remove the misfed original without tearing it. Close the cover securely so that cover clicks into place. 2 Open and close the document feeder. Opening and closing the cover clears the misfeed display. Copying cannot be resumed until this step is performed. However, this step is not - Sharp AR-M355U | AR-M355 | AR-M455 Operation Manual Suite - Page 50
function, see page 6-3. For problems related to document filing, see page 7-28. For fax, printer, and network scanner problems, see the manuals for those functions. For peripheral device problems, see the explanation of the device. If the message "CALL FOR SERVICE. CODE:**-**"(Note) appears in the - Sharp AR-M355U | AR-M355 | AR-M455 Operation Manual Suite - Page 51
TROUBLESHOOTING Problem Check Solution or cause Printing stops before the job is finished If too many pages collect on the output tray, the tray full sensor activates and stops printing. You have run out of paper. Remove the paper from the output tray. Load paper. (Page 2-2) Smudges on - Sharp AR-M355U | AR-M355 | AR-M455 Operation Manual Suite - Page 52
TROUBLESHOOTING Problem Check Solution or cause Is paper other than SHARPrecommended paper being used? Use SHARP-recommended paper. (Page 2-16) Printed paper is wrinkled or the image rubs off easily. Is paper size or weight out of the allowable range? Paper damp? Use paper in the allowable - Sharp AR-M355U | AR-M355 | AR-M455 Operation Manual Suite - Page 53
- Sharp AR-M355U | AR-M355 | AR-M455 Operation Manual Suite - Page 54
in the finisher 3-12 ● Troubleshooting finisher problems 3-13 SADDLE STITCH FINISHER 3-14 ● Part names 3-14 ● Specifications 3-14 ● Saddle stitch finisher functions 3-15 ● Using the saddle stitch finisher 3-18 ● Staple cartridge replacement and staple jam removal 3-19 ● Misfeed in the - Sharp AR-M355U | AR-M355 | AR-M455 Operation Manual Suite - Page 55
the configurations which are compatible. Specifications Name Paper size (for duplex copy)*1 Paper weight (for duplex copy)*1 Reference paper position Bypass tray paper capacity*2 Dimensions Weight Duplex module (AR-DU3) or Duplex module/bypass tray (AR-DU4) 11" x 17", 8-1/2" x 14", 8-1/2" x 13 - Sharp AR-M355U | AR-M355 | AR-M455 Operation Manual Suite - Page 56
remaining in the tray, combine it with the paper to be added, and reload as a single stack. ● Do not use paper that has already been printed on by a plain paper fax machine or a laser printer. This may cause printed images to become dirty. ● Do not use paper that has already been printed on by - Sharp AR-M355U | AR-M355 | AR-M455 Operation Manual Suite - Page 57
DUPLEX MODULE Troubleshooting (concerning the duplex module) Check the list below before calling for service. Problem Check Solution or cause Message indicating the paper type Special paper cannot be used for two-sided cannot be used for two-sided printing printing. Use a paper type adequate - Sharp AR-M355U | AR-M355 | AR-M455 Operation Manual Suite - Page 58
group of users . Output paper in the copy mode and the fax mode will be delivered to the top tray of the stacker separated from printed output. (Printed output can also be delivered to the top tray.) Part names Top cover Open for misfeed removal. Top tray Output paper from the printer, copier, and - Sharp AR-M355U | AR-M355 | AR-M455 Operation Manual Suite - Page 59
not to tear the misfed paper during removal. 2 Remove the misfed paper. Be careful not to tear the misfed paper during removal. After removing the paper, press down on the top cover to close it. 7 Close the paper guide. Close the paper guide securely. 3 If the misfed paper is not found in step - Sharp AR-M355U | AR-M355 | AR-M455 Operation Manual Suite - Page 60
removal. Top tray Printer, copier and fax output can be delivered here. To print onto large paper (11" x 17", 8-1/2" x 14", 8-1/2" x 13", A3 or B4), extend the tray. Staple box Pull the box out to replace the staple cartridge or to remove jammed staples. Offset tray Stapled sets or sets to - Sharp AR-M355U | AR-M355 | AR-M455 Operation Manual Suite - Page 61
only be used in the offset tray. Stapled sets will not be offset. ■ Staple sort mode Collated sets will be stapled and delivered to the offset tray. The stapling positions, orientation, paper size for stapling, and stapling capacity are shown below. Stapling positions Top left corner of printouts - Sharp AR-M355U | AR-M355 | AR-M455 Operation Manual Suite - Page 62
FINISHER Using the finisher functions When the [OUTPUT] key on the main screen of copy mode is touched, a screen for selecting the sort/group/staple sort functions and selecting an exit tray will appear. As a selection is made, the touch key for the selection will be highlighted. OUTPUT SORT - Sharp AR-M355U | AR-M355 | AR-M455 Operation Manual Suite - Page 63
empty staple cartridge from the staple box. 8 While pushing the staple unit release lever to the left, rotate the staple unit to face down. 5 Insert a new staple cartridge into the staple box aligning the arrow of the staple cartridge with that of the staple box. When reinstalling the staple box - Sharp AR-M355U | AR-M355 | AR-M455 Operation Manual Suite - Page 64
finisher compiler. Release the open the compiler. latch to finisher 7 Raise the lever at the end of the staple box. Remove the top staple if it is bent. If bent staples remain, a staple jam will occur again. 2 Remove the misfed paper from the stapler compiler. Be careful not to tear the misfed - Sharp AR-M355U | AR-M355 | AR-M455 Operation Manual Suite - Page 65
from the output area. Be careful not to tear the misfed paper during removal. 5 Raise the paper guide and remove the misfed paper. Be careful not to tear the misfed paper during removal. Paper guide 2 Open the finisher top cover. Top cover Move the tab in the direction of the arrow as shown - Sharp AR-M355U | AR-M355 | AR-M455 Operation Manual Suite - Page 66
THE STAPLER UNIT" or "CHECK STAPLER POSITION OR STAPLER JAM" message displayed? Is a message "ADD STAPLES" displayed? Check the staple unit. (See page 3-11.) Replace the staple cartridge. (See page 3-10.) Different size paper included? Stapled sets are not stacked correctly or some sheets in - Sharp AR-M355U | AR-M355 | AR-M455 Operation Manual Suite - Page 67
this section for staple cartridge replacement or to remove jammed staples. NOTES ● Do not press on the saddle stitch finisher (particularly the offset tray). ● Be careful about the offset tray during printing because the tray moves up and down. ● The saddle stitch finisher requires the installation - Sharp AR-M355U | AR-M355 | AR-M455 Operation Manual Suite - Page 68
. Approx. 86 lbs. (39 kg) Name Punch module Paper sizes for hole 3 holes: 11" x 17", 8-1/2" x 11", A3, A4 punching 2 holes: 8-1/2" x 14", 8-1/2" x 11"R Specifications are subject to change for improvement without notice. Supplies AR-SC2 staple cartridges must be used for this finisher. The - Sharp AR-M355U | AR-M355 | AR-M455 Operation Manual Suite - Page 69
using the staple sort or punch function When using the staple sort or punch function, the original must be placed in the following orientations to enable stapling or punching in the desired position on the paper. Staple sort Document feeder Document glass Punch Document feeder Document glass - Sharp AR-M355U | AR-M355 | AR-M455 Operation Manual Suite - Page 70
staples image rotation will not function when the hole punching function is used. Two or three holes can be punched depending on the paper size. (See paper paper size that cannot be punched, the paper will be output without being punched. (For paper sizes that can be punched, see the specifications - Sharp AR-M355U | AR-M355 | AR-M455 Operation Manual Suite - Page 71
grouped. (9) (10) (6) [CENTER TRAY] key If the center tray is selected, output paper will be delivered to the exit tray. (2) [STAPLE SORT] key (See page 3-16.) When Staple Sort is selected, sorted sets will be stapled and delivered to the offset tray. (They will not be offset stacked.) (3) [SORT - Sharp AR-M355U | AR-M355 | AR-M455 Operation Manual Suite - Page 72
procedure below to replace the staple cartridge or remove jammed staples. ■ Staple cartridge replacement 1 Open the front cover. 6 Insert a new staple cartridge into the staple box. After inserting the staple cartridge, press down on the staple box cover to lock the cartridge in place. 2 Pull out - Sharp AR-M355U | AR-M355 | AR-M455 Operation Manual Suite - Page 73
SADDLE STITCH FINISHER ■ Staple jam removal 1 Unlatch the saddle stitch finisher and slide it away from the machine. 5 If saddle stitch was selected, open the saddle stitch section cover. 2 Open the front cover. 6 Remove the misfed paper. Be careful not to tear the misfed paper during removal. - Sharp AR-M355U | AR-M355 | AR-M455 Operation Manual Suite - Page 74
box in until it clicks into place. 11Raise the lever at the end of the staple box. Remove the top staple if it is bent. If bent staples remain, a staple jam will occur again. ■ Disposal of hole punch scrap 1 Unlatch the saddle stitch finisher and slide it away from the machine. 14 3 Push the - Sharp AR-M355U | AR-M355 | AR-M455 Operation Manual Suite - Page 75
following the procedure below. 1 Press the detach button and separate the saddle stitch finisher from the machine. 5 Remove the misfed paper. Remove the paper gently, taking care not to tear it. CAUTION The saddle stitch finisher and the machine are connected at the rear. Exercise caution when - Sharp AR-M355U | AR-M355 | AR-M455 Operation Manual Suite - Page 76
onto the machine. 11Rotate roller rotating knob D in the direction of the arrow. Roller rotating knob D 12Remove any misfed paper from the saddle stitch tray. 3 Remove the paper gently, taking care not to tear it. 13Close the cover of the saddle stitch section. 14Close the front cover. 3-23 - Sharp AR-M355U | AR-M355 | AR-M455 Operation Manual Suite - Page 77
jammed staples. (See page 3-20.) Stapling cannot be performed (including saddle stitch). Message requesting displayed? adding staples Replace the staple cartridge. (See page 3-19.) Check that a staple cartridge has been installed. (See page 3-20.) Different size paper included? Stapling - Sharp AR-M355U | AR-M355 | AR-M455 Operation Manual Suite - Page 78
Part 2: Copier Operation - Sharp AR-M355U | AR-M355 | AR-M455 Operation Manual Suite - Page 79
- Sharp AR-M355U | AR-M355 | AR-M455 Operation Manual Suite - Page 80
feeder.... 4-10 ● Copying from the document glass 4-11 ● Automatic two-sided copying from the document glass 4-13 ADJUSTING THE EXPOSURE 4-14 REDUCTION/ENLARGEMENT/ZOOM 4-15 ● Automatic selection (auto image 4-15 ● Manual selection (preset copy ratios/zoom 4-16 ● XY ZOOM 4-18 SPECIAL PAPERS - Sharp AR-M355U | AR-M355 | AR-M455 Operation Manual Suite - Page 81
scanning of original and scanned image may become expanded compared with original itself. ■ Size and weight of acceptable originals ■ Total number of originals that can be set in the document feeder originals into the document feeder tray, be sure to remove any staples or paper clips. ●If - Sharp AR-M355U | AR-M355 | AR-M455 Operation Manual Suite - Page 82
size detection function. The factory default setting is "INCH-1". The setting can be changed using "ORIGINAL SIZE DETECTOR SETTING" in the key operator programs. Detectable original sizes Group Document feeder tray (for automatic document feeder) Document glass 1 INCH-1 11" x 17", 8-1/2" x 14 - Sharp AR-M355U | AR-M355 | AR-M455 Operation Manual Suite - Page 83
document feeder tray or on the document glass so that the top and bottom of the original is positioned as shown in the illustration. If not, staples original Orientation of paper Copy after rotation Face down Face down ●This function operates in both the auto paper select or auto image mode. (" - Sharp AR-M355U | AR-M355 | AR-M455 Operation Manual Suite - Page 84
the scanning size 4 If you load an original that is not a standard size (such as an AB size), or if the size is not detected correctly, you must touch the [ORIGINAL] key and set the original size manually. Perform the following steps after placing the document in the automatic document feeder or - Sharp AR-M355U | AR-M355 | AR-M455 Operation Manual Suite - Page 85
frequently used original size saves you the trouble of manually setting the size each time you copy that size of document. ● To cancel an original size Touch the [CUSTOM SIZE] key. AB INCH E INPUT AUTO MANUAL CUSTOM SIZE AUTO EXPOSURE AUTO A4 PAPER SE 100% COPY RAT 5 Enter the X (width) and - Sharp AR-M355U | AR-M355 | AR-M455 Operation Manual Suite - Page 86
, B5, B5R or A5)) are set and the auto paper select function is enabled. READY TO SCAN FOR COPY. If originals of a size other than the sizes above are 1. 81/2x11 PLAIN to be copied, manually 81/2x11 2. 11x17 PLAIN select the desired paper PLAIN 3. 11x17 PLAIN size by touching the 4. 81 - Sharp AR-M355U | AR-M355 | AR-M455 Operation Manual Suite - Page 87
the [QUICK FILE] key. Either key can be FILE touched to store the scanned document QUICK FILE image on the machine's hard disk. The stored image can be re-used later. For more information on this function, see "Document filing function" in chapter 7. If the [FILE] key is grayed out, only - Sharp AR-M355U | AR-M355 | AR-M455 Operation Manual Suite - Page 88
key When using the automatic document feeder, sorting is automatically selected when the original is placed in the document feeder. ● Grouping copies by page the appropriate key to select the desired output tray. OUTPUT SORT STAPLE SORT GROUP OFFSET TRAY OFFSET CENTER TRAY 0 OK SADDLE STITCH - Sharp AR-M355U | AR-M355 | AR-M455 Operation Manual Suite - Page 89
NORMAL COPYING Automatic two-sided copying using the automatic document feeder When the optional duplex module is installed, the following automatic two-sided copying can be performed. The paper is automatically turned over during copying, allowing two-sided copies to be made with ease. Original - Sharp AR-M355U | AR-M355 | AR-M455 Operation Manual Suite - Page 90
B5, B5R or A5)) are set and the auto paper select function is enabled. READY TO SCAN FOR COPY. If originals of a size other than the sizes above are 1. 81/2x11 PLAIN to be copied, manually 81/2x11 2. 11x17 PLAIN select the desired paper PLAIN 3. 11x17 PLAIN size by touching the 4. 81 - Sharp AR-M355U | AR-M355 | AR-M455 Operation Manual Suite - Page 91
mode. (page 49.) 2-SIDED COPY Group mode is the default mode. OUTPUT FILE To select sort mode, touch the [OUTPUT store the scanned document QUICK FILE image on the machine's hard disk. The stored image can be re-used later. For more information on this function, see "Document filing - Sharp AR-M355U | AR-M355 | AR-M455 Operation Manual Suite - Page 92
is installed, the following automatic two-sided copying can be performed. The paper is automatically turned over during copying, allowing two-sided copies to be made with ease. Original Copy 1 Place the original on the document glass. (pages 4-3 to 4-6) 3 Touch the [1-sided to 2-sided copy] key - Sharp AR-M355U | AR-M355 | AR-M455 Operation Manual Suite - Page 93
characters About the steps that follow If an automatic document feeder is being used, see pages 4-7 through 4-10. If the document glass is being used, see pages 4-11 through 413. NOTES ● To return to the automatic exposure mode, touch the [AUTO / MANUAL] key to highlight [AUTO], and then touch the - Sharp AR-M355U | AR-M355 | AR-M455 Operation Manual Suite - Page 94
below) ● Manual selection: Preset copy ratios/zoom (see page 4-16) Automatic selection (auto image) The reduction or enlargement ratio will be selected automatically based on the original size and the selected paper size. 1 Place the original in the document feeder tray or on the document glass - Sharp AR-M355U | AR-M355 | AR-M455 Operation Manual Suite - Page 95
Manual guide can be used to set two additional enlargement ratios and two additional reduction ratios.> 1 Place the original in the document feeder tray or on the document TO SCAN FOR COPY. 0 OK AUTO ORIGINAL ZOOM AUTO EXPOSURE AUTO 81/2x11 PAPER SELECT XY ZOOM MENU AUTO IMAGE COPY - Sharp AR-M355U | AR-M355 | AR-M455 Operation Manual Suite - Page 96
the [QUICK FILE] key. Either key can be FILE touched to store the scanned document QUICK FILE image on the machine's hard disk. The stored image can be re-used later. For more information on this function, see "Document filing function" in chapter 7. If the [FILE] key is grayed out, only - Sharp AR-M355U | AR-M355 | AR-M455 Operation Manual Suite - Page 97
document feeder tray or on the document glass. (pages 4-3 to 4-6) NOTE When the original is placed in the document feeder, the ratio can be set from 25% to 200%. 2 Touch the [COPY RATIO] key. UTO 4 PAPER repeat)" on page 10 of the key operator's guide). 6 Touch the [Y] key. X 50 Y 100 ZOOM 4-18 - Sharp AR-M355U | AR-M355 | AR-M455 Operation Manual Suite - Page 98
or 7 on page 4-18). 4 9 If needed, touch the [PAPER SELECT] key and select the paper size. 0 If the AUTO PAPER PLAIN AUTO ORIGINAL AUTO SELECT mode is on, the appropriate copy paper PLAIN EXPOSURE size will have been PLAIN PAPER SELECT automatically selected PLAIN X-50% Y-70% based on the - Sharp AR-M355U | AR-M355 | AR-M455 Operation Manual Suite - Page 99
tray can be used to make copies on transparencies, postcards, label sheets, envelopes*1, and plain paper. *1 Envelopes can be placed in the tray 2. 1 Place the original in the document feeder tray or on the document glass. (pages 4-3 to 4-6) 5 Select the bypass tray. RE DY TO SC N FOR COPY 81 - Sharp AR-M355U | AR-M355 | AR-M455 Operation Manual Suite - Page 100
● Tandem copy 5-9 ● Covers/inserts 5-11 ● Transparency film with insert sheets 5-22 ● Multi shot 5-23 ● Book copy 5-25 ● Card shot 5-26 ● Mirror image 5-28 ● B/W reverse 5-28 ● Print menu 5-29 STORING, USING AND DELETING JOB PROGRAMS 5-41 ● Storing a job program 5-41 ● Calling up a job - Sharp AR-M355U | AR-M355 | AR-M455 Operation Manual Suite - Page 101
key in the main screen. READY TO SCAN FOR COPY. SPECIAL MODES 2-SIDED COPY AUTO ORIGINAL AUTO EXPOSURE AUTO 81/2 x11 PAPER 100% COPY RATIO (1) SPECIAL MODES MARGIN SHIFT 5-26) Multi shot (page 5-23) Mirror image (page 5-28) ●The following special functions requiring setting screens start on - Sharp AR-M355U | AR-M355 | AR-M455 Operation Manual Suite - Page 102
text or image on the copy paper approximately 1/2" (10 mm) in its initial setting. This function is convenient when stapling or binding About the steps that follow If an automatic document feeder is being used, see pages 4-7 through 4-10. If the document glass is being used, see pages 4-11 through - Sharp AR-M355U | AR-M355 | AR-M455 Operation Manual Suite - Page 103
of the Key operator's guide) Original Copy EDGE ERASE Eliminates shadow lines around the edges of copies caused when heavy paper or a book is used the steps that follow If an automatic document feeder is being used, see pages 4-7 through 4-10. If the document glass is being used, see pages 4- - Sharp AR-M355U | AR-M355 | AR-M455 Operation Manual Suite - Page 104
Dual page copy ●The dual page copy function can be used only when copying from the document glass. The automatic document feeder cannot be used with this function. ●Only 8-1/2" x 11" (A4) paper can be used. To display the special modes screen... See "General procedure for using special functions - Sharp AR-M355U | AR-M355 | AR-M455 Operation Manual Suite - Page 105
stitch finisher is installed, copies can be stapled in two positions along the center of scan a two-sided original using the automatic document feeder. 3 Select the binding position (left binding or right binding). LEFT RIGHT BINDING BINDING C SE If you wish to insert a different type of paper - Sharp AR-M355U | AR-M355 | AR-M455 Operation Manual Suite - Page 106
original size and the paper size. (See steps 2 and 3 on page 4-15.) 11Select any desired copy settings such as the exposure or number of copies, and then press the [START] key. 12[When using the automatic document feeder:] Copying will start after all originals have been scanned. (The next step - Sharp AR-M355U | AR-M355 | AR-M455 Operation Manual Suite - Page 107
3 Place the first set of originals in the document feeder tray. (page 4-3) 4 Make sure that the desired paper size is selected, select the number of copies or other copy settings, and press the [START] key. Scanning of originals will start. After scanning of the first set of originals (A in the - Sharp AR-M355U | AR-M355 | AR-M455 Operation Manual Suite - Page 108
required to complete the job. To use this function, two machines must be connected to your network as network printers programs. (See page 5-7 of the "Operation manual (for printer)") ●When configuring the tandem settings in the server document feeder or on the document glass. (page 4-3) 5-9 - Sharp AR-M355U | AR-M355 | AR-M455 Operation Manual Suite - Page 109
CANCEL] key. • As an example, the following conditions must be met when a staple finisher is installed on the server machine and not on the client machine: (1) is pressed, if the client machine cannot print because it is out of paper or other reason, the server machine will print its half of the - Sharp AR-M355U | AR-M355 | AR-M455 Operation Manual Suite - Page 110
document feeder is used. A different type of paper can also be automatically added as an insert at specified pages. ● Covers/inserts can be disabled in the key operator programs (page 11 of the key operator's guide The original must be scanned from the document feeder. The document glass cannot be - Sharp AR-M355U | AR-M355 | AR-M455 Operation Manual Suite - Page 111
copied on with the (X) keys ([YES] or [NO]). (2) Select whether one-sided copying or two-sided copying is to be performed on the front cover paper with the (Y) keys. This selection is only possible when the [YES] key of (X) has been selected. (The one-sided/two-sided selection made here only - Sharp AR-M355U | AR-M355 | AR-M455 Operation Manual Suite - Page 112
These are specified with the [INSERTION TYPE A SETTING] key and [INSERTION TYPE B SETTING] in the touch panel. ●Examples of insertion methods for insert paper are given on page 5-21. To display the special modes screen... See "General procedure for using special functions" on page 5-2. 1 Touch the - Sharp AR-M355U | AR-M355 | AR-M455 Operation Manual Suite - Page 113
B SETTING]. 10Touch the [OK] key in the screen of step 9. You will return to the screen of step 2. 11If you wish to insert a different paper with the [INSERTION TYPE B SETTING] key, repeat steps 2 through 6. Use the [INSERTION TYPE B SETTING] key instead of the [INSERTION TYPE A SETTING] key, and - Sharp AR-M355U | AR-M355 | AR-M455 Operation Manual Suite - Page 114
the [CANCEL], [DELETE], or [AMEND] keys appear. AMEND THE INSERTION? OK TS INSERTION TYPE A SETTING INSERTION TYPE B SETTING CANCEL OK INSERTION SETTINGS PAPER TRAY SETTINGS PAGE LAYOUT CANCEL DELETE AMEND 2 The set covers/inserts pages are shown. PAGE LAYOUT FRONT COVER INSERTION TYPE - Sharp AR-M355U | AR-M355 | AR-M455 Operation Manual Suite - Page 115
SPECIAL MODES ■ Examples of covers and inserts The relations between the originals and finished copies when covers or inserts are inserted are shown on the following pages. Covers ●One-sided copying of one-sided originals ●Two-sided copying of one-sided originals (page 5-17) (page 5-18) ● - Sharp AR-M355U | AR-M355 | AR-M455 Operation Manual Suite - Page 116
SPECIAL MODES ■ Covers (One-sided copying of one-sided originals) One-sided copies are made of the following one-sided originals. 1st page 2nd page 3rd page 4th page 5th page 1 2 3 4 5 6th page 6 Copying on cover Front cover Back cover No copying No copying Resulting copies 1 2 - Sharp AR-M355U | AR-M355 | AR-M455 Operation Manual Suite - Page 117
SPECIAL MODES ■ Covers (Two-sided copying of one-sided originals) Two-sided copies are made of the following one-sided originals. 1st page 2nd page 3rd page 4th page 5th page 1 2 3 4 5 6th page 6 6 6 Copying on cover Front cover Back cover No copying No copying 2 Resulting - Sharp AR-M355U | AR-M355 | AR-M455 Operation Manual Suite - Page 118
■ Covers (One-sided copying of Two-sided originals) One-sided copies are made of the following two-sided originals. 1st page 2nd page 3rd page 1 3 5 SPECIAL MODES 6 4 2 Copying on cover Front cover Back cover No copying No copying Resulting copies 1 2 3 4 5 6 One-sided 1 2 - Sharp AR-M355U | AR-M355 | AR-M455 Operation Manual Suite - Page 119
SPECIAL MODES ■ Covers (Two-sided copying of two-sided originals) Two-sided copies are made of the following two-sided originals. 1st page 2nd page 3rd page 1 3 5 6 4 2 6 6 Copying on cover Front cover Back cover No copying No copying 2 Resulting copies 1 3 5 4 6 One-sided - Sharp AR-M355U | AR-M355 | AR-M455 Operation Manual Suite - Page 120
SPECIAL MODES ■ Inserts (One-sided copying of one-sided originals) One-sided and two-sided copying is performed using the following one-sided originals. The insertion page of the insert is set to page 3. 1st page 2nd page 3rd page 4th page 5th page 6th page 1 2 3 4 5 6 Copying on - Sharp AR-M355U | AR-M355 | AR-M455 Operation Manual Suite - Page 121
DISABLE STAPLE DISABLE PUNCH 6 Touch the [TYPE/SIZE] key. PER TRAY SETTINGS TYPE / SIZE TRAY 2 PLAIN / 81/2x11 PRINT COPY DOC. FAX I-FAX FILING 3 Touch the [PAPER TRAY SETTINGS] key. The paper tray selection PAPER TRAY screen will appear. RINT SETTINGS TA ORWARD PRINTER CONDITION - Sharp AR-M355U | AR-M355 | AR-M455 Operation Manual Suite - Page 122
paper. 12Touch the outer [OK] key in the screen of step 7. You will return to the main screen of copy mode. About the steps that follow If an automatic document feeder originals, select the desired paper size, and select the copy paper size, and selected number of original pages may require that - Sharp AR-M355U | AR-M355 | AR-M455 Operation Manual Suite - Page 123
images to be copied onto one sheet of copy paper. SPECIAL MODES MULTI SHOT If needed, the orientation of the copy paper and the 2in1 4in1 orientation of the images that follow If an automatic document feeder is being used, see pages 4-7 through 4-10. If the document glass is being used, - Sharp AR-M355U | AR-M355 | AR-M455 Operation Manual Suite - Page 124
be used in combination with the pamphlet function to staple and fold the copies at the centerline. To paper, continue from step 4. 4 Touch the [OK] key in the special modes screen. You will return to the main screen of copy mode. 5 Place the originals on the document glass. (page 4-3) Scan - Sharp AR-M355U | AR-M355 | AR-M455 Operation Manual Suite - Page 125
return the X and Y values to the initial settings configured in the key operator programs, touch the [SIZE RESET] key. ("CARD SHOT SETTINGS" on page 15 of the key operator's guide). ●To have the images enlarged or reduced by a suitable ratio based on the entered original size so that the front and - Sharp AR-M355U | AR-M355 | AR-M455 Operation Manual Suite - Page 126
glass" (page 4-11). 7 Press the [START] key. The front side of the card is scanned. 10Touch the [READ-END] key. NOTE The original must be placed on the document glass. The document feeder (automatic document feeder) cannot be used. To cancel the card shot function, touch the [CANCEL] key in the - Sharp AR-M355U | AR-M355 | AR-M455 Operation Manual Suite - Page 127
document feeder is being used, see pages 4-7 through 4-10. If the document glass is being used, see pages 4-11 through 413. To cancel the mirror image function, touch the [MIRROR IMAGE a large amount of toner) can be printed with black/white reverse to reduce toner consumption. Original B/W reverse - Sharp AR-M355U | AR-M355 | AR-M455 Operation Manual Suite - Page 128
paper sizes may cause the printed contents to be cut off or the print position to shift. ● If a copy job with a print menu setting is saved using the document use the special modes in the Job settings / print screen (or the document filing print screen in the Web page if the machine is connected to - Sharp AR-M355U | AR-M355 | AR-M455 Operation Manual Suite - Page 129
setting has not been selected. Selected during selection of the print menu setting. Not selected, print menu setting has already been selected. The image displayed within each key varies depending on the key position. 3 Select the print menu. LAYOUT CANCEL DATE STAMP PAGE NUMBERING TEXT OK - Sharp AR-M355U | AR-M355 | AR-M455 Operation Manual Suite - Page 130
that follow If an automatic document feeder is being used, see pages 4-7 through 4-10. If the document glass is being used, see Printing operation Margin shift Like the copy image, the printed contents are shifted in image" or "B/W reverse", printing takes place normally at the set position - Sharp AR-M355U | AR-M355 | AR-M455 Operation Manual Suite - Page 131
whether to print on only the first page, or all pages. The touched key is highlighted. 6 Touch the [OK] key. CANCEL CURRENT SETTING 2004/AUG/01 DATE CHANGE OK FIRST PAGE ALL PAGES 7 Continue from step 4 of "Common operation procedure for using the print menu" (page 5-30). NOTE To cancel a date - Sharp AR-M355U | AR-M355 | AR-M455 Operation Manual Suite - Page 132
SPECIAL MODES ■ Printing a stamp (reverse text) on copies A message such as "CONFIDENTIAL" can be printed in reverse text on copies. The following 12 messages are available. CONFIDENTIAL PRIORITY PRELIMINARY FINAL FOR YOUR INFO. DO NOT COPY IMPORTANT COPY URGENT DRAFT TOP SECRET PLEASE - Sharp AR-M355U | AR-M355 | AR-M455 Operation Manual Suite - Page 133
scanned original pages is automatically used. If you need to enter the total pages manually (for example, when a large number of originals are scanned in batches), touch the [MANUAL "Card shot", the number of copied images is the total pages. ● When specifies the sheet of paper (not the page number) - Sharp AR-M355U | AR-M355 | AR-M455 Operation Manual Suite - Page 134
2 1 Front cover image Insert Back cover image image Items that are selected are reflected in the print image on the right side must be copied on. 10Touch the [OK] key. CANCEL OK TOTAL PAGE AUTO MANUAL PAGE NUMBER 11Continue from step 4 of "Common operation procedure for using the print - Sharp AR-M355U | AR-M355 | AR-M455 Operation Manual Suite - Page 135
SPECIAL MODES Examples of page number printing Page number printing during one-sided copying (5 originals) Setting TOTAL PAGE FIRST NUMBER LAST NUMBER PRINTING STARTS FROM SHEET Printed contents when settings are changed as follows Value AUTO 1 AUTO 1 1st page 2nd page 3rd page 4th page 5th page - Sharp AR-M355U | AR-M355 | AR-M455 Operation Manual Suite - Page 136
SPECIAL MODES Page number printing during two-sided copying of body pages with covers (one-side copying) inserted (9 originals) Setting Value 1st page (front cover) Front Back 2nd page Front Back 3rd page Front Back 4th page Front Back 5th page Front Back TOTAL PAGE AUTO FIRST NUMBER 1 - Sharp AR-M355U | AR-M355 | AR-M455 Operation Manual Suite - Page 137
. (Go to step 6.) 4 The stored text sequences will appear as keys. Touch the key of the desired text sequence. TEXT RECALL No.01 TARO YAMADA 3 No.04 No.02 October, 2004 Meeting No.05 No.03 No.06 CANCEL OK 6 DIRECT ENTRY 1/5 The selected text sequence key is highlighted. If the desired - Sharp AR-M355U | AR-M355 | AR-M455 Operation Manual Suite - Page 138
entry screen. If no free keys appear, change screens with the or key. 5 Touch the [BACK] key. 3 6 04 Minutes of meeting BACK 1/5 05 06 The entered text is stored. 4 Touch the text key that you wish to edit or delete. TEXT STORE/DELETE No.01 TARO YAMADA No.02 October, 2004 Meeting No - Sharp AR-M355U | AR-M355 | AR-M455 Operation Manual Suite - Page 139
SPECIAL MODES ■ Checking and changing the print layout You can check the print layout after the print items have been selected. If needed you can change the print position or delete print content. 1 Touch the [LAYOUT] key on the print menu screen. LAYOUT DATE CANCEL STAMP OK OK 1/ PAGE - Sharp AR-M355U | AR-M355 | AR-M455 Operation Manual Suite - Page 140
settings has been prohibited in the key operator programs, you will not be able to store a job program. (See page 15 of the key operator's guide.) 4 Select the copy settings that you wish to store in the job program. TO STORE, MAKE SELECTIONS AND PRESS [OK], TO DELETE, PRESS [CANCEL]. SPECIAL - Sharp AR-M355U | AR-M355 | AR-M455 Operation Manual Suite - Page 141
settings has been prohibited in the key operator programs, you will not be able to clear a job program. (See page 15 of the key operator's guide.) 5-42 - Sharp AR-M355U | AR-M355 | AR-M455 Operation Manual Suite - Page 142
job while the interrupt original is being scanned or while you are selecting copy settings, touch the [CANCEL] key. 2 Place the original for the interrupt copy job in the document feeder or on the document glass (page 4-3). 3 Select the exposure mode, paper size, number of copies, and any other - Sharp AR-M355U | AR-M355 | AR-M455 Operation Manual Suite - Page 143
- Sharp AR-M355U | AR-M355 | AR-M455 Operation Manual Suite - Page 144
6 MACHINE MAINTENANCE (FOR COPYING) This chapter explains procedures for cleaning the machine, and troubleshooting. Page USER MAINTENANCE 6-2 ● Cleaning the document glass and the automatic document feeder ....... 6-2 ● Cleaning the main charger of the photoconductive drum 6-2 TROUBLESHOOTING - Sharp AR-M355U | AR-M355 | AR-M455 Operation Manual Suite - Page 145
USER MAINTENANCE Cleaning the document glass and the automatic document feeder If the document glass, document cover or automatic document scanning unit have dirty spots, these spots will form lines in scanned images. These will show up as defects when the images not solve the problem, pull the knob - Sharp AR-M355U | AR-M355 | AR-M455 Operation Manual Suite - Page 146
. Black lines appear on copies when the Clean the original scanning area. (See page automatic document feeder is used. 6-2.) Original smudged or blotchy? Use a clean original. Image cannot be Is the auto paper select or auto image Rotation copy functions only if the machine rotated. function - Sharp AR-M355U | AR-M355 | AR-M455 Operation Manual Suite - Page 147
SAVING A DOCUMENT IMAGE FILE 7-6 ● Quick File 7-6 ● Filing 7-7 ● Print jobs 7-9 ● Scan Save 7-10 CALLING UP AND USING A FILE 7-13 ● Searching for and calling up a saved file 7-13 ● Calling up and using a saved file 7-15 CUSTOM SETTINGS 7-21 ● Creating, editing, and deleting user names and - Sharp AR-M355U | AR-M355 | AR-M455 Operation Manual Suite - Page 148
(printer data, page 7-9) Transmission in fax/image send mode (filing, page 7-7) and Scanning a document only (scan save, page 7-10) Save to machine's hard disk HDD Call up a saved file to reuse it. Machine hard disk Print Send (facsimile expansion kit or network scanner expansion kit required - Sharp AR-M355U | AR-M355 | AR-M455 Operation Manual Suite - Page 149
or fax/ image send mode): User name : User unknown password can be set for a file saved in one of these folders. ■ Attributes of saved files The protect setting can be selected for files saved with the document filing function. This prevents a file from being moved or automatically or manually - Sharp AR-M355U | AR-M355 | AR-M455 Operation Manual Suite - Page 150
if you make a mistake when entering a password or numeric setting. This key is also used to cancel scanning of a document. (6) [CA] key Use this key to edit or delete a user name or custom folder. Saving files To save files to the main folder or custom folders, a user name must be previously - Sharp AR-M355U | AR-M355 | AR-M455 Operation Manual Suite - Page 151
key Touch to check the use of the machine's hard disk. (3) [SEARCH] key Touch to search for a file by user name, file name, or folder name. (4) [SCAN TO HDD] key Touch to select scan save. Scan save is used to save the image file of a scanned document in the main folder or a custom folder without - Sharp AR-M355U | AR-M355 | AR-M455 Operation Manual Suite - Page 152
document in copy mode, printer mode, or fax/image transmission mode, "QUICK FILE" can be selected to save an image of the document to the Quick File folder. The image can be called up at a later time, allowing you to print or transmit the document document feeder" document, the warning "THE SCANNED - Sharp AR-M355U | AR-M355 | AR-M455 Operation Manual Suite - Page 153
settings. UTO See steps 1 to 8 of ORIGINAL "Making copies with the AUTO EXPOSURE automatic document feeder" on pages 4-7 to 4-8 and "ADJUSTING AUTO A4 THE EXPOSURE" on page 4-14 5 Touch the [OK] key. The touched user name is selected and you return to the screen of step 3. The selected - Sharp AR-M355U | AR-M355 | AR-M455 Operation Manual Suite - Page 154
DOCUMENT IMAGE FILE 9 Touch the [OK] key. FOLDER OK 2/2 The touched folder is selected and you return to the screen of step 7. The selected folder name is displayed. 14You will return to the screen of step 10. The set password is displayed with " ". PASSWORD , the USER NAME password that will - Sharp AR-M355U | AR-M355 | AR-M455 Operation Manual Suite - Page 155
SAVING A DOCUMENT IMAGE FILE Print jobs Print jobs sent to the machine using the machine's printer driver can be FILE FOLDER FILE NAME Tanaka7890123456 Suzuki7890123456 SEARCH BACK USER NAME DATE 1 1 User unknown 2004/10/01 User unknown 2004/10/01 PRINTS Touch the key of the file that - Sharp AR-M355U | AR-M355 | AR-M455 Operation Manual Suite - Page 156
DOCUMENT IMAGE FILE Scan Save Scan save is used to save a scanned document image in the main folder or the custom folder without copying or transmitting it. 1 Press the [DOCUMENT 5 The screens for selecting the user name, file name, folder, size, see "Manually setting the scanning size" on page - Sharp AR-M355U | AR-M355 | AR-M455 Operation Manual Suite - Page 157
feeder must be used. Scanning begins. If you are using the document glass, touch the [READ-END] key after all pages have been scanned. NOTE This completes the scan save procedure. Follow the steps below when you wish to call up the image and print or transmit it. 18The saved image can be called - Sharp AR-M355U | AR-M355 | AR-M455 Operation Manual Suite - Page 158
to the 2in1 function described in the fax and network scanner manuals. It is also equivalent to the "Multi shot" function in copy mode; however, only 2in1 is possible for scan save.) This function reduces two original pages and arranges the images on a single page in a uniform layout. (5) (4) [JOB - Sharp AR-M355U | AR-M355 | AR-M455 Operation Manual Suite - Page 159
folder name, or user name to quickly search for the file. To search for a file, touch the [SEARCH] key in the main screen of document filing mode or in searching for a file 1 Touch the [SEARCH] key in the main screen of document filing mode or in a screen that shows folders or files in a folder. - Sharp AR-M355U | AR-M355 | AR-M455 Operation Manual Suite - Page 160
file name or folder name. SEARCH FILE OR FOLDER NAME Product specifications Products Product_info CANCEL SEARCH AGAIN USER NAME Yamada Sato Akata DATE 2003/12/30 2003/12/30 ●See page 7-5 for a list of the document filing icons. ●When a file name is touched, the operation selection screen - Sharp AR-M355U | AR-M355 | AR-M455 Operation Manual Suite - Page 161
file (page 7-16). ● [Send] : Transmit the saved file (page 7-17). The file can be transmitted by Scan to E-mail, Scan to FTP, fax, or Internet fax. (All of these methods require installation of the appropriate options.) (Page 1-11) ● [Property change] : Change the attribute of the saved file (page - Sharp AR-M355U | AR-M355 | AR-M455 Operation Manual Suite - Page 162
(2) (3) JOB SETTINGS Basic specifications SELECT THE JOB. PRINT Yamada staple sort functions, and to select the output tray. (3) [2-SIDED] key When performing two-sided printing, use this key to select the orientation of the image on the back side of the paper. To have the front and back images - Sharp AR-M355U | AR-M355 | AR-M455 Operation Manual Suite - Page 163
to Email/FTP and the resolution is set when performing a fax or Internet fax transmission. (2) [FILE FORMAT] key [FILE FORMAT] key is displayed in E-mail/FTP mode. Touch this key to set the file format of scan images that you transmit. (3) [FILE NAME/USER NAME] display This shows the file name and - Sharp AR-M355U | AR-M355 | AR-M455 Operation Manual Suite - Page 164
to directly enter the destination for a Scan to E-mail/FTP or Internet fax transmission, . ● Touch this key to enter the sub-address and passcode for an F-code fax transmission. NOTE See the "Operation manual (for facsimile)" and "Operation manual (for network scanner)" for detailed explanations of - Sharp AR-M355U | AR-M355 | AR-M455 Operation Manual Suite - Page 165
using [PROPERTY CHANGE] to change the attribute to [SHARING] or [CONFIDENTIAL]. JOB SETTINGS / MOVE Basic specifications Yamada Taro SELECT THE FOLDER THE FILE IS MOVED TO. FILE NAME Basic specifications 8A1/24x11 MOVE TO: CANCEL MOVE 1 Touch the [MOVE TO:] key and select the folder to - Sharp AR-M355U | AR-M355 | AR-M455 Operation Manual Suite - Page 166
, touch the [DETAIL] key. X JOB DETAIL CALL INTERNET FAX Use the keys to change screens. When you are finished, touch more keys Tanaka7890123456 14:38 12/09 01 than can appear in one screen and NAME COPY_20041021_153050 DATA SIZE: 21,987,543KB DOCUMENT 1-SIDED STYLE: SPECIAL MODES: FILE - Sharp AR-M355U | AR-M355 | AR-M455 Operation Manual Suite - Page 167
for the selected operation. (1) (2) CUSTOM SETTINGS DOCUMENT FILING CONTROL OK 2 Touch the [DOCUMENT CONTROL] key. TOTAL COUNT DEFAULT SETTINGS ADDRESS CONTROL SENDER CONTROL DOCUMENT FILING CONTROL KEY OPERATOR P FILING USER NAME REGISTRATION CUSTOM FOLDER REGISTRATION AMEND/DELETE - Sharp AR-M355U | AR-M355 | AR-M455 Operation Manual Suite - Page 168
, touch the [STORED TO:] key. If you wish to use the main folder, go to step 8. No.001 REGISTRATION IS COMPLETED. USER NAME Yamada PASSWORD SELECT THE DEFAULT FOLDER THE FILE STORED TO: MAIN FOLDER 7 The folders that have been created appear. Touch the desired folder. If you wish to create a new - Sharp AR-M355U | AR-M355 | AR-M455 Operation Manual Suite - Page 169
any previously saved data (files or folders). After entering the password, the following screen will appear. USER NAME / AMEND/DELETE No.001 USER NAME Yamada DELETE EXIT INITIAL Yamada PASSWORD SELECT THE DEFAULT FOLDER THE FILE WITH THIS USER NAME IS STORED. STORED TO: MAIN FOLDER ● To edit - Sharp AR-M355U | AR-M355 | AR-M455 Operation Manual Suite - Page 170
Sasaki 1/1 Hasegawa Ono Nakata Yamada ALL FOLDERS ABCD EFGHI JKLMN OPQRST UVWXYZ ADD NEW When you touch a user name, a password entry screen appears. If you touched the [ADD NEW] key, program a user name as explained on page 7-22. The folder name programmed in step 1 will be selected as the - Sharp AR-M355U | AR-M355 | AR-M455 Operation Manual Suite - Page 171
steps 1 to 10 to create a new folder. ■ Editing/deleting a custom folder To edit a previously created folder (change the folder name, initial, password, or user name), or to delete a folder, follow steps 1 and 2 on page 7-21 and then follow the steps below. When deleting a folder... A folder - Sharp AR-M355U | AR-M355 | AR-M455 Operation Manual Suite - Page 172
ABC/abc] key during entry to return to alphabetical character entry. You can also enter numbers and symbols. 9 When finished, touch the [OK] key. Sharp äÄ The cursor ( ) moves forward and a space is entered. 7-26 You will exit the character entry screen and return to the programming screen. If you - Sharp AR-M355U | AR-M355 | AR-M455 Operation Manual Suite - Page 173
■ Entering numbers and symbols 1 Touch the [AB/ab 12#$%] key. ENTERING CHARACTERS 3 When you have finished entering characters, touch the [OK] key. 1&1 When the characters "12#$%" are highlighted, number/symbol entry mode is selected. 2 Enter the desired number or symbol. Numbers and symbols that - Sharp AR-M355U | AR-M355 | AR-M455 Operation Manual Suite - Page 174
using the document filing function. If you experience any difficulty, refer to the following table. For information on general machine problems, printer problems, fax problems, and network scanner problems, please see the troubleshooting sections of the appropriate manuals. Problem A saved file - Sharp AR-M355U | AR-M355 | AR-M455 Operation Manual Suite - Page 175
CHAPTER 8 SPECIFICATIONS This chapter contains useful information about the machine. Page SPECIFICATIONS 8-2 LIST OF COMBINATION OF PERIPHERAL DEVICES 8-4 INDEX ...8-5 8-1 - Sharp AR-M355U | AR-M355 | AR-M455 Operation Manual Suite - Page 176
(D)) For power supply requirements, see the name plate located on the back of the main unit. Temperature: 50°F to 86°F (10°C to 30°C) Humidity: 20% to 85% Automatic document feeder Name Original size Weight of originals Number of originals Power supply Dimensions Weight B/W scanner module/DSPF 11 - Sharp AR-M355U | AR-M355 | AR-M455 Operation Manual Suite - Page 177
SPECIFICATIONS Continuous copying speed (when the offset function is not used) AR-M355N AR-M455N Copy paper size 100% / Reduced / Enlarged 11" x 17" (A3) 17 copies/min. 20 copies/min. 8-1/2" x 14" (B4) 20 copies/min. 22 copies/min. 8-1/2" x 11" (A4) 35 copies/ - Sharp AR-M355U | AR-M355 | AR-M455 Operation Manual Suite - Page 178
unit Related to extension of functions and others PS3 expansion kit Network scanner expansion kit Facsimile expansion kit Fax memory (8 MB) *1 *1 *1 *1 *1 *1 *1 *1 = ( A ) and ( B) must be installed together. *1 = ( A) requires installation of one of the ( B) units. = Cannot be installed together - Sharp AR-M355U | AR-M355 | AR-M455 Operation Manual Suite - Page 179
shut-off mode 1-8 Automatic copy image rotation 4-4 Automatic document feeder 1-9, 2-22, 4-2 -1-sided copies 4-7 -Acceptable originals 4-2 -Automatic two-sided copying 4-10 -Misfeed original 2-22 -Setting originals 4-3 -User maintenance 6-2 Automatic exposure adjustment 4-14 Automatic - Sharp AR-M355U | AR-M355 | AR-M455 Operation Manual Suite - Page 180
adjustment 4-14 Manual selection 4-16 Margin shift 1-4, 5-2, 5-3 Meaning of "R 1-2 Mirror image 1-6, 5-2, 5-28 Misfeed 2-17 to 2-22, 3-6, 3-12, 3-22 to 3-23 Misfeed in the paper feed area 2-20 to 2-21 Misfeed original 2-22 Misfeed removal 2-17 -Automatic document feeder 2-22 -Bypass - Sharp AR-M355U | AR-M355 | AR-M455 Operation Manual Suite - Page 181
the toner cartridges 2-15 Right output tray 1-11 Rotation copying 4-4 ■S Saddle stitch 1-7, 3-14, 3-17 Saddle stitch finisher 1-11, 3-14 Saddle stitch tray 3-14 [SADDLE STITCH] key 3-18 Saving a document image file 7-6 to 7-12 -Filing 7-7 to 7-8 -Print jobs 7-9 -Quick file 7-6 -Scan save - Sharp AR-M355U | AR-M355 | AR-M455 Operation Manual Suite - Page 182
Transparency inserts 1-5, 5-2, 5-22 Tray 1-9 Troubleshooting -Copier operation 6-3 -Document filing function 7-28 -Duplex module 3-4 - paper 2-3 to 2-4 Types and sizes of paper that can be used 2-3 ■U Upper exit tray extension 1-9, 1-11 Upper paper output area 1-9 User maintenance 6-2 User - Sharp AR-M355U | AR-M355 | AR-M455 Operation Manual Suite - Page 183
any representations or warranties on behalf of Sharp. Specifically, SHARP DOES NOT EXTEND TO YOU, THE END-USER, ANY EXPRESS WARRANTY OR ANY IMPLIED WARRANTY OF MERCHANTABILITY, FITNESS FOR USE OR FITNESS FOR ANY PARTICULAR PURPOSE IN CONNECTION WITH THE HARDWARE, SOFTWARE OR FIRMWARE EMBODIED IN, OR - Sharp AR-M355U | AR-M355 | AR-M455 Operation Manual Suite - Page 184
14 • DOCUMENT FILING PROGRAMS 16 Be sure to become thoroughly familiar with this manual to gain the maximum benefit from the product. Before installing this product, be sure to read the installation requirements and cautions sections of the "Operation manual (for general information and copier - Sharp AR-M355U | AR-M355 | AR-M455 Operation Manual Suite - Page 185
MANUAL (for printer) LASER PRINTER Be sure to become thoroughly familiar with this manual to gain the maximum benefit from the product. Before installing this product, be sure to read the installation requirements and cautions sections of the "Operation manual (for general information and copier - Sharp AR-M355U | AR-M355 | AR-M455 Operation Manual Suite - Page 186
arising from or related to the use of this operation manual. © Copyright SHARP Corporation 2004. All rights reserved. Reproduction, adaptation or translation of Sharp Corporation. Microsoft®, Windows®, Windows® 95, Windows® 98, Windows® Me, Windows NT® 4.0, Windows® 2000, Windows® XP, Windows® Server - Sharp AR-M355U | AR-M355 | AR-M455 Operation Manual Suite - Page 187
BASIC PRINTING PROCEDURES SETTING THE PRINTER DRIVER 1-2 G Printer driver settings in Windows (selecting and setting print conditions Printer settings 5-5 G Network settings 5-7 CHAPTER 6 TROUBLESHOOTING TROUBLESHOOTING 6-2 G Checking the IP address 6-4 CHAPTER 7 APPENDIX PRINTER SPECIFICATIONS - Sharp AR-M355U | AR-M355 | AR-M455 Operation Manual Suite - Page 188
1 BASIC PRINTING PROCEDURES This chapter explains how to configure printer driver settings at your computer, and provides basic information on printing. Page SETTING THE PRINTER DRIVER 1-2 G Printer driver settings in Windows (selecting and setting print conditions) ..1-2 G Using the Help file - Sharp AR-M355U | AR-M355 | AR-M455 Operation Manual Suite - Page 189
the [Setup] tab in the printer driver properties. The SHARP AR-M455N PCL6 properties is shown as an example. I Windows NT4.0 / 2000 / XP / Server 2003 The procedure for adjusting the settings in Windows XP is explained in the following. 1 Select [Printers and Faxes] from the [Start] menu. 2 Right - Sharp AR-M355U | AR-M355 | AR-M455 Operation Manual Suite - Page 190
the [Job Handling] tab of the printer driver window. 1 Follow steps 1 and 2 on page 1-2. 2 Click the [Job Handling] tab. 4 Enter a user name and a job name in in the printer driver, open the Help file. I Opening Help in Windows This window is the SHARP AR-M455N PCL6 Properties in Windows Me. Click - Sharp AR-M355U | AR-M355 | AR-M455 Operation Manual Suite - Page 191
4.0 Click the [Properties] button to open the printer driver properties window. (2) In Windows 2000/XP/Server 2003 Select the [SHARP AR-M455N PCL6] printer icon in [Select Printer].In Windows 2000, the properties consist of five tabs: [Main], [Paper], [Advanced], [Job Handling], and [Watermarks]. In - Sharp AR-M355U | AR-M355 | AR-M455 Operation Manual Suite - Page 192
THE PRINTER DRIVER Check the paper size to make sure it is correct. Next, specify the paper feeding method in [Paper Selection]. Normally [Auto Select] is used. When finished, click the [OK] button to close the printer properties window. 7 Click the [OK] button in the Print window in Windows 95 - Sharp AR-M355U | AR-M355 | AR-M455 Operation Manual Suite - Page 193
2003 In [Select Printer], select the "SHARP AR-M455N PCL6" printer icon. In Windows 2000, the properties consist of five tabs: [Main], [Paper], [Advanced], [Job Handling], and [Watermarks]. In Windows XP/Server 2003, click the [Preferences] button to open the printer driver properties. (1) To use - Sharp AR-M355U | AR-M355 | AR-M455 Operation Manual Suite - Page 194
settings. (See "Custom settings" in the "Operation manual (for general information and copier operation)".) If you select [Paper Source] or [Paper Type], be sure to configure the tray settings in the [Configuration] tab of the printer driver properties. 6 Adjust the print contrast settings as needed - Sharp AR-M355U | AR-M355 | AR-M455 Operation Manual Suite - Page 195
PROPERTIES This chapter explains how to configure settings in the printer driver. The settings are changed in the software application. Page SELECTING PRINTING FUNCTIONS 2-2 G Settings in the [Main] tab 2-2 G Settings in the [Paper] tab 2-6 G Settings in the [Advanced] tab 2-9 G Settings in the - Sharp AR-M355U | AR-M355 | AR-M455 Operation Manual Suite - Page 196
from an application is explained in this section. (The windows that are shown are the AR-M455N PCL6 printer driver in Windows Me.) The following optional peripheral devices are installed in the printer driver windows: B/W scanner module/DSPF + Saddle stitch finisher + Mail-bin stacker + Punch - Sharp AR-M355U | AR-M355 | AR-M455 Operation Manual Suite - Page 197
up to 30 sets of settings, allowing the settings to be easily changed by simply selecting the desired set. Default setting: Factory Defaults [Save] Save the settings under the name that appears in "User Settings". Up to 20 characters can be entered for the name. If none of the settings have been - Sharp AR-M355U | AR-M355 | AR-M455 Operation Manual Suite - Page 198
Original image [Right] Right binding [Top] Top binding Binding edge Binding edge Binding edge Default setting: Left [Staple] [None Do not staple. [1 Staple]........ Staple in one place. [2 Staples] ...... Staple in two places. Default setting: None Pamphlet stapling function The paper is stapled - Sharp AR-M355U | AR-M355 | AR-M455 Operation Manual Suite - Page 199
When using the punch function, the automatic image rotation function does not operate. Paper sizes that can be punched are indicated in the specifications on page 3-15 of the "Operation manual (for general information and copier operation)". [Example] {Original 1} {Punch positions} (8) [No Offset - Sharp AR-M355U | AR-M355 | AR-M455 Operation Manual Suite - Page 200
in the application, the paper size setting in the printer driver is used. [Fit To Page] When this checkbox is selected, the print image corresponding to the paper size selected in [Paper Size] is automatically reduced or enlarged to fit the paper selected in [Fit To Paper Size]. Default setting: Not - Sharp AR-M355U | AR-M355 | AR-M455 Operation Manual Suite - Page 201
installed.) (7) Transparency Inserts The printer can be instructed to separate the transparencies by inserting blank sheets of paper. Click this button to open the window for selection of transparency insert settings. This cannot be selected when two-sided printing, the staple function, or the punch - Sharp AR-M355U | AR-M355 | AR-M455 Operation Manual Suite - Page 202
] can be stored, allowing settings to be changed by simply selecting a set. Default settings: No Different Paper [Save] Click this button to save a set of different paper settings. A [User Settings] window will appear. User setting text entries can be up to 20 characters long. If a [Delete] button - Sharp AR-M355U | AR-M355 | AR-M455 Operation Manual Suite - Page 203
GL/2). [Raster] is used to print with raster graphics, and [Vector] is used to print with Vector (HP-GL/2) commands. Default setting: Vector (HP-GL/2) (2) Image Adjustment This field is used to adjust the brightness and contrast. [Brightness] This adjusts the brightness of colors. The brightness can - Sharp AR-M355U | AR-M355 | AR-M455 Operation Manual Suite - Page 204
to create margin at the left, right, or top of the paper. Select [None], [0.4 in.], [0.8 in.], or [1.2 in.]. Default setting: None One-sided copying Print data Image shifted to the right Image shifted Image shifted to the left to the bottom Margin (6) Overlays This function is used to print - Sharp AR-M355U | AR-M355 | AR-M455 Operation Manual Suite - Page 205
Image. The image quality might be down for Line Art. (10) Toner Save Select this to save toner. Solids will be printed in halftone to reduce toner " in "Network settings" on page 5-7 of the key operator program.) Default setting: Not selected To cancel a tandem printing job Touch the [STOP/DELETE - Sharp AR-M355U | AR-M355 | AR-M455 Operation Manual Suite - Page 206
. A name (user name, file name, etc) can be assigned to the file for easy searching. For information on using this function at the operation panel of the machine, see chapter 7, "Document filing function", of the "Operation manual (for general information and copier operation)". Default setting: Not - Sharp AR-M355U | AR-M355 | AR-M455 Operation Manual Suite - Page 207
are satisfactory, the user initiates printing from the operation panel of the machine and the remaining sets are printed. (The sample set is included in the total number of sets.) If the sample set is not satisfactory, the job can be deleted. [Pass Code] (5-digit number) To require that a passcode - Sharp AR-M355U | AR-M355 | AR-M455 Operation Manual Suite - Page 208
Default setting: Selected (4) Auto Job Control Review Select this to have the job control screen always open when printing from the printer driver. If you changed the account number, user that appears in [Job ID] in the [Job Control] window (which appears when printing is executed) will appear in the - Sharp AR-M355U | AR-M355 | AR-M455 Operation Manual Suite - Page 209
and bottom of the preview screen. Default setting: x: 0, y: 0 NOTE The image that appears in the Watermark Preview is an approximate representation of what will appear in the print. [Center] Select this setting to have the watermark printed in the center of the paper. (2) Size Use this setting to - Sharp AR-M355U | AR-M355 | AR-M455 Operation Manual Suite - Page 210
explains various functions that allow you to access the Web pages in the printer from your computer. Page REMOTE OPERATION VIA A NETWORK 3-2 G How to access the Web page and view Help 3-2 ABOUT THE WEB PAGES (FOR USERS 3-3 G Directly printing a file on a computer 3-4 ABOUT THE WEB PAGES (FOR THE - Sharp AR-M355U | AR-M355 | AR-M455 Operation Manual Suite - Page 211
user Web pages, users can monitor the machine, and directly print a file specified on a computer. In the administrator Web pages, the administrator can configure the machine's e-mail settings, settings for print by e-mail, and passwords the "General" button or the "Document Filing" button in Help in - Sharp AR-M355U | AR-M355 | AR-M455 Operation Manual Suite - Page 212
Test Page The "Printer Settings List", which shows printer condition settings and key operator settings, and various font lists can be printed. (5) Admin Mode To open the Web pages for the administrator, click here and then enter the administrator's user name and password. ABOUT THE WEB PAGES - Sharp AR-M355U | AR-M355 | AR-M455 Operation Manual Suite - Page 213
Left / Top / Right) Left Duplex To print on both sides of the paper, select this checkbox. (Only for models that support the two-sided printing.) Not selected Staple Select a staple setting. (Off / 1 Staple / 2 Staples) Off Account Number Quick File When "AUDITING MODE" is enabled in the key - Sharp AR-M355U | AR-M355 | AR-M455 Operation Manual Suite - Page 214
and the output counts for the printer and copy functions. The e-mail addresses of the recipients and the schedule must be entered. (page 3-11) (5) Alerts Message This is used to send information on error conditions such as when the machine runs out of paper or toner, or a misfeed or failure occurs - Sharp AR-M355U | AR-M355 | AR-M455 Operation Manual Suite - Page 215
can be set for the administrator and a password can be set for users. 1 Click [Passwords] in the menu frame. 2 Enter the current password in "Admin Password". When establishing a password for the first time, enter "Sharp" in "Admin Password". CAUTION Be sure to enter "S" in upper case and "harp - Sharp AR-M355U | AR-M355 | AR-M455 Operation Manual Suite - Page 216
the printer driver. Files with the extensions pcl, ps*, pdf*, tiff, tif, and prn can be printed. *The PS3 expansion kit is required. (Encrypted PDF files an FTP server from the operation panel of the machine 1 Press the [DOCUMENT FILING] key twice to display the global access screen. 3 Select the - Sharp AR-M355U | AR-M355 | AR-M455 Operation Manual Suite - Page 217
A4 PAPER SELECT QUICK FILE OUTPUT 2-SIDED TANDEM PRINT CANCEL NUMBER OF PRINTS 1 (1~999) PRINT Print settings can be changed in this screen before printing. For more information on the print settings, see page 7-16 of the operation manual (for general information and copier operation). The image - Sharp AR-M355U | AR-M355 | AR-M455 Operation Manual Suite - Page 218
extensions pcl, ps*, pdf*, tiff, and tif can be printed. *The optional PS3 extension kit is required. The number PRINTER CONDITION SETTINGS" in the "PRINTER DEFAULT SETTINGS" menu of the user settings. G Encrypted PDF files cannot be printed, with the exception of files encrypted with a null password - Sharp AR-M355U | AR-M355 | AR-M455 Operation Manual Suite - Page 219
and E-mail Alert settings These functions send information on machine use (print count, copy count, etc.) and error conditions (paper misfeed, out of paper, out of toner, etc.) via e-mail to the administrator of the machine or the dealer. I Information setup Machine identification information - Sharp AR-M355U | AR-M355 | AR-M455 Operation Manual Suite - Page 220
for the printer will be transmitted to the specified addresses via E-mail each time a specified event occurs. The meaning of each event item is shown below. Example: Paper Jam: A paper misfeed has occurred. Toner Low: Toner is low. Toner Empty: Toner must be added. Paper Empty: Paper must be - Sharp AR-M355U | AR-M355 | AR-M455 Operation Manual Suite - Page 221
SETTINGS This chapter describes the printer configuration settings. Page MAKING CONFIGURATION SETTING 4-2 G Operation procedure common to all printer configuration settings (items that can be set from the operation panel 4-2 G Printer Default settings 4-4 G PCL settings 4-5 G PostScript settings - Sharp AR-M355U | AR-M355 | AR-M455 Operation Manual Suite - Page 222
error page is printed or not when a PostScript error has occurred. (See page 4-5.) * An optional PS3 expansion kit is needed. Operation procedure common to all printer touch the [OK] key. CUSTOM SETTINGS PRINTER DEFAULT SETTINGS COPIES ORIENTATION DEFAULT PAPER SIZE 1 PORTRAIT A4 To set another - Sharp AR-M355U | AR-M355 | AR-M455 Operation Manual Suite - Page 223
key operation for configuration setting CUSTOM SETTINGS PRINTER DEFAULT SETTINGS A DEFAULT OUTPUT TRAY CENTER TRAY These keys and indicator are available on setting screens that require the entry of numerical values. 20 (1 999) DEFAULT PAPER TYPE PLAIN B LINE THICKNESS 5 C D A The name - Sharp AR-M355U | AR-M355 | AR-M455 Operation Manual Suite - Page 224
SETTING Printer Default settings The default settings are used to set specific print conditions for printing in an environment where the print driver is not used (such as printing from MS-DOS or from a computer that does not have the provided print driver installed). NOTE When the printer driver is - Sharp AR-M355U | AR-M355 | AR-M455 Operation Manual Suite - Page 225
Operation manual (for general information and copier operation)") can be printed. When the optional extended font kit is installed, the "PCL EXTENDED FONT LIST" can be printed. I PCL LINE FEED CODE This setting is used to select how the printer responds when a line break command is received. Default - Sharp AR-M355U | AR-M355 | AR-M455 Operation Manual Suite - Page 226
CHAPTER 5 KEY OPERATOR PROGRAMS This chapter explains the key operator programs for the printer function. Key operators should read this chapter to ensure correct use of the key operator programs. Page KEY OPERATOR PROGRAMS 5-2 G Key operator program list 5-2 G Procedure - Sharp AR-M355U | AR-M355 | AR-M455 Operation Manual Suite - Page 227
list Program name Printer settings Default settings Prohibit notice page printing Print density level Prohibit test page printing A4/letter size auto change Interface settings Hexadecimal dump mode I/O timeout Enable parallel port Parallel port emulation switching Enable USB port USB port emulation - Sharp AR-M355U | AR-M355 | AR-M455 Operation Manual Suite - Page 228
CONTOROL FAX DATA RECEIVE/FORWARD KEY OPERATOR PROGRAMS 3 Use the numeric keys to enter the five-digit key operator code number. KEY OPERATOR CODE The factory default setting for the key operator code is indicated on page 2 of the key operator's guide. Follow these steps to PRINTER SETTINGS - Sharp AR-M355U | AR-M355 | AR-M455 Operation Manual Suite - Page 229
NetBEUI RESET THE NIC TANDEM SETTING PING COMMAND For information on the following settings, see the indicated manuals. General settings/copy settings/ document filing settings Image send settings Key operator's guide Operation manual (for facsimile) and Operation manual (for network scanner - Sharp AR-M355U | AR-M355 | AR-M455 Operation Manual Suite - Page 230
2-15 of "Operation manual (for general information and copier operation)") A4/letter size auto change If this program is set, and printing onto A4 size paper is selected but not available, the printer will automatically substitute 8-1/2" x 11" size paper in place of A4 paper if 8-1/2" x 11" paper is - Sharp AR-M355U | AR-M355 | AR-M455 Operation Manual Suite - Page 231
switching If the machine is connected using the USB port, select the emulated printer language. The setting items are the same as those of "Parallel port emulation switching". NOTE It is recommended to set "AUTO" (default setting) unless an error due to this setting occurs frequently. Enable - Sharp AR-M355U | AR-M355 | AR-M455 Operation Manual Suite - Page 232
Default setting: Enable Reset the NIC This program is used to reset all setting items of NIC (Network Interface Card) of this product to the factory default printers) print in tandem. Tandem printing is not possible if the other machine is a different model than your machine. The factory default - Sharp AR-M355U | AR-M355 | AR-M455 Operation Manual Suite - Page 233
CHAPTER 6 TROUBLESHOOTING This chapter provides solutions to problems you may encounter when using the machine. Be sure to read this chapter whenever you encounter a problem. Page TROUBLESHOOTING 6-2 G Checking the IP address 6-4 6-1 - Sharp AR-M355U | AR-M355 | AR-M455 Operation Manual Suite - Page 234
use, the copier function, document filing function or the network scanner function, please read "Troubleshooting" in the corresponding manuals. Problem Check Solution or cause Printer is on but data is Is the interface cable correctly connected? not received. Make sure the USB or parallel - Sharp AR-M355U | AR-M355 | AR-M455 Operation Manual Suite - Page 235
TROUBLESHOOTING Problem Check Solution or cause The printer driver Is there sufficient free space on your hard Delete any unneeded files and applications to increase cannot be installed. drive? free space on your hard drive. Are you using an operating system that is not Make sure your - Sharp AR-M355U | AR-M355 | AR-M455 Operation Manual Suite - Page 236
[PRINTER TEST PAGE] key. PRINTER TEST PAGE DOCUMENT FILING USER/FOLDER LIST NOTE There are a variety of different types of network environments. When using the machine in a network environment, refer to the detailed explanations in the online manual (Print Server Card Users Manual) in the Software - Sharp AR-M355U | AR-M355 | AR-M455 Operation Manual Suite - Page 237
CHAPTER 7 APPENDIX This chapter contains product specifications and other technical information. Page PRINTER SPECIFICATIONS 7-2 NOTICE PAGE PRINTING 7-3 PRINT AREA 7-4 7-1 - Sharp AR-M355U | AR-M355 | AR-M455 Operation Manual Suite - Page 238
10Base-T/100Base-TX Supported protocols: IPX/SPX, TCP/IP, EtherTalk, NetBEUI For detailed network specifications, see the manual for the print server card. (The manual is provided in PDF format in the Software CD-ROM (2).) Operating system IBM PC/AT or compatible computer: Windows® 95/98/Me - Sharp AR-M355U | AR-M355 | AR-M455 Operation Manual Suite - Page 239
selected exit tray or to the stapler compiler. In these cases printed paper will be delivered partly to the specified destination (tray or compiler) and programs, such as disabling of twosided printing, disabling of the staple function, or disabling of a specified exit tray. GAn invalid account - Sharp AR-M355U | AR-M355 | AR-M455 Operation Manual Suite - Page 240
the printer driver used and the type of software application. Approx. 11/64" (4.2mm) Paper size (OS/2) 16 DeskTop 17 PS Text 18 Microsoft Publishing 19 Math-8 20 PS Math No. Windows 3.1 Latin 1 30 Windows 3.1 Latin 2 31 Windows 3.1 Latin 5 32 Windows Baltic (not 3.1) 33 Windows - Sharp AR-M355U | AR-M355 | AR-M455 Operation Manual Suite - Page 241
document filing function. For programs related to the printer function, fax function, network scanner function, and internet fax function, see the following manuals: GPrinter Operation manual (for printer), chapter 5 GFax Operation manual (for facsimile), chapter 8 GNetwork scanner / Internet fax - Sharp AR-M355U | AR-M355 | AR-M455 Operation Manual Suite - Page 242
it possible to monitor each account's usage of the document filing function (a document filing count is kept). G A limit can be set for the number of scan-saved image file pages that can be printed. Programming a key operator code The key operator code is a 5-digit number that must be entered in - Sharp AR-M355U | AR-M355 | AR-M455 Operation Manual Suite - Page 243
document feeder 14 Quick scan from document glass 14 Initial margin shift setting 15 Erase width adjustment 15 Card shot settings 15 Setting a maximum number of copies 15 Disabling deletion of job programs 15 Disabling of bypass-tray in duplex copy 15 Disabling of auto paper selection - Sharp AR-M355U | AR-M355 | AR-M455 Operation Manual Suite - Page 244
in the display will change to asterisks ( ). The factory default setting for the key operator code number is 00000. 4 Touch the [KEY CHANGE] key . PRINTER NGS SETTINGS KEY OPERATOR CODE CHANGE program on page 7. OPERATOR CODE If you wish to configure a different program, select the program - Sharp AR-M355U | AR-M355 | AR-M455 Operation Manual Suite - Page 245
are available on setting screens that require the entry of numerical values. OK 20 (1 999) A ORIGINAL SIZE DETECTOR SETTING DISABLING OF DOCUMENT FEEDER 1/3 DISABLING OF DUPLEX DISABLING OF STAPLER B DISABLING OF PUNCH DISABLING OF OPTIONAL PAPER DRAWER C D E A When a key that appears - Sharp AR-M355U | AR-M355 | AR-M455 Operation Manual Suite - Page 246
600dpi x 600dpi SCANNING MODE FOR DOCUMENT FEEDER DISABLING OF BYPASS-TRAY IN DUPLEX COPY QUICK SCAN FROM DOCUMENT GLASS DISABLING OF AUTO PAPER SELECTION INITIAL MARGIN SHIFT SETTING DOCUMENT FILING SETTINGS DEFAULT MODE SETTINGS DEFAULT OUTPUT TRAY THE NUMBER OF USER NAME DISPLAYED SETTING - Sharp AR-M355U | AR-M355 | AR-M455 Operation Manual Suite - Page 247
pages per account G Resetting account G Account limit paper is not counted. When using the network scanner feature and fax feature, the number of transmitted pages can also be displayed or printed. (Touch the [IMAGE AUDITING MODE OK COPIES DOCUMENT FILING PRINTS IMAGE SEND G Auditing mode - Sharp AR-M355U | AR-M355 | AR-M455 Operation Manual Suite - Page 248
the numeric keys, and then enter limits for the copy, printer, and document filing functions. After entering each limit, touch the [ENTER] key. When finished, touch the [IMAGE SEND] key and then enter limits for fax send, E-MAIL/FTP and Internet-fax send. If you enter the number of an account that - Sharp AR-M355U | AR-M355 | AR-M455 Operation Manual Suite - Page 249
. (This setting is effective only for printing without use of the dedicated printer driver. If the printer driver is used, the printer driver setting will override the setting of this program.) Print data Example of print in the toner save mode Toner save in copy mode This program is used to save - Sharp AR-M355U | AR-M355 | AR-M455 Operation Manual Suite - Page 250
in main screen of copy mode Exposure adjustment screen in main screen of fax, Internet fax, Exposure level3 and network scanner modes (middle level) Exposure adjustment screen in [SCAN TO HDD] in main screen of document filing mode Auto clear setting If the machine is not used for a certain - Sharp AR-M355U | AR-M355 | AR-M455 Operation Manual Suite - Page 251
as EXTRA for all copier functions and no original size will be displayed. Disabling of document feeder This program is used to prevent use of the reversing automatic document feeder when it malfunctions. In this case, scanning can still be performed using the document glass. Disabling of duplex - Sharp AR-M355U | AR-M355 | AR-M455 Operation Manual Suite - Page 252
set for each paper tray in the paper tray settings of the user settings (page 2-5 of the "Operation manual (for general information and copier operation)"). 12 Optimization of a hard disk This is used to optimize the "Main folder" and "Custom folder" that are used for the document filing function - Sharp AR-M355U | AR-M355 | AR-M455 Operation Manual Suite - Page 253
default setting for the key operator code is 00000. Product key Use these programs to enter the product keys for the following options. PS3 expansion kit This program is used to enter the product key for the PS3 expansion kit (this allows the machine to be used as a PostScript compatible printer - Sharp AR-M355U | AR-M355 | AR-M455 Operation Manual Suite - Page 254
can be changed: Paper tray/Exposure tray/Copy ratio/2-sided copy/Out put (auto, sort, staple sort, group, output tray) NOTE If this program is used to change the default setting for the duplex function to other than "one-sided" "one-sided" and the automatic document feeder fails or is disabled - Sharp AR-M355U | AR-M355 | AR-M455 Operation Manual Suite - Page 255
two-sided copying. Disabling of auto paper selection This program is used to disable the auto paper selection function. When this program is enabled, paper that is the same size as the original placed on the document glass or in the automatic document feeder is not automatically selected. PROGRAMS - Sharp AR-M355U | AR-M355 | AR-M455 Operation Manual Suite - Page 256
SCAN TO E-MAIL/FTP], [FAX SEND], and [I-FAX SEND] keys control the corresponding transmission operations in the [JOB SETTINGS] transmission screen. Key operator authority setting When a password has been established for a file, user name or folder, this program is used to allow the key operator code - Sharp AR-M355U | AR-M355 | AR-M455 Operation Manual Suite - Page 257
resolution, touch the key of the desired resolution. Default exposure settings This is used to change the default exposure level for "SCAN TO HDD" of the document filing function. The default exposure is initially set to "AUTO". If changed to "MANUAL", the exposure level can be adjusted to five - Sharp AR-M355U | AR-M355 | AR-M455 Operation Manual Suite - Page 258
INSTALLING THE PRINTER DRIVER AND UTILITIES (SOFTWARE INSTALLATION) 3 • UNINSTALLING PRINTER DRIVERS AND PRINTER UTILITIES 15 • INSTALLING PRINTER DRIVERS USING THE "ADD PRINTER WIZARD" 16 • CONNECTING THE MACHINE TO YOUR COMPUTER 18 Be sure to become thoroughly familiar with this manual to - Sharp AR-M355U | AR-M355 | AR-M455 Operation Manual Suite - Page 259
arising from or related to the use of this operation manual. © Copyright SHARP Corporation 2004. All rights reserved. Reproduction, adaptation or translation Acknowledgments Microsoft®, Windows®, Windows® 95, Windows® 98, Windows® Me, Windows NT® 4.0, Windows® 2000, Windows® XP, Windows® Server 2003 - Sharp AR-M355U | AR-M355 | AR-M455 Operation Manual Suite - Page 260
Thank you for purchasing this product. This manual explains how to install the printer driver and utilities required for the printer function. To use the printer function, please read the following manuals. Software setup guide (for printer) (this manual) This explains the contents of the - Sharp AR-M355U | AR-M355 | AR-M455 Operation Manual Suite - Page 261
installation of the following utilities, and online manuals. G Printer Driver: The printer driver that is required for use of this product. "Software CD-ROM (1)" contains PCL5e and PCL6. G Printer Administration Utility*1: When using the printer in a network environment, this administration utility - Sharp AR-M355U | AR-M355 | AR-M455 Operation Manual Suite - Page 262
15. *1 To install the software from the CD-ROM, you must have administrator rights. *2 Windows 95 and Windows NT 4.0 are not supported. 2. Installation of the printer driver using the "Add printer wizard" Installation of the printer driver using the "Add printer wizard" is performed using basic - Sharp AR-M355U | AR-M355 | AR-M455 Operation Manual Suite - Page 263
, see the operating system manual or Help. Computer running Windows Computer running Windows Computer running Windows Computer running Windows To install the printer driver, see "Installing the printer driver (standard installation)" and "Installing the printer driver (custom installation)" on - Sharp AR-M355U | AR-M355 | AR-M455 Operation Manual Suite - Page 264
you wish to install the printer status monitor or the PC-FAX driver, click the [Utility Software] button in this window and then click the [Printer Status Monitor] or [PC-FAX Driver] button and follow the on-screen instructions. G If you wish to install the printer administration utility, click the - Sharp AR-M355U | AR-M355 | AR-M455 Operation Manual Suite - Page 265
the checkbox of the printer driver to be installed so that a checkmark appears. 12Select the printer driver being installed as the default printer and click the [Next] button. 13Check the contents of the window and click the [Next] button. Installation of the printer driver begins. NOTE When you - Sharp AR-M355U | AR-M355 | AR-M455 Operation Manual Suite - Page 266
you wish to install the printer status monitor or the PC-FAX driver, click the [Utility Software] button in this window and then click the [Printer Status Monitor] or [PC-FAX Driver] button and follow the on-screen instructions. G If you wish to install the printer administration utility, click the - Sharp AR-M355U | AR-M355 | AR-M455 Operation Manual Suite - Page 267
and click the [Next] button. Click the checkbox of the printer driver to be installed so that a checkmark appears. 13Select the printer driver being installed as the default printer and click the [Next] button. 14When the printer name window appears, click the [Next] button. If you wish to change - Sharp AR-M355U | AR-M355 | AR-M455 Operation Manual Suite - Page 268
INSTALLING THE PRINTER DRIVER AND UTILITIES (SOFTWARE INSTALLATION) I Using the machine as a shared printer via a server If the printer server in a Windows NT server environment, NetWare server environment, or other environment is configured to share the printer (the machine), follow the steps - Sharp AR-M355U | AR-M355 | AR-M455 Operation Manual Suite - Page 269
THE PRINTER DRIVER AND UTILITIES (SOFTWARE INSTALLATION) Installation method 2 Use this procedure to install the software in the following environments: 1. The printer is connected by USB cable or parallel cable. 2. Windows version: Windows XP/Server 2003 NOTE To install this software, you - Sharp AR-M355U | AR-M355 | AR-M455 Operation Manual Suite - Page 270
INSTALLING THE PRINTER DRIVER AND UTILITIES (SOFTWARE INSTALLATION) 11Follow the on-screen instructions to install the printer driver. If a warning message regarding the Windows logo test appears while the printer driver files are being copied (the warning message may appear several times), be sure - Sharp AR-M355U | AR-M355 | AR-M455 Operation Manual Suite - Page 271
the installation, make sure the USB interface cable is not connected to the machine. The procedure for installing the printer driver is explained here using Windows Me as an example. 1 Insert the "SOFTWARE CD-ROM (1)" that accompanied the machine into your CDROM drive. 2 Double-click [My Computer - Sharp AR-M355U | AR-M355 | AR-M455 Operation Manual Suite - Page 272
INSTALLING THE PRINTER DRIVER AND UTILITIES (SOFTWARE INSTALLATION) 12When you are asked if you wish to install the display font, select an answer and click the [Next] button. 13Follow the on-screen instructions to install the printer driver. If you are using Windows 2000 and a warning message - Sharp AR-M355U | AR-M355 | AR-M455 Operation Manual Suite - Page 273
the [Next] button. G If you wish to install the PC-FAX driver, click the [Utility Software] button in this window and then click the [PC-FAX Driver] button and follow the onscreen instructions. 7 Click the [Next] button. 11Select the printer port and click the [Next] button. Select [LPT1] for the - Sharp AR-M355U | AR-M355 | AR-M455 Operation Manual Suite - Page 274
font, select an answer and click the [Next] button. 17Follow the on-screen instructions to install the printer driver. 18When the finish setup window appears, click the [OK] button. 19When the finish installation window appears, click the [Close] button. When the message "Now connect the interface - Sharp AR-M355U | AR-M355 | AR-M455 Operation Manual Suite - Page 275
PCL6 driver in Windows 2000/XP/Server 2003 R:\Drivers\Printer\EnglishA*\PCL6\2kxp Path for using PCL6 driver in Windows 95/98 R:\Drivers\Printer\EnglishA*\PCL6\9x Path for using PCL6 driver in Windows me R:\Drivers\Printer\EnglishA*\PCL6\me Path for using PCL6 driver in Windows NT 4.0 R:\Drivers - Sharp AR-M355U | AR-M355 | AR-M455 Operation Manual Suite - Page 276
Windows XP. 2 Insert the supplied CD-ROM into the CDROM drive. 3 Click the [start] button, click [Control Panel], click [Printers and Other Hardware], and then click [Printers and Faxes]. 4 Click [Add a printer] in [Printer Tasks]. 5 Follow the on-screen instructions. To specify the printer driver - Sharp AR-M355U | AR-M355 | AR-M455 Operation Manual Suite - Page 277
I Connection with a network connector To use the machine as a network printer, read the online manual on the "Software CD-ROM (2)". Use a network cable that is shielded. MACHINE TO I Connection with a USB cable Please purchase a USB cable (shielded) that complies with the following standard. The - Sharp AR-M355U | AR-M355 | AR-M455 Operation Manual Suite - Page 278
MODEL AR-FX12 FACSIMILE EXPANSION KIT OPERATION MANUAL Page • BEFORE USING THE FAX FEATURE 1-1 • BASIC OPERATIONS 2-1 • USING CONVENIENT FUNCTIONS 1 3-1 • USING CONVENIENT FUNCTIONS 2 4-1 • USING CONVENIENT FUNCTIONS 3 5-1 • PROGRAMMING 6-1 • TROUBLESHOOTING 7-1 • KEY OPERATOR - Sharp AR-M355U | AR-M355 | AR-M455 Operation Manual Suite - Page 279
could void the user's authority to operate this equipment. I FAX interface cable and Line instruction manual, may cause harmful interference to radio communications. Operation of this equipment in a residential area is likely to cause harmful interference in which case the user will be required - Sharp AR-M355U | AR-M355 | AR-M455 Operation Manual Suite - Page 280
and copier operation)". General and copier-related key operator programs: See the key operator's guide. Printer function: See "Operation manual (for printer)". (if the printer option is installed) Network scanner function: See "Operation manual (for network scanner)". (if the network scanner option - Sharp AR-M355U | AR-M355 | AR-M455 Operation Manual Suite - Page 281
SCREEN) ... 1-4 ORIGINALS 1-6 G ORIGINALS THAT CAN BE FAXED 1-6 LOADING A DOCUMENT 1-7 G USING THE AUTOMATIC DOCUMENT FEEDER 1-7 G USING THE DOCUMENT GLASS 1-7 CHECKING THE SIZE OF A LOADED ORIGINAL .... 1-8 G MANUALLY SETTING THE SCANNING SIZE ....... 1-8 STORING, DELETING, AND USING ORIGINAL - Sharp AR-M355U | AR-M355 | AR-M455 Operation Manual Suite - Page 282
FAX ... 5-2 G RECEIVING A FAX AFTER TALKING (MANUAL RECEPTION 5-3 G SENDING A FAX AFTER TALKING (MANUAL TROUBLESHOOTING WHEN A TRANSACTION REPORT IS PRINTED...... 7-2 VIEWING THE COMMUNICATION ACTIVITY REPORT..... 7-3 WHEN AN ALARM SOUNDS AND A WARNING MESSAGE IS DISPLAYED 7-3 PROBLEMS - Sharp AR-M355U | AR-M355 | AR-M455 Operation Manual Suite - Page 283
page 1-2 of this manual. I Lithium battery A lithium battery inside the machine keeps key operator program settings for the fax function in memory. G switch and fax power switch are kept continually off. G When the battery dies, please consult your dealer or your nearest Sharp customer assistance - Sharp AR-M355U | AR-M355 | AR-M455 Operation Manual Suite - Page 284
USERS This equipment complies with Part 68 of the FCC rules and the requirements instructions problems which cannot be solved by reading this manual, please contact Sharp Electronics Corporation P.O. Box 650 Mahwah, NJ 07430-1163 Telephone: 1-800-BE-SHARP This equipment may not be used on coin service - Sharp AR-M355U | AR-M355 | AR-M455 Operation Manual Suite - Page 285
this information into your FAX machine, you should complete the following steps: See CHAPTER 8 of this instruction manual. IMPORTANT SAFETY INFORMATION Never install telephone jacks in wet locations unless the jack is specifically designed for wet locations. G Never touch uninsulated telephone wires - Sharp AR-M355U | AR-M355 | AR-M455 Operation Manual Suite - Page 286
CORRECTLY AS A FACSIMILE NOTICE FOR USERS IN CANADA NOTICE : This product meets the applicable Industry Canada technical specifications. NOTICE : The Ringer Equivalence est indiqué sur l'étiquette de l'appareil. Sharp Electronics of Canada Ltd. 335 Britannia Road East, Mississauga, Ontario, L4Z 1W9 - Sharp AR-M355U | AR-M355 | AR-M455 Operation Manual Suite - Page 287
- Sharp AR-M355U | AR-M355 | AR-M455 Operation Manual Suite - Page 288
SETTINGS SCREEN 1-4 ORIGINALS 1-6 G ORIGINALS THAT CAN BE FAXED 1-6 LOADING A DOCUMENT 1-7 G USING THE AUTOMATIC DOCUMENT FEEDER 1-7 G USING THE DOCUMENT GLASS 1-7 CHECKING THE SIZE OF A LOADED ORIGINAL 1-8 G MANUALLY SETTING THE SCANNING SIZE 1-8 STORING, DELETING, AND USING ORIGINAL SIZES - Sharp AR-M355U | AR-M355 | AR-M455 Operation Manual Suite - Page 289
points and program the required information. I Make sure the fax power switch is turned on In addition to the machine power switch (see page 1-17 of the "Operation manual (for general information and copier operation)"), the machine also has a fax power switch (see "Fax power switch" on page - Sharp AR-M355U | AR-M355 | AR-M455 Operation Manual Suite - Page 290
Model AR-M355N/ AR-M455N AR-M355U/ AR-M455U Key name Description in this manual Described in the configuration where the optional fax expansion kit (AR-FX12) is installed on the AR-M355N/AR-M455N models. No functions related to document filing or Internet fax reception are described in this manual - Sharp AR-M355U | AR-M355 | AR-M455 Operation Manual Suite - Page 291
key to store a document image that you are transmitting in the temporary storage folder. Memory and reception mode display This shows the amount of fax memory that is free and the currently selected reception mode. * Can only be used on the AR-M355N/AR-M455N. The AR-M355U/AR-M455U models do not - Sharp AR-M355U | AR-M355 | AR-M455 Operation Manual Suite - Page 292
network scanner option is installed and a destination other than a fax numbers is stored in a one-touch key, one of the following icons will appear. :Scan to E-mail destination :Scan to Desktop destination :Internet fax destination :Multiple destinations (Scan to E-mail, fax, etc.) :Scan to - Sharp AR-M355U | AR-M355 | AR-M455 Operation Manual Suite - Page 293
ORIGINALS ORIGINALS THAT CAN BE FAXED I Original sizes Minimum original size Maximum original size Using the automatic document feeder Using the document glass 8-1/2" (width) x 5-1/2" (length) (A5: 210 mm (width) x 148 mm (length)) 5-1/2" (width) x 8-1/2" (length) (A5R: 148 mm (width) x 210 mm - Sharp AR-M355U | AR-M355 | AR-M455 Operation Manual Suite - Page 294
). NOTES G Use the automatic document feeder for long originals. The document glass cannot be used. G When faxing a long original, touch the [LONG SIZE] key in step 3 of "MANUALLY SETTING THE SCANNING SIZE" (page 1-8). USING THE DOCUMENT GLASS 1 Open the document glass cover, and place the - Sharp AR-M355U | AR-M355 | AR-M455 Operation Manual Suite - Page 295
THE SCANNING SIZE If you load an original that is not a standard size (such as an AB size), or if the size is not detected correctly, you must touch the [ORIGINAL] key and set the original size manually. Perform the following steps after loading the document in the automatic document feeder or - Sharp AR-M355U | AR-M355 | AR-M455 Operation Manual Suite - Page 296
used original size saves you the trouble of manually setting the size each time you fax that size of document. G To cancel an original with the keys. STANDARD RESOLUTION AUTO 81/2X11 ORIGINAL 2 Touch the key under [SCAN SIZE]. X CANCEL OK X (width) is initially AY selected. X 17 (2 - Sharp AR-M355U | AR-M355 | AR-M455 Operation Manual Suite - Page 297
manual). Touch this key if your original has small Fine characters or diagrams. The original will be scanned or diagrams. This setting gives the best image quality. However, transmission will take longer document feeder, the resolution setting cannot be changed once scanning has begun. G When a fax - Sharp AR-M355U | AR-M355 | AR-M455 Operation Manual Suite - Page 298
STANDARD RESOLUTION AUTO ORIGINAL 2 Touch the desired exposure key. AUTO MANUAL To darken the exposure, touch the key. To lighten the exposure document feeder, the exposure setting cannot be changed once scanning has begun. G The default (initial) exposure setting can be changed in "Default - Sharp AR-M355U | AR-M355 | AR-M455 Operation Manual Suite - Page 299
document to multiple locations. • Full fax numbers entered with the numeric keys can also be stored in group keys. SHARP GROUP GROUP:025 SHARP CORPORATION SHARP for the dial tone through the speaker, and then dial. • Faxes must be sent manually when using on-hook dialing. • On-hook dialing is not - Sharp AR-M355U | AR-M355 | AR-M455 Operation Manual Suite - Page 300
BY AUTO-DIALING (ONE-TOUCH DIALING AND GROUP DIALING 2-4 G SENDING A FAX BY SPEED DIALING 2-4 G FAX NUMBER ENTRY WITH GLOBAL ADDRESS SEARCH ....... 2-5 G ENLARGING/REDUCING THE IMAGE BEFORE TRANSMISSION ... 2-6 G FAXING A TWO-SIDED ORIGINAL 2-7 PRIORITY TRANSMISSION OF A STORED JOB 2-9 CANCELING - Sharp AR-M355U | AR-M355 | AR-M455 Operation Manual Suite - Page 301
.* * Can only be used on the AR-M355N/AR-M455N. The AR-M355U/AR-M455U models do not have this function. DDRESS REVIEW These keys are used to ESS TION 100% SPECIAL MODES FILE QUICK FILE store the scanned image in the machine's hard disk. The stored image can be printed or transmitted again at - Sharp AR-M355U | AR-M355 | AR-M455 Operation Manual Suite - Page 302
a power failure occurs while a document is being scanned in the automatic document feeder, the machine will stop and a document jam will occur. After power is restored, remove the document as explained on page 2-22 of "Operation manual (for general information and copier operation)". G A job number - Sharp AR-M355U | AR-M355 | AR-M455 Operation Manual Suite - Page 303
BOOK] key. PEAKER FAX SWITCH RESEND ADDRESS BOOK ADDRESS REVIEW The address book screen appears. This step is not necessary if the address book already appears. Go to step 3. 3 Touch the one-touch key for the desired destination. READY TO SEND. SHARP CORPORATION SHARP GROUP CORPO.TPS Refer - Sharp AR-M355U | AR-M355 | AR-M455 Operation Manual Suite - Page 304
a fax number search service must be in operation. 1 Touch the [GLOBAL ADDRESS SEARCH] key. S TTINGS The server change ADDRESS REVIEW screen desired LDAP server key. SERVER CHANGE Document division 1 Document division 2 A1210 project team Software development center CANCEL OK 1/2 To search - Sharp AR-M355U | AR-M355 | AR-M455 Operation Manual Suite - Page 305
the network scanner option is installed, touch the [MODE SWITCH] key and then the [FAX] key to switch to fax mode. SPEAKER FAX MODE SWITCH When fax mode is selected, "FAX" appears in the top half of the [MODE SWITCH] key. 2 Load the original. GUsing the automatic document feeder: Page 1-7 GUsing - Sharp AR-M355U | AR-M355 | AR-M455 Operation Manual Suite - Page 306
document feeder. Follow the steps below to automatically send a two-sided document. 1 Make sure the machine is in fax mode. When the [IMAGE SEND] key light is on, the machine is in fax IMAGE SEND] key. If the network scanner 2-SIDED BOOKLET 2-SIDE TABLET 2 FAX "MANUALLY SETTING THE SCANNING - Sharp AR-M355U | AR-M355 | AR-M455 Operation Manual Suite - Page 307
used, the scanned document image is stored in the machine's hard disk. For information on managing stored images, see "Document filing function"* in chapter 7 of the "Operation manual (for general information and copier operation)".) * Can only be used on the AR-M355N/AR-M455N. The AR-M355U/AR-M455U - Sharp AR-M355U | AR-M355 | AR-M455 Operation Manual Suite - Page 308
the job status screen, refer to page 1-15 of "Operation manual (for general information and copier operation)". 1 Press the [JOB STATUS] key. 3 Touch or has been stored. Cancellation is done from the fax job status screen. (Printing of a received fax cannot be canceled.) 1 Press the [JOB STATUS - Sharp AR-M355U | AR-M355 | AR-M455 Operation Manual Suite - Page 309
trays, the key operator program can be used to change the output tray for fax reception. (See "Fax output tray setting" on page 8-9.) I If received data cannot be printed If the machine is out of paper or toner, or if a paper jam occurs or the machine is busy printing a copy or print job, received - Sharp AR-M355U | AR-M355 | AR-M455 Operation Manual Suite - Page 310
you. Page SENDING THE SAME DOCUMENT TO MULTIPLE DESTINATIONS IN A SINGLE OPERATION (BROADCAST TRANSMISSION 3-2 G USING BROADCAST TRANSMISSION 3-3 ERASING EDGE SHADOWS (EDGE ERASE 3-4 G USING EDGE ERASE 3-4 FAXING A DIVIDED ORIGINAL (DUAL PAGE SCAN 3-5 AUTOMATIC TRANSMISSION AT A SPECIFIED TIME - Sharp AR-M355U | AR-M355 | AR-M455 Operation Manual Suite - Page 311
on the AR-M355U/AR-M455U) destinations can be selected. NOTES G If you frequently use broadcasting to send documents to the same FAX DE SWITCH ADDRESS BOOK ADDRESS REVIEW SPE IAL MODE Successively enter destination numbers Beep Reception Successive Beep transmission The document is scanned - Sharp AR-M355U | AR-M355 | AR-M455 Operation Manual Suite - Page 312
-M355N/AR-M455N. The AR-M355U/AR-M455U models do not have this function. DETAIL OF BROADCAST xxxx ADDRESS 002 HQ ADMIN. START TIME 10:01 11/01 STATUS NGXXXXX OK RETRY 1/ 1 010 SENDAI BRANCH 10:01 11/01 NGXXXXX FILE FAILED ALL DESTINATIONS (A) (B) (C) (A) [FILE] tab This only appears - Sharp AR-M355U | AR-M355 | AR-M455 Operation Manual Suite - Page 313
faxing thick originals or books. Transmission to CENTER ERASE other machine Eliminates shadow lines produced by the bindings of bound documents. scan" on the following page USING EDGE ERASE 1 In fax mode, touch the [SPECIAL MODES] key. MODE SWITCH If the address book screen ADDRESS REVIEW - Sharp AR-M355U | AR-M355 | AR-M455 Operation Manual Suite - Page 314
document 11"x17" (A3) Two 8-1/2"x11" (A4) pages the original is divided into two pages when 3 scanned into memory I Selecting Dual Page Scan Follow the steps below and then send the fax. 1 In fax mode, touch the [SPECIAL MODES] key. MODE SWITCH If the address book ADDRESS REVIEW - Sharp AR-M355U | AR-M355 | AR-M455 Operation Manual Suite - Page 315
scanned document image is stored in the machine's hard disk. For information on managing stored images, see "Document filing function" in chapter 7 of the "Operation manual (for general information and copier operation)".) * Can only be used on the AR-M355N/AR-M455N. The AR-M355U/AR in the fax job - Sharp AR-M355U | AR-M355 | AR-M455 Operation Manual Suite - Page 316
oriented originals should be placed vertically as shown below. USING THE AUTOMATIC DOCUMENT FEEDER Portrait original 1st page 2nd page 3rd page 4th page 1st page 2nd page The arrangement of the images on the printed fax varies depending on how the original is placed in the transmitting machine - Sharp AR-M355U | AR-M355 | AR-M455 Operation Manual Suite - Page 317
PAPER (CARD SHOT) When faxing a card, this function allows you to combine the front and back sides on a single sheet of paper. To use this function, the original must be scanned on the document SIZE RESET] key. ( "CARD SHOT SETTINGS" on page 15 of key operator's guide) G To have the images enlarged - Sharp AR-M355U | AR-M355 | AR-M455 Operation Manual Suite - Page 318
. Place the front side of the original face down and close the document cover. 6 Follow steps 4 through 7 of "BASIC PROCEDURE FOR SENDING FAXES" (pages 2-2 to 2-3 ). 7 Press the [START] key. The front side of the card is scanned. 10Touch the [READ-END] key. A beep will sound to inform you that - Sharp AR-M355U | AR-M355 | AR-M455 Operation Manual Suite - Page 319
document feeder is 50. When you need to fax more pages than can be loaded in the automatic document feeder, use Job Build mode. This function allows you to scan 1 In fax mode, touch the [SPECIAL MODES] key and then touch the key. MODE SWITCH If the address book screen ADDRESS REVIEW appears, touch - Sharp AR-M355U | AR-M355 | AR-M455 Operation Manual Suite - Page 320
/FRI 03:00 PM SHARP PLANNING DIV. FAX No. 0666211221 P. 001/001 (1) (2) (3) (4) (1) Date and time: The date and time, and the font used to print the date and time, are set in the custom settings. (page 2-12 of "Operation manual (for general information and copier operation))"). (2) Own name - Sharp AR-M355U | AR-M355 | AR-M455 Operation Manual Suite - Page 321
(page 7-2). 1 In fax mode, touch the [SPECIAL MODES] key. MODE SWITCH If the address book screen ADDRESS REVIEW appears, touch the SUB SPECIAL MODES TRANSACTION REPORT OK CANCEL OK ALWAYS PRINT PRINT AT ERROR PRINT ORIGINAL IMAGE DO NOT PRINT If you want the transaction report to print - Sharp AR-M355U | AR-M355 | AR-M455 Operation Manual Suite - Page 322
machine 2) Permits polling 3) Document data previously scanned into memory Serial Polling:Group keys and the broadcast transmission function (page 3-2) can be used to successively poll multiple fax machines in a single operation. Up to 500 (maximum of 300 on the AR-M355U/ARM455U) machines can be - Sharp AR-M355U | AR-M355 | AR-M455 Operation Manual Suite - Page 323
"POLLING." appears in the touch panel. The fax is received from the other machine and printed out. NOTE To cancel the operation Press the [JOB STATUS] key and then cancel the operation. (See "CANCELING ON-HOOK DIALING" on page 2-9.) I Manual polling A document should not be loaded in the machine - Sharp AR-M355U | AR-M355 | AR-M455 Operation Manual Suite - Page 324
mode. If the light is not on, press the [IMAGE SEND] key. 5 Touch the [PUBLIC BOX] key. This specifies that the document will be 3 scanned into the Public Box. PUBLIC BOX FAX E-MAIL/FTP INTERNET FAX MODE SWITCH If the network scanner option is installed, touch the [MODE SWITCH] key and then the - Sharp AR-M355U | AR-M355 | AR-M455 Operation Manual Suite - Page 325
follow these steps to print it out. If no documents have been stored, the [PUBLIC BOX] key will be grayed out. 1 In fax mode, touch the [SPECIAL MODES] key and then touch the key. MODE SWITCH If the address book screen ADDRESS REVIEW appears, touch the [CONDITION SETTINGS] SPECIAL MODES key to - Sharp AR-M355U | AR-M355 | AR-M455 Operation Manual Suite - Page 326
up to 500 (maximum of 300 on the AR-M355U/AR-M455U) destination fax numbers can be stored. NOTES G A program Scan (page 3-5) and card shot (page 3-8), place the document on the document glass. 2 Touch the [SPECIAL MODES] key and then the [PROGRAM] key. If the address book screen ADDRESS REVIEW - Sharp AR-M355U | AR-M355 | AR-M455 Operation Manual Suite - Page 327
IMAGE SEND key (See "If received data cannot be printed" on page 2-10.) blinks. Printing not possible because of paper or toner problem Other machine Your machine "Transfer" instruction using custom settings Printing Fax a transmission. (See "CANCELING A FAX TRANSMISSION" on page 2-9.) The data - Sharp AR-M355U | AR-M355 | AR-M455 Operation Manual Suite - Page 328
the same way as for the PCL5e or PCL6 printer driver. I Using the PC-FAX function To fax a document using the PC-FAX function, select the PC-FAX driver as the printer driver on your computer and "print" the document. Fax data will be created and the fax will be transmitted. For more information, see - Sharp AR-M355U | AR-M355 | AR-M455 Operation Manual Suite - Page 329
- Sharp AR-M355U | AR-M355 | AR-M455 Operation Manual Suite - Page 330
Please read those sections which are of interest to you. Page TRANSMISSION BETWEEN MACHINES SUPPORTING F-CODES .... 4-2 G MEMORY BOXES AND SUB-ADDRESSES/PASSCODES REQUIRED FOR F-CODE TRANSMISSION 4-2 G ENTERING (DIALING) A FAX NUMBER WITH A SUB-ADDRESS AND PASSCODE 4-3 G CREATING A MEMORY BOX FOR - Sharp AR-M355U | AR-M355 | AR-M455 Operation Manual Suite - Page 331
telecommunications networks and services. MEMORY BOXES AND SUB-ADDRESSES/PASSCODES REQUIRED FOR F-CODE TRANSMISSION "Memory boxes" can be created in the memory of fax machines that support F-Code communication. These boxes are used to store faxes received from other machines and documents to be - Sharp AR-M355U | AR-M355 | AR-M455 Operation Manual Suite - Page 332
SUPPORTING F-CODES ENTERING (DIALING) A FAX NUMBER WITH A SUBADDRESS AND PASSCODE When transmitting to a memory box in another fax machine, the sub-address and passcode must be entered after the other machine's fax number. Enter the other machine's fax fax number (refer to page 6-3). G Manual - Sharp AR-M355U | AR-M355 | AR-M455 Operation Manual Suite - Page 333
polling, the other machine's fax number is not programmed as a passcode for F-code polling memory. The sub-address code polling memory, do not set the reception mode to manual reception. I Scanning a document into an F-code polling memory box The procedure for scanning a document into an F-Code - Sharp AR-M355U | AR-M355 | AR-M455 Operation Manual Suite - Page 334
SHARP BRANCH EX used for transmission. PUBLI PROCEDURE FOR F-CODE POLLING Make sure that a document has not been loaded in the auto document feeder or on the document code polling. 4 1 In fax mode, touch the [SPECIAL MODES] key and then the key. MODE SWITCH If the address book ADDRESS REVIEW - Sharp AR-M355U | AR-M355 | AR-M455 Operation Manual Suite - Page 335
reception, and sending document data to another machine's F-code confidential memory box is called F-code confidential transmission. NOTES G This machine does not support Sharp's previous confidential transmission function, which uses the programmed sender's fax number and ID code. G Refer to pages - Sharp AR-M355U | AR-M355 | AR-M455 Operation Manual Suite - Page 336
Document data received to an F-code confidential memory box is automatically cleared after printing. G When a new fax is received to an F-code confidential box while a previously received fax RECEPTION SLA SCANNER TEAM MARKETING GROUP the right of memory boxes that have received document data. - Sharp AR-M355U | AR-M355 | AR-M455 Operation Manual Suite - Page 337
requests the relay transmission must both support F-codes; however, the end receiving machines programmed in the F-code relay broadcast memory box do not need to support F-codes. Relay request machine (sends document) Relay machine (your machine) 1) Document is sent from machine requesting relay - Sharp AR-M355U | AR-M355 | AR-M455 Operation Manual Suite - Page 338
touch keys or group keys) can be programmed in the F-code relay broadcast memory box. A document received from a relay request machine is initially stored in and relay the fax to those machines. (If a passcode (SID) is not programmed in the memory box , enter only the password when dialing.) Aside - Sharp AR-M355U | AR-M355 | AR-M455 Operation Manual Suite - Page 339
- Sharp AR-M355U | AR-M355 | AR-M455 Operation Manual Suite - Page 340
the scope of use of the fax machine. Please read those sections that are of interest to you. Page USING AN EXTENSION PHONE 5-2 G USING AN EXTENSION PHONE TO RECEIVE A FAX 5-2 G RECEIVING A FAX AFTER TALKING (MANUAL RECEPTION) ... 5-3 G SENDING A FAX AFTER TALKING (MANUAL TRANSMISSION) .... 5-4 5-1 - Sharp AR-M355U | AR-M355 | AR-M455 Operation Manual Suite - Page 341
or at the end of reception and an error message appears in the display, refer to page 7-3. I Changing the reception mode to "MANUAL RECEPTION" 1 Press the [CUSTOM SETTINGS] key. Then touch the [FAX DATA RECEIVE/ FORWARD] key . LIST PRINT FAX DATA SENDER CONTROL RECEIVE/FORWARD 3 Touch the - Sharp AR-M355U | AR-M355 | AR-M455 Operation Manual Suite - Page 342
stored print jobs. G You can also talk on the extension phone and manually receive a fax while the machine is printing. If the machine rings during printing, lift the extension phone and speak. To receive a fax, press the [IMAGE SEND] key with the extension phone still lifted. When you hear - Sharp AR-M355U | AR-M355 | AR-M455 Operation Manual Suite - Page 343
switches to fax reception, press your [START] key. Transmission begins. 2 Load the original. (see page 1-7) NOTE If you have loaded the original on the document glass, you can only send one page by manual transmission. 3 Set the original size, resolution, exposure and other scanning conditions as - Sharp AR-M355U | AR-M355 | AR-M455 Operation Manual Suite - Page 344
programmed in auto dial keys (one-touch and group keys), programs, user indexes, and memory boxes. Page PROGRAMMING 6-2 STORING, EDITING, AND DELETING CODE MEMORY BOXES...6-10 G PROGRAMMING AN F-CODE MEMORY BOX 6-10 G SETTING FOR F-CODE POLLING MEMORY BOXES (POLLING TIMES 6-11 G SETTING FOR F-CODE - Sharp AR-M355U | AR-M355 | AR-M455 Operation Manual Suite - Page 345
and group keys), user indexes, and memory on page 3-17.) A combined total of 999 (maximum of 500 on the AR-M355U/AR-M455U) one-touch keys and group keys can be stored, and eight programs ) [PROGRAM] key Store a program key (page 6-8) DOCUMENT FILING CONTROL 3 Touch the [DIRECT ADDRESS / PROGRAM] - Sharp AR-M355U | AR-M355 | AR-M455 Operation Manual Suite - Page 346
characters, see chapter 7 of the "Operation manual (for general information and copier operation)." 3 Touch the [INITIAL] key No.048 E-MAIL FAX NAME SHARP CORPORATION INITIAL FAX No. 4 Touch a letter key. INITIAL CANCEL OK FAX HARP CORPORATION INDEX INTERNET-F 7 Touch an index - Sharp AR-M355U | AR-M355 | AR-M455 Operation Manual Suite - Page 347
(s). G If you are not going to enter a sub-address and password after the fax number, proceed to step 13. NOTES G For information on sub-addresses and passcodes, see "MEMORY BOXES AND SUB-ADDRESSES/ PASSCODES REQUIRED FOR F-CODE TRANSMISSION" on page 4-2. G A maximum of 64 digits can be entered - Sharp AR-M355U | AR-M355 | AR-M455 Operation Manual Suite - Page 348
DELETE No.048 E-MAIL FAX DELETE INTERNET-FAX EXIT NAME SHARP CORPORATION 1/2 INITIAL S INDEX USER 3 FAX No. 0666211221/3456/ NOTE one-touch key is included in a group of end receiving machines for an F-code relay broadcast operation. (See "EDITING AND DELETING A MEMORY BOX" on page 6- - Sharp AR-M355U | AR-M355 | AR-M455 Operation Manual Suite - Page 349
Up to 500 (maximum of 300 on the AR-M355U/AR-M455U) destinations can be stored in a group . AL GROUP-DIGITAL DOCUMENT EX USER 2 ADDRESS AME G Enter the fax number and then a SHARP CORPORATION OK 1/2 DIRECT ENTRY ADDRESS REVIEW "Operation Manual (for general information and copier operation - Sharp AR-M355U | AR-M355 | AR-M455 Operation Manual Suite - Page 350
in the group key, touch the [ADDRESS REVIEW] key. Full numbers entered with the numeric DELETE EXIT INITIAL INDEX KEY NAME S USER 2 ADDRESS SHARP GROUP 4 ADDRESS G To edit the FAX TRANSMISSION" on page 2-9.) G The group key is included in the end receiving machines for an F-code - Sharp AR-M355U | AR-M355 | AR-M455 Operation Manual Suite - Page 351
you wish to store. PROGRAM NAME SHARP PROGRAM SETTINGS ADDRESS 2 ADDRESSES RESOLUTION FINE SPECIAL MODES DUAL PAGE SCAN EXPOSURE AUTO ENTER PROGRAM YOU REQUIRE. AUTO EXPOSURE STANDARD RESOLUTION CANCEL OK FAX MODE SWITCH ADDRESS BOOK ADDRESS REVIEW SPECIAL MODES 6 When you are - Sharp AR-M355U | AR-M355 | AR-M455 Operation Manual Suite - Page 352
[USER 1], [USER 2], [USER 3], [USER 4], [USER 5], and [USER 6] appear. You can assign any name up to 6 characters long to each of the USER indexes on entering characters, see chapter 7 of the "Operation Manual (for general information and copier operation)". When finished, touch the [OK] key. The - Sharp AR-M355U | AR-M355 | AR-M455 Operation Manual Suite - Page 353
Touch the [F-CODE MEMORY BOX] key. O 5 Touch the [SUB ADDRESS] key. F-CODE MEMORY BOX / POLLING MEMORY No.001 BOX NAME FAX INFORMATION The sub Manual (for general information and copier operation)". 6-10 6 Use the numeric keys (0 through 9) to enter a sub-address (max. 20 digits). F-CODE - Sharp AR-M355U | AR-M355 | AR-M455 Operation Manual Suite - Page 354
have document data that was scanned into an F-code polling memory box automatically cleared after one transmission, or to leave the document AN F-CODE MEMORY BOX" on the previous page and store a box name, sub-address, and passcode. 2 Touch the [POLLING TIMES] key. BOX NAME FAX INFORMATION SUB - Sharp AR-M355U | AR-M355 | AR-M455 Operation Manual Suite - Page 355
you forget the passcode, consult your Sharp dealer. 1 Touch the [CONFIDENTIAL] key in step 3 of "PROGRAMMING AN F-CODE MEMORY BOX" on pages 6-10 key. BOX NAME FAX INFORMATION SUB ADDRESS 55112233/481221 PRINT PIN 3 Use the numeric keys to enter a 4-digit number. F-CODE MEMORY BOX / - Sharp AR-M355U | AR-M355 | AR-M455 Operation Manual Suite - Page 356
) Program the end receiving machines to which document data received in the F-code relay broadcast memory box will be transmitted when then the [FAX] key and enter the fax number. OK FAX E-MAIL DIRECT ENTRY INTERNET-FAX ADDRESS REVIEW JKLMN OPQRST UVWXYZ ABC GROUP G Enter the fax number and - Sharp AR-M355U | AR-M355 | AR-M455 Operation Manual Suite - Page 357
edit or delete. MEMORY BOX / AMEND/DELETE SELECT MEMORY BOX TO AMEND/DELETE. POLLING MEMORY REPORT FAX INFORMATION EXIT 1/1 5 Touch the keys as needed to edit or delete the information. F-CODE MEMORY BOX / POLLING MEMORY No.005 BOX NAME REPORT SUB ADDRESS 22233311/351212 POLLING TIMES ONCE - Sharp AR-M355U | AR-M355 | AR-M455 Operation Manual Suite - Page 358
CHAPTER 7 TROUBLESHOOTING This chapter contains information to help you make efficient use of the fax features of the machine, including solutions to common problems. Page WHEN A TRANSACTION REPORT IS PRINTED 7-2 VIEWING THE COMMUNICATION ACTIVITY REPORT 7-3 WHEN AN ALARM SOUNDS AND A WARNING - Sharp AR-M355U | AR-M355 | AR-M455 Operation Manual Suite - Page 359
signals or image signals were distorted due to line conditions or other reasons, and communication was not successful. First two digits of communication error number: Error code from 00 to 31 appears. Last four digits of communication error number: Codes for use by service technicians. A fax was - Sharp AR-M355U | AR-M355 | AR-M455 Operation Manual Suite - Page 360
fax cannot be Add the indicated Operation manual (for printed because there is no paper. general information and suitable paper. copier operation), page 2-2. CHANGE THE TONER CARTRIDGE. The machine is out of toner Replace the toner Operation manual (for and the received document cartridge - Sharp AR-M355U | AR-M355 | AR-M455 Operation Manual Suite - Page 361
general information and copier operation), page 1-17. Is the machine in fax mode? Press the [IMAGE SEND] "BASIC PROCEDURE key to set the machine to FOR SENDING fax mode. FAXES", page 2-2. Does the receiving fax machine have paper? Does the receiving machine support G3 transmission? Check - Sharp AR-M355U | AR-M355 | AR-M455 Operation Manual Suite - Page 362
you to add as instructed by the display SOUNDS AND A toner or paper? (Printing is not message. Printing will WARNING MESSAGE possible.) begin. IS DISPLAYED", page 7-3. A received image Was the wrong side of the original Check with the operator of prints out blank. scanned in the transmitting - Sharp AR-M355U | AR-M355 | AR-M455 Operation Manual Suite - Page 363
- Sharp AR-M355U | AR-M355 | AR-M455 Operation Manual Suite - Page 364
machine to customize certain functions and settings. Page KEY OPERATOR PROGRAMS 8-2 G KEY OPERATOR PROGRAM LIST 8-2 G USING THE KEY OPERATOR PROGRAMS 8-3 G KEY OPERATOR PROGRAMS 8-4 G OPERATION SETTINGS 8-4 G FAX SETTINGS 8-5 G PRINTING OUT SETTINGS 8-11 8-1 - Sharp AR-M355U | AR-M355 | AR-M455 Operation Manual Suite - Page 365
scanner option is installed) 8-4 Initial resolution setting 8-4 Scan complete sound setting 8-5 Default exposure settings 8-5 FAX SETTINGS Fax default settings Fax supports ECM) 8-7 Distinctive ring detection 8-7 Disable of fax number direct entry 8-7 Fax error 8-8 Fax receive - Sharp AR-M355U | AR-M355 | AR-M455 Operation Manual Suite - Page 366
numeric keys to enter the five-digit key operator code number. For the factory default setting for the key KEY OPERATOR CODE operator code number, see page 2 of the key operator's guide. 5 Touch the [OPERATION SETTINGS] key or the [FAX SETTINGS] key to display the key operator programs. E SEND - Sharp AR-M355U | AR-M355 | AR-M455 Operation Manual Suite - Page 367
, see the key operator's guide. For programs related to the printer and network scanner functions, see the corresponding manuals. NOTE Settings established with the key operator programs can be verified by printing them out (page 8-11). OPERATION SETTINGS G Default display settings G The number - Sharp AR-M355U | AR-M355 | AR-M455 Operation Manual Suite - Page 368
/ image send mode, and for scan save in document filing mode*. This program is initially set to "AUTO". If changed to "MANUAL", the exposure level can be adjusted to five levels. Level 1 is the lightest level and level 5 is the darkest level. * Can only be used on the AR-M355N/AR-M455N. The AR-M355U - Sharp AR-M355U | AR-M355 | AR-M455 Operation Manual Suite - Page 369
2. ringer volume, 3. line monitor, 4. fax receive signal, 5. Fax communication error signal. KEY OPERATOR PROGRAMS SPEAKER VOLUME SETTINGS OK SETTING OK AUTO PRINT AT MEMORY FULL PRINT DAILY AT DESIGNATED TIME HOUR 13 MINUTE 01 Touch the "HOUR" and "MINUTE" keys and then set the hour by - Sharp AR-M355U | AR-M355 | AR-M455 Operation Manual Suite - Page 370
is a G3 machine that supports ECM) Line conditions can sometimes distort a transmitted fax image. When ECM (Error Correction Mode) is turned on document reduced to match the size of the other machine's printing paper. Auto reduction is normally turned on. If the setting is turned off, documents - Sharp AR-M355U | AR-M355 | AR-M455 Operation Manual Suite - Page 371
fax page you send. Normally OUTSIDE THE ORIGINAL IMAGE is selected. To have your name and number printed inside the original image, select INSIDE THE ORIGINAL IMAGE the call when a document is sent by manual transmission. Recall in case of communication error When sending a document, this setting is - Sharp AR-M355U | AR-M355 | AR-M455 Operation Manual Suite - Page 372
style setting This setting determines the selection condition for paper when printing received documents. Select one of the three conditions below. AUTO SIZE SELECT is normally selected. G PRINT ACTUAL SIZE CUT OFF DISABLED The received fax image is printed at its actual size (without dividing it - Sharp AR-M355U | AR-M355 | AR-M455 Operation Manual Suite - Page 373
AR-M351U/AR-M451U/ AR-M355U/AR-M455U) numbers can be entered. This program is normally disabled. To block reception from the entered fax numbers, touch the [VALID] key. Entering anti junk fax apply to F-code polling memory. (see "USING THE POLLING FUNCTION" on page 3-14) The "Fax polling security" - Sharp AR-M355U | AR-M355 | AR-M455 Operation Manual Suite - Page 374
code number. For the factory default setting for the key KEY OPERATOR CODE operator code number, see page 2 of the key operator's guide. 5 Touch the [KEY OPERATOR PROGRAMS LIST] key. KEY OPERATOR PROGRAMS LIST IMAGE SENDING ACTIVITY REPORT (FAX) ANTI JUNK FAX NUMBER LIST 6 Touch the [IMAGE - Sharp AR-M355U | AR-M355 | AR-M455 Operation Manual Suite - Page 375
- Sharp AR-M355U | AR-M355 | AR-M455 Operation Manual Suite - Page 376
CHAPTER 9 APPENDIX This chapter contains reference information regarding the fax features of the machine. Page SPECIFICATIONS 9-2 INDEX ...9-3 9-1 - Sharp AR-M355U | AR-M355 | AR-M455 Operation Manual Suite - Page 377
999 (500 on the AR-M355U/AR-M455U) one-touch and group keys, redialing (automatic) Timer transmission Yes Program function Yes (8 programs) F-code support Yes (can transmit and receive SUB/SEP (sub-address) and SID/PWD (passcode) signals) Image memory 2 MB *2 Error Correction Mode (ECM) Yes - Sharp AR-M355U | AR-M355 | AR-M455 Operation Manual Suite - Page 378
Address review 1-4, 3-3 Alarm 7-3 Anti junk fax setting Default exposure settings 8-5 Deleting a passcode 8-11 Deleting document data -F-code polling memory box 4-5 -Public Box 3-16 Dial mode setting 8-5 Display switching 1-5 Distinctive ring detection 8-7 Document glass 1-7 Dual page scan - Sharp AR-M355U | AR-M355 | AR-M455 Operation Manual Suite - Page 379
3-2 -Canceling 2-9 -Card shot 3-8 to 3-9 -Dual page scan 3-5 -Edge erase 3-4 -Enlargement/reduction transmission 2-6 -F-code transmission 4-3 -Image rotation 2-8 -Job build mode 3-10 -Manual transmission 5-4 -Own number sending 3-11 -PC-fax 3-19 -Priority transmission 2-9 -Quick On-line - Sharp AR-M355U | AR-M355 | AR-M455 Operation Manual Suite - Page 380
scan 3-5 -Edge erase 3-4 -Job build mode 3-10 -Memory box 3-15 to 3-16 -Own number sending 3-11 -Polling 3-14 -Program 3-17 -Timer transmission 3-6 Transaction report 3-12 Specifications Transaction report print select setting 8-6 Transmission error 2-8 TYPE/NOTE column 7-2 IU Using an
-
 1
1 -
 2
2 -
 3
3 -
 4
4 -
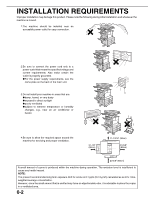 5
5 -
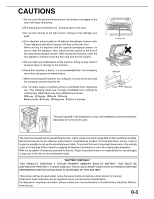 6
6 -
 7
7 -
8
-
9
-
10
-
11
-
12
-
13
-
14
-
15
-
16
-
17
-
18
-
19
-
20
-
21
-
22
-
23
-
24
-
25
-
26
-
27
-
28
-
29
-
30
-
31
-
32
-
33
-
34
-
35
-
36
-
37
-
38
-
39
-
40
-
41
-
42
-
43
-
44
-
45
-
46
-
47
-
48
-
49
-
50
-
51
-
52
-
53
-
54
-
55
-
56
-
57
-
58
-
59
-
60
-
61
-
62
-
63
-
64
-
65
-
66
-
67
-
68
-
69
-
70
-
71
-
72
-
73
-
74
-
75
-
76
-
77
-
78
-
79
-
80
-
81
-
82
-
83
-
84
-
85
-
86
-
87
-
88
-
89
-
90
-
91
-
92
-
93
-
94
-
95
-
96
-
97
-
98
-
99
-
100
-
101
-
102
-
103
-
104
-
105
-
106
-
107
-
108
-
109
-
110
-
111
-
112
-
113
-
114
-
115
-
116
-
117
-
118
-
119
-
120
-
121
-
122
-
123
-
124
-
125
-
126
-
127
-
128
-
129
-
130
-
131
-
132
-
133
-
134
-
135
-
136
-
137
-
138
-
139
-
140
-
141
-
142
-
143
-
144
-
145
-
146
-
147
-
148
-
149
-
150
-
151
-
152
-
153
-
154
-
155
-
156
-
157
-
158
-
159
-
160
-
161
-
162
-
163
-
164
-
165
-
166
-
167
-
168
-
169
-
170
-
171
-
172
-
173
-
174
-
175
-
176
-
177
-
178
-
179
-
180
-
181
-
182
-
183
-
184
-
185
-
186
-
187
-
188
-
189
-
190
-
191
-
192
-
193
-
194
-
195
-
196
-
197
-
198
-
199
-
200
-
201
-
202
-
203
-
204
-
205
-
206
-
207
-
208
-
209
-
210
-
211
-
212
-
213
-
214
-
215
-
216
-
217
-
218
-
219
-
220
-
221
-
222
-
223
-
224
-
225
-
226
-
227
-
228
-
229
-
230
-
231
-
232
-
233
-
234
-
235
-
236
-
237
-
238
-
239
-
240
-
241
-
242
-
243
-
244
-
245
-
246
-
247
-
248
-
249
-
250
-
251
-
252
-
253
-
254
-
255
-
256
-
257
-
258
-
259
-
260
-
261
-
262
-
263
-
264
-
265
-
266
-
267
-
268
-
269
-
270
-
271
-
272
-
273
-
274
-
275
-
276
-
277
-
278
-
279
-
280
-
281
-
282
-
283
-
284
-
285
-
286
-
287
-
288
-
289
-
290
-
291
-
292
-
293
-
294
-
295
-
296
-
297
-
298
-
299
-
300
-
301
-
302
-
303
-
304
-
305
-
306
-
307
-
308
-
309
-
310
-
311
-
312
-
313
-
314
-
315
-
316
-
317
-
318
-
319
-
320
-
321
-
322
-
323
-
324
-
325
-
326
-
327
-
328
-
329
-
330
-
331
-
332
-
333
-
334
-
335
-
336
-
337
-
338
-
339
-
340
-
341
-
342
-
343
-
344
-
345
-
346
-
347
-
348
-
349
-
350
-
351
-
352
-
353
-
354
-
355
-
356
-
357
-
358
-
359
-
360
-
361
-
362
-
363
-
364
-
365
-
366
-
367
-
368
-
369
-
370
-
371
-
372
-
373
-
374
-
375
-
376
-
377
-
378
-
379
-
380
 |
 |

PART 1: GENERAL INFORMATION
•
BEFORE USING
THE PRODUCT
•
MANAGING THE MACHINE
•
PERIPHERAL DEVICES
PART 2: COPIER OPERATION
•
MAKING COPIES
•
CONVENIENT COPY
FUNCTIONS
•
MACHINE MAINTENANCE
(FOR COPYING)
•
DOCUMENT FILING
FUNCTION
•
SPECIFICATIONS
1-1
2-1
3-1
4-1
5-1
6-1
7-1
8-1
Page
OPERATION MANUAL
(for general information and copier operation)
MODEL
AR-M355N
AR-M455N
LASER PRINTER
Be sure to become thoroughly familiar with this manual to
gain the maximum benefit from the product.
Before
installing this product, be sure to read the installation
requirements
and
cautions
sections.
Be sure to keep all operation manuals handy for reference
including this manual, the "Operation manual (for general
information and copier operation)" and operation manuals
for any optional equipment which has been installed.