Sharp AR-M355U AR-M355 AR-M455 Operation Manual Suite - Page 303
Transmission By Auto-dialing (one-touch Dialing And Group Dialing), Sending A Fax By Speed Dialing
 |
View all Sharp AR-M355U manuals
Add to My Manuals
Save this manual to your list of manuals |
Page 303 highlights
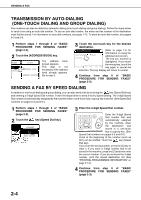
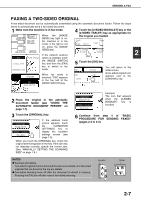
SENDING A FAX TRANSMISSION BY AUTO-DIALING (ONE-TOUCH DIALING AND GROUP DIALING) Fax numbers can also be dialed by automatic dialing (one-touch dialing and group dialing). Follow the steps below to send a fax using an auto dial number. To use an auto dial number, the name and fax number of the destination must first be stored. For information on auto dial numbers, see page 1-12. To store an auto dial number, see pages 6-3 and 6-6. 1 Perform steps 1 through 6 of "BASIC PROCEDURE FOR SENDING FAXES" (page 2-2). 2 Touch the [ADDRESS BOOK] key. PEAKER FAX SWITCH RESEND ADDRESS BOOK ADDRESS REVIEW The address book screen appears. This step is not necessary if the address book already appears. Go to step 3. 3 Touch the one-touch key for the desired destination. READY TO SEND. SHARP CORPORATION SHARP GROUP CORPO.TPS Refer to page 1-5 for S information on using the address book screen. The key you touched is highlighted. If you touch the wrong key, touch the FREQUENT USE ABCD EFGHI JKLMN OPQRS key again to cancel the selection. The key display will return to normal. 4 Continue from step 8 of "BASIC PROCEDURE FOR SENDING FAXES" (page 2-3). SENDING A FAX BY SPEED DIALING In addition to one-touch dialing and group dialing, you can also send a fax by touching the key (Speed Dial key) and entering a 3-digit Speed Dial number. Follow the steps below to send a fax by Speed Dialing. The 3-digit Speed Dial number is automatically assigned by the machine when a one-touch key or group key is stored. (See Speed Dial numbers on pages 6-3 and 6-6.) 1 Perform steps 1 through 6 of "BASIC PROCEDURE FOR SENDING FAXES" (page 2-2). 2 Touch the key (Speed Dial key). SPEAKER FAX MODE SWITCH 3 Enter the 3-digit Speed Dial number. Enter the 3-digit Speed Dial number that was automatically assigned by the machine when the destination was stored in a one-touch key or a group key. (See Speed Dial numbers on pages 6-3 and 6-6.) Zeros at the beginning of the number (such as 001) can be omitted. Touch the key (Speed Dial key). If you enter the wrong number, press the [C] key to clear it. If you enter a 3-digit number that is not stored in the machine, press the [C] and then enter the correct number. If you do not know the 3-digit number, print the stored destination list (See "PRINTING PROGRAMMED INFORMATION" on page 6-14.) 4 Continue from step 8 of "BASIC PROCEDURE FOR SENDING FAXES" (page 2-3). 2-4
-
 1
1 -
2
-
3
-
4
-
5
-
6
-
7
-
8
-
9
-
10
-
11
-
12
-
13
-
14
-
15
-
16
-
17
-
18
-
19
-
20
-
21
-
22
-
23
-
24
-
25
-
26
-
27
-
28
-
29
-
30
-
31
-
32
-
33
-
34
-
35
-
36
-
37
-
38
-
39
-
40
-
41
-
42
-
43
-
44
-
45
-
46
-
47
-
48
-
49
-
50
-
51
-
52
-
53
-
54
-
55
-
56
-
57
-
58
-
59
-
60
-
61
-
62
-
63
-
64
-
65
-
66
-
67
-
68
-
69
-
70
-
71
-
72
-
73
-
74
-
75
-
76
-
77
-
78
-
79
-
80
-
81
-
82
-
83
-
84
-
85
-
86
-
87
-
88
-
89
-
90
-
91
-
92
-
93
-
94
-
95
-
96
-
97
-
98
-
99
-
100
-
101
-
102
-
103
-
104
-
105
-
106
-
107
-
108
-
109
-
110
-
111
-
112
-
113
-
114
-
115
-
116
-
117
-
118
-
119
-
120
-
121
-
122
-
123
-
124
-
125
-
126
-
127
-
128
-
129
-
130
-
131
-
132
-
133
-
134
-
135
-
136
-
137
-
138
-
139
-
140
-
141
-
142
-
143
-
144
-
145
-
146
-
147
-
148
-
149
-
150
-
151
-
152
-
153
-
154
-
155
-
156
-
157
-
158
-
159
-
160
-
161
-
162
-
163
-
164
-
165
-
166
-
167
-
168
-
169
-
170
-
171
-
172
-
173
-
174
-
175
-
176
-
177
-
178
-
179
-
180
-
181
-
182
-
183
-
184
-
185
-
186
-
187
-
188
-
189
-
190
-
191
-
192
-
193
-
194
-
195
-
196
-
197
-
198
-
199
-
200
-
201
-
202
-
203
-
204
-
205
-
206
-
207
-
208
-
209
-
210
-
211
-
212
-
213
-
214
-
215
-
216
-
217
-
218
-
219
-
220
-
221
-
222
-
223
-
224
-
225
-
226
-
227
-
228
-
229
-
230
-
231
-
232
-
233
-
234
-
235
-
236
-
237
-
238
-
239
-
240
-
241
-
242
-
243
-
244
-
245
-
246
-
247
-
248
-
249
-
250
-
251
-
252
-
253
-
254
-
255
-
256
-
257
-
258
-
259
-
260
-
261
-
262
-
263
-
264
-
265
-
266
-
267
-
268
-
269
-
270
-
271
-
272
-
273
-
274
-
275
-
276
-
277
-
278
-
279
-
280
-
281
-
282
-
283
-
284
-
285
-
286
-
287
-
288
-
289
-
290
-
291
-
292
-
293
-
294
-
295
-
296
-
297
-
 298
298 -
 299
299 -
 300
300 -
 301
301 -
 302
302 -
 303
303 -
 304
304 -
 305
305 -
 306
306 -
 307
307 -
 308
308 -
309
-
310
-
311
-
312
-
313
-
314
-
315
-
316
-
317
-
318
-
319
-
320
-
321
-
322
-
323
-
324
-
325
-
326
-
327
-
328
-
329
-
330
-
331
-
332
-
333
-
334
-
335
-
336
-
337
-
338
-
339
-
340
-
341
-
342
-
343
-
344
-
345
-
346
-
347
-
348
-
349
-
350
-
351
-
352
-
353
-
354
-
355
-
356
-
357
-
358
-
359
-
360
-
361
-
362
-
363
-
364
-
365
-
366
-
367
-
368
-
369
-
370
-
371
-
372
-
373
-
374
-
375
-
376
-
377
-
378
-
379
-
380
 |
 |
