Sharp AR-M355U AR-M355 AR-M455 Operation Manual Suite - Page 305
Enlarging/reducing The Image Before Transmission, Procedure For Sending
 |
View all Sharp AR-M355U manuals
Add to My Manuals
Save this manual to your list of manuals |
Page 305 highlights
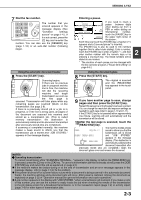
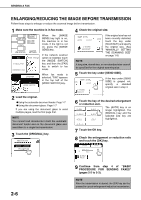
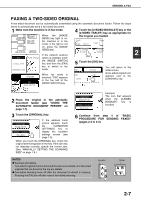
SENDING A FAX ENLARGING/REDUCING THE IMAGE BEFORE TRANSMISSION Follow these steps to enlarge or reduce the scanned image before transmission. 1 Make sure the machine is in fax mode. When the [IMAGE SEND] key light is on, the machine is in fax mode. If the light is not on, press the [IMAGE SEND] key. FAX E-MAIL/FTP INTERNET FAX MODE SWITCH If the network scanner option is installed, touch the [MODE SWITCH] key and then the [FAX] key to switch to fax mode. SPEAKER FAX MODE SWITCH When fax mode is selected, "FAX" appears in the top half of the [MODE SWITCH] key. 2 Load the original. GUsing the automatic document feeder: Page 1-7 GUsing the document glass: Page 1-7 If you are using the document glass to send multiple pages, load the first page first. NOTE You cannot load documents in both the automatic document feeder and on the document glass and send them in a single fax transmission. 3 Touch the [ORIGINAL] key. RESOLUTION AUTO 11X17 ORIGINAL 4 Check the original size. SCAN SIZE AUTO 11X17 2-SIDED BOOKLET 100% 2TA If the original size has not been correctly detected, touch the key under [SCAN SIZE] and specify the original size. (See "MANUALLY SETTING THE SCANNING SIZE" on page 1-8) NOTE A long size, stored size, or non-standard size cannot be specified for the original scanning size. 5 Touch the key under [SEND SIZE]. SEND SIZE 00% AUTO 2-SIDED TABLET If the key under [SEND SIZE] is grayed out, specify a standard original size in step 4. 6 Touch the key of the desired enlargement or reduction size. 51/2 X81/2 81/2 X13 The [AUTO] key is no longer highlighted. The 51/2 X81/2R 81/2 X14 [MANUAL] key and the selected size key are 81/2 X11 11X17 highlighted. 81/2 X11R 7 Touch the OK key. 8 Check the enlargement or reduction ratio and touch the [OK] key. SPEAKER SEND SIZE 70% 81/2X13 2-SIDED TABLET RESEND OK 2-6 9 Continue from step 4 of "BASIC PROCEDURE FOR SENDING FAXES" (pages 2-2 to 2-3). NOTE After the transmission is stored, the [CA] key can be pressed to cancel enlargement/reduction transmission.
-
 1
1 -
2
-
3
-
4
-
5
-
6
-
7
-
8
-
9
-
10
-
11
-
12
-
13
-
14
-
15
-
16
-
17
-
18
-
19
-
20
-
21
-
22
-
23
-
24
-
25
-
26
-
27
-
28
-
29
-
30
-
31
-
32
-
33
-
34
-
35
-
36
-
37
-
38
-
39
-
40
-
41
-
42
-
43
-
44
-
45
-
46
-
47
-
48
-
49
-
50
-
51
-
52
-
53
-
54
-
55
-
56
-
57
-
58
-
59
-
60
-
61
-
62
-
63
-
64
-
65
-
66
-
67
-
68
-
69
-
70
-
71
-
72
-
73
-
74
-
75
-
76
-
77
-
78
-
79
-
80
-
81
-
82
-
83
-
84
-
85
-
86
-
87
-
88
-
89
-
90
-
91
-
92
-
93
-
94
-
95
-
96
-
97
-
98
-
99
-
100
-
101
-
102
-
103
-
104
-
105
-
106
-
107
-
108
-
109
-
110
-
111
-
112
-
113
-
114
-
115
-
116
-
117
-
118
-
119
-
120
-
121
-
122
-
123
-
124
-
125
-
126
-
127
-
128
-
129
-
130
-
131
-
132
-
133
-
134
-
135
-
136
-
137
-
138
-
139
-
140
-
141
-
142
-
143
-
144
-
145
-
146
-
147
-
148
-
149
-
150
-
151
-
152
-
153
-
154
-
155
-
156
-
157
-
158
-
159
-
160
-
161
-
162
-
163
-
164
-
165
-
166
-
167
-
168
-
169
-
170
-
171
-
172
-
173
-
174
-
175
-
176
-
177
-
178
-
179
-
180
-
181
-
182
-
183
-
184
-
185
-
186
-
187
-
188
-
189
-
190
-
191
-
192
-
193
-
194
-
195
-
196
-
197
-
198
-
199
-
200
-
201
-
202
-
203
-
204
-
205
-
206
-
207
-
208
-
209
-
210
-
211
-
212
-
213
-
214
-
215
-
216
-
217
-
218
-
219
-
220
-
221
-
222
-
223
-
224
-
225
-
226
-
227
-
228
-
229
-
230
-
231
-
232
-
233
-
234
-
235
-
236
-
237
-
238
-
239
-
240
-
241
-
242
-
243
-
244
-
245
-
246
-
247
-
248
-
249
-
250
-
251
-
252
-
253
-
254
-
255
-
256
-
257
-
258
-
259
-
260
-
261
-
262
-
263
-
264
-
265
-
266
-
267
-
268
-
269
-
270
-
271
-
272
-
273
-
274
-
275
-
276
-
277
-
278
-
279
-
280
-
281
-
282
-
283
-
284
-
285
-
286
-
287
-
288
-
289
-
290
-
291
-
292
-
293
-
294
-
295
-
296
-
297
-
298
-
299
-
 300
300 -
 301
301 -
 302
302 -
 303
303 -
 304
304 -
 305
305 -
 306
306 -
 307
307 -
 308
308 -
 309
309 -
 310
310 -
311
-
312
-
313
-
314
-
315
-
316
-
317
-
318
-
319
-
320
-
321
-
322
-
323
-
324
-
325
-
326
-
327
-
328
-
329
-
330
-
331
-
332
-
333
-
334
-
335
-
336
-
337
-
338
-
339
-
340
-
341
-
342
-
343
-
344
-
345
-
346
-
347
-
348
-
349
-
350
-
351
-
352
-
353
-
354
-
355
-
356
-
357
-
358
-
359
-
360
-
361
-
362
-
363
-
364
-
365
-
366
-
367
-
368
-
369
-
370
-
371
-
372
-
373
-
374
-
375
-
376
-
377
-
378
-
379
-
380
 |
 |
