Sony Ericsson Elm User Guide - Page 25
Smile detection, Scenes, Photo fix, Tips on using the camera, Focus, Shoot mode, Review, Settings
 |
View all Sony Ericsson Elm manuals
Add to My Manuals
Save this manual to your list of manuals |
Page 25 highlights
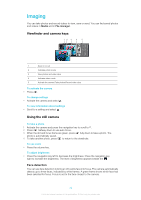
To set face detection 1 Activate the camera and press the navigation key to scroll to . 2 Select > Focus > Face detection. Smile detection Smile detection allows you to capture the smiles of family and friends. The camera detects up to three faces and selects one face for smile detection and auto focus. A yellow frame shows which face is selected. When the selected face smiles, the camera automatically takes a photo. To set Smile detection 1 Activate the camera and press the navigation key to scroll to . 2 Select > Shoot mode > Smile detection. 3 When appears, the camera is in Smile detection mode. To use Smile detection 1 With Smile detection set, point the camera at your subject. 2 Press fully down. When appears, smile detection is activated. A yellow frame shows the face in focus. 3 The camera automatically takes the photo when the subject smiles. 4 To take a photo, although no smile is detected, press fully down again. Scenes You can use Scenes to quickly set up the camera for common situations using preprogrammed scenes. The camera has determined a number of settings for you to fit the selected scene, ensuring the best possible photo. To use Scenes 1 Activate the camera and press the navigation key to scroll to . 2 Select > Scenes. 3 Select a scene. 4 Select to return to the viewfinder. 5 Take a photo. Photo fix You can use Photo fix to improve photos. In a one-click operation, brightness, light and contrast are adjusted to give you the best possible photo. The improvements are saved as a copy of the photo. The original photo is not affected. To improve a photo with Photo fix 1 Activate the camera and press the navigation key to scroll to . 2 Make sure Review is set to On. Select > Settings and scroll to Review > On. Select to return to the viewfinder. 3 Take a photo. 4 When you review the photo, select Options > Photo fix. 5 Review the improvement and select Save to save. 6 If you do not want to save the improvement, select Back. Tips on using the camera Rule of thirds Don't place your subject in the middle of the frame. By placing it a third of the way in, you achieve a better result. Hold it steady Avoid blurry photos by holding the camera steady. Try to steady your hand by leaning it against a solid object. You can also use the self-timer to make sure that the phone is steady when the photo is taken. 25 This is an Internet version of this publication. © Print only for private use.
-
 1
1 -
2
-
3
-
4
-
5
-
6
-
7
-
8
-
9
-
10
-
11
-
12
-
13
-
14
-
15
-
16
-
17
-
18
-
19
-
 20
20 -
 21
21 -
 22
22 -
 23
23 -
 24
24 -
 25
25 -
 26
26 -
 27
27 -
 28
28 -
 29
29 -
 30
30 -
31
-
32
-
33
-
34
-
35
-
36
-
37
-
38
-
39
-
40
-
41
-
42
-
43
-
44
-
45
-
46
-
47
-
48
-
49
-
50
-
51
-
52
-
53
-
54
-
55
-
56
-
57
-
58
-
59
-
60
-
61
-
62
-
63
-
64
-
65
-
66
-
67
-
68
 |
 |