Sony DAV X10 Operating Instructions - Page 42
Setting [STB SYNCHRO], Enjoying digital sound, to select [STB SYNCHRO], then press
 |
View all Sony DAV X10 manuals
Add to My Manuals
Save this manual to your list of manuals |
Page 42 highlights
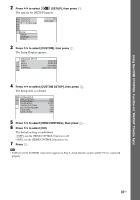
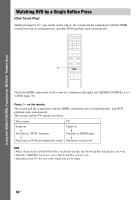
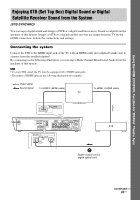
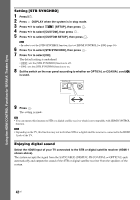
Using the HDMI CONTROL Function for 'BRAVIA' Theatre Sync Setting [STB SYNCHRO] 1 Press "/1. 2 Press DISPLAY when the system is in stop mode. 3 Press X/x to select [SETUP], then press . 4 Press X/x to select [CUSTOM], then press . 5 Press X/x to select [CUSTOM SETUP], then press . Note • In order to set the [STB SYNCHRO] function, first set [HDMI CONTROL] to [ON] (page 36). 6 Press X/x to select [STB SYNCHRO], then press . 7 Press X/x to select [ON]. The default setting is underlined. • [OFF]: sets the [STB SYNCHRO] function to off. • [ON]: sets the [STB SYNCHRO] function to on. 8 Set the switch on the rear panel according to whether an OPTICAL or COAXIAL cord (C) is used. DIGITAL IN OPTICAL COAXIAL SAT/ CABLE COAXIAL 9 Press . The setting is made. Tip • You can operate this function on STB or a digital satellite receiver which is not compatible with HDMI CONTROL function. Note • Depending on the TV, this function may not work when STB or a digital satellite receiver is connected to the HDMI 1 jack of the TV. Enjoying digital sound Select the HDMI input of your TV connected to the STB or digital satellite receiver (HDMI 1 shown above). The system accepts the signal from the SAT/CABLE (DIGITAL IN COAXIAL or OPTICAL) jack automatically and outputs the sound of the STB or digital satellite receiver from the speakers of the system. 42US
-
 1
1 -
2
-
3
-
4
-
5
-
6
-
7
-
8
-
9
-
10
-
11
-
12
-
13
-
14
-
15
-
16
-
17
-
18
-
19
-
20
-
21
-
22
-
23
-
24
-
25
-
26
-
27
-
28
-
29
-
30
-
31
-
32
-
33
-
34
-
35
-
36
-
 37
37 -
 38
38 -
 39
39 -
 40
40 -
 41
41 -
 42
42 -
 43
43 -
 44
44 -
 45
45 -
 46
46 -
 47
47 -
48
-
49
-
50
-
51
-
52
-
53
-
54
-
55
-
56
-
57
-
58
-
59
-
60
-
61
-
62
-
63
-
64
-
65
-
66
-
67
-
68
-
69
-
70
-
71
-
72
-
73
-
74
-
75
-
76
-
77
-
78
-
79
-
80
-
81
-
82
-
83
-
84
-
85
-
86
-
87
-
88
-
89
-
90
-
91
-
92
-
93
-
94
-
95
-
96
-
97
-
98
-
99
-
100
-
101
-
102
-
103
-
104
-
105
-
106
-
107
 |
 |
