Sony DAV X10 Operating Instructions - Page 75
Changing the password, Calibrating the Appropriate Settings Automatically, AUTO CALIBRATION
 |
View all Sony DAV X10 manuals
Add to My Manuals
Save this manual to your list of manuals |
Page 75 highlights
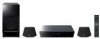
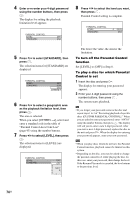
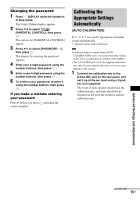
Changing the password 1 Press DISPLAY while the system is in stop mode. The Control Menu display appears. 2 Press X/x to select [PARENTAL CONTROL], then press . The options for [PARENTAL CONTROL] appear. 3 Press X/x to select [PASSWORD t], then press . The display for entering the password appears. 4 Enter your 4-digit password using the number buttons, then press . 5 Enter a new 4-digit password using the number buttons, then press . 6 To confirm your password, re-enter it using the number buttons, then press . If you make a mistake entering your password Press C before you press and input the correct number. Calibrating the Appropriate Settings Automatically (AUTO CALIBRATION) D. C. A. C.* can set the appropriate surround sound automatically. * Digital Cinema Auto Calibration Note • Loud test sound is output when [AUTO CALIBRATION] starts. You cannot turn the volume down. Give consideration to children and neighbor. • The A.CAL MIC jack is for the supplied calibration mic only. Do not connect other mics as it may cause damage to the system. 1 Connect the calibration mic to the A.CAL MIC jack on the rear panel, and set it up at the ear level using a tripod, etc. (not supplied). The front of each speaker should face the calibration mic, and there should be no obstruction between the speakers and the calibration mic. Advanced Settings and Adjustments continued 75US
-
 1
1 -
2
-
3
-
4
-
5
-
6
-
7
-
8
-
9
-
10
-
11
-
12
-
13
-
14
-
15
-
16
-
17
-
18
-
19
-
20
-
21
-
22
-
23
-
24
-
25
-
26
-
27
-
28
-
29
-
30
-
31
-
32
-
33
-
34
-
35
-
36
-
37
-
38
-
39
-
40
-
41
-
42
-
43
-
44
-
45
-
46
-
47
-
48
-
49
-
50
-
51
-
52
-
53
-
54
-
55
-
56
-
57
-
58
-
59
-
60
-
61
-
62
-
63
-
64
-
65
-
66
-
67
-
68
-
69
-
 70
70 -
 71
71 -
 72
72 -
 73
73 -
 74
74 -
 75
75 -
 76
76 -
 77
77 -
 78
78 -
 79
79 -
 80
80 -
81
-
82
-
83
-
84
-
85
-
86
-
87
-
88
-
89
-
90
-
91
-
92
-
93
-
94
-
95
-
96
-
97
-
98
-
99
-
100
-
101
-
102
-
103
-
104
-
105
-
106
-
107
 |
 |
