Sony DAV X10 Operating Instructions - Page 77
The measurement is OK., To select the auto calibration, setting mode, To adjust the subwoofer level
 |
View all Sony DAV X10 manuals
Add to My Manuals
Save this manual to your list of manuals |
Page 77 highlights
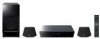
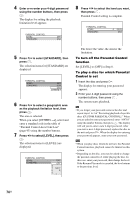
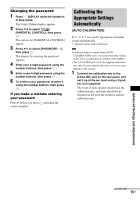
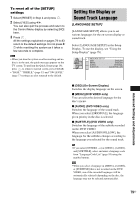
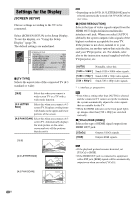
Advanced Settings and Adjustments x The measurement is OK. Unplug the calibration mic, then select [YES]. The result is implemented. Measurement complete. FRONT L : 10 1/4 ft 3.12m 0.0dB FRONT R : 11ft 3.35m + 0.5dB SUBWOOFER : 11ft 3.35m + 1.0dB If OK, unplug calibration mic and select "YES". YES NO x The measurement is not OK. Follow the message, then select [YES] to retry. Measurement failure. Check front speaker connection. Retry? YES NO Note • While the Auto Calibration function works: - do not turn off the power. - do not press any button. - do not change the volume. - do not change the function. - do not load or eject a disc. - do not unplug the calibration mic. • Depending on the acoustics of the room, the displayed distance may not represent the actual distance. To select the auto calibration setting mode You can select the auto calibration setting mode. 1 Press SYSTEM MENU. 2 Press X/x repeatedly until "A.CAL MODE" appears in the front panel display, then press or c. 3 Press X/x to select a setting. The default setting is underlined. • "A.CAL ON": reflects the setting that is set by the auto calibration. • "A.CAL OFF": returns to the default speaker setting, regardless of the speaker setting made by the auto calibration function. 4 Press . 5 Press SYSTEM MENU. The system menu turns off. Note • If "Setup A.CAL" appears in the front panel display, perform [AUTO CALIBRATION]. For details, see page 75. • When you perform [AUTO CALIBRATION], "A.CAL MODE" is set to "A.CAL ON" automatically. To adjust the subwoofer level 1 Press SYSTEM MENU. 2 Press X/x repeatedly until "SW LEVEL" appears in the front panel display, then press or c. 3 Press X/x to adjust. Adjusts the subwoofer level (-6.0 dB - +6.0 dB, 0.5 dB increments). The adjusted value appears in the front panel display. 4 Press . 5 Press SYSTEM MENU. The system menu turns off. Note • When you perform [AUTO CALIBRATION], the subwoofer level setting is readjusted. 77US
-
 1
1 -
2
-
3
-
4
-
5
-
6
-
7
-
8
-
9
-
10
-
11
-
12
-
13
-
14
-
15
-
16
-
17
-
18
-
19
-
20
-
21
-
22
-
23
-
24
-
25
-
26
-
27
-
28
-
29
-
30
-
31
-
32
-
33
-
34
-
35
-
36
-
37
-
38
-
39
-
40
-
41
-
42
-
43
-
44
-
45
-
46
-
47
-
48
-
49
-
50
-
51
-
52
-
53
-
54
-
55
-
56
-
57
-
58
-
59
-
60
-
61
-
62
-
63
-
64
-
65
-
66
-
67
-
68
-
69
-
70
-
71
-
 72
72 -
 73
73 -
 74
74 -
 75
75 -
 76
76 -
 77
77 -
 78
78 -
 79
79 -
 80
80 -
 81
81 -
 82
82 -
83
-
84
-
85
-
86
-
87
-
88
-
89
-
90
-
91
-
92
-
93
-
94
-
95
-
96
-
97
-
98
-
99
-
100
-
101
-
102
-
103
-
104
-
105
-
106
-
107
 |
 |
