Sony DAV X10 Operating Instructions - Page 71
Using the DIGITAL MEDIA PORT Adapter, Playing the connected component on the system
 |
View all Sony DAV X10 manuals
Add to My Manuals
Save this manual to your list of manuals |
Page 71 highlights
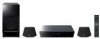
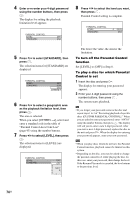
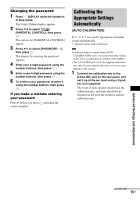
Using the DIGITAL MEDIA PORT Adapter The DIGITAL MEDIA PORT (DMPORT) adapter is for enjoying sound from a portable audio source or computer. By connecting a DIGITAL MEDIA PORT adapter, you can enjoy sound from the connected component on the system. The DIGITAL MEDIA PORT adapter (TDMBT1, Bluetooth adapter) is supplied. For details, see the operating instructions of TDM-BT1. Also, you can use other type of DIGITAL MEDIA PORT adapter. Available DIGITAL MEDIA PORT adapters vary in each area. For details on connecting the DIGITAL MEDIA PORT adapter, see "Other Components Hookup" (page 25). Note • Connect the supplied DIGITAL MEDIA PORT adapter (TDM-BT1) to the DMPORT1 jack on the unit. Connect the other DIGITAL MEDIA PORT adapter to the DMPORT2 jack on the unit. • Do not connect an adaptor other than the DIGITAL MEDIA PORT adapter. • Do not connect or disconnect the DIGITAL MEDIA PORT adapter to/from the unit while the system is turned on. • Wait a moment after turning on the system, then operate the DIGITAL MEDIA PORT adapter. • Depending on the type of DIGITAL MEDIA PORT adapter (not supplied), images may also be output. In this case, the system outputs a composite video signal only regardless of the type of video signal. Playing the connected component on the system 1 Press FUNCTION repeatedly until "DMPORT1" or "DMPORT2" appears in the front panel display. 2 Start playback of the connected component. The sound and images from the connected component are played on the system or connected TV. For operation details of the supplied DIGITAL MEDIA PORT adapter (TDMBT1), see the operating instructions of the TDM-BT1. For operation details of the other DIGITAL MEDIA PORT adapter (not supplied), see the operating instructions of each adapter. Tip • When listening to MP3 or other compressed music using a portable audio source, you can enhance the sound. Press SOUND FIELD repeatedly until "AUTO" or "P.AUDIO" appears in the front panel display. To cancel, select "2CH STEREO." Note • Depending on the type of DIGITAL MEDIA PORT adapter (not supplied), you may be able to operate a connected component using either the buttons on the remote or the control unit. The following illustration shows an example of buttons that can be used in this case. ./> H x X Other Operations 71US
-
 1
1 -
2
-
3
-
4
-
5
-
6
-
7
-
8
-
9
-
10
-
11
-
12
-
13
-
14
-
15
-
16
-
17
-
18
-
19
-
20
-
21
-
22
-
23
-
24
-
25
-
26
-
27
-
28
-
29
-
30
-
31
-
32
-
33
-
34
-
35
-
36
-
37
-
38
-
39
-
40
-
41
-
42
-
43
-
44
-
45
-
46
-
47
-
48
-
49
-
50
-
51
-
52
-
53
-
54
-
55
-
56
-
57
-
58
-
59
-
60
-
61
-
62
-
63
-
64
-
65
-
 66
66 -
 67
67 -
 68
68 -
 69
69 -
 70
70 -
 71
71 -
 72
72 -
 73
73 -
 74
74 -
 75
75 -
 76
76 -
77
-
78
-
79
-
80
-
81
-
82
-
83
-
84
-
85
-
86
-
87
-
88
-
89
-
90
-
91
-
92
-
93
-
94
-
95
-
96
-
97
-
98
-
99
-
100
-
101
-
102
-
103
-
104
-
105
-
106
-
107
 |
 |
