Sony DAV X10 Operating Instructions - Page 80
Settings for the Display, SCREEN SETUP] - instruction manual
 |
View all Sony DAV X10 manuals
Add to My Manuals
Save this manual to your list of manuals |
Page 80 highlights
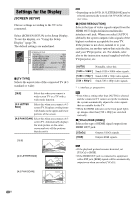
Settings for the Display [SCREEN SETUP] Choose settings according to the TV to be connected. Select [SCREEN SETUP] in the Setup Display. To use the display, see "Using the Setup Display" (page 78). The default settings are underlined. SCREEN SETUP TV TYPE: 16:9 HDMI RESOLUTION: AUTO YCBCR/RGB (HDMI): YCBCR SCREEN SAVER: ON BACKGROUND: JACKET PICTURE BLACK LEVEL: ON BLACK LEVEL (COMPONENT OUT): OFF 4:3 OUTPUT: FULL x [TV TYPE] Selects the aspect ratio of the connected TV (4:3 standard or wide). [16:9] Select this when you connect a wide-screen TV or a TV with a wide mode function. [4:3 LETTER BOX] Select this when you connect a 4:3 screen TV. Displays a wide picture with bands on the upper and lower portions of the screen. [4:3 PAN SCAN] Select this when you connect a 4:3 screen TV. Automatically displays the wide picture on the entire screen and cuts off the portions that do not fit. [16:9] [4:3 LETTER BOX] Note • Depending on the DVD, [4:3 LETTER BOX] may be selected automatically instead of [4:3 PAN SCAN] or vice versa. x [HDMI RESOLUTION] Selects the type of video signals output from the HDMI OUT (high-definition multimedia interface out) jack. When you select [AUTO] (default), the system outputs video signals of the highest resolution acceptable for your TV. If the picture is not clear, natural or to your satisfaction, try another option that suits the disc and your TV/projector, etc. For details, refer also to the instruction manual supplied with the TV/projector, etc. [AUTO] Normally, select this. [1920 × 1080i*] Sends 1920 × 1080i video signals. [1280 × 720p*] Sends 1280 × 720p video signals. [720 × 480p*] Sends 720 × 480p video signals. * i: interlace, p: progressive Note • Even when a setting other than [AUTO] is selected and the connected TV cannot accept the resolution, the system automatically adjusts the video signals that are suitable for the TV. • When the HDMI indicator on the front panel lights up, images other than [720 × 480p] are stretched vertically. x [YCBCR/RGB (HDMI)] Selects the type of HDMI signal output from HDMI OUT jack. [YCBCR] [RGB] Outputs YCBCR signals. Outputs RGB signals. Note • If the playback picture becomes distorted, set [YCBCR] to [RGB]. • If the HDMI OUT jack is connected to equipment with a DVI jack, [RGB] signals will be automatically output even when you select [YCBCR]. [4:3 PAN SCAN] 80US
-
 1
1 -
2
-
3
-
4
-
5
-
6
-
7
-
8
-
9
-
10
-
11
-
12
-
13
-
14
-
15
-
16
-
17
-
18
-
19
-
20
-
21
-
22
-
23
-
24
-
25
-
26
-
27
-
28
-
29
-
30
-
31
-
32
-
33
-
34
-
35
-
36
-
37
-
38
-
39
-
40
-
41
-
42
-
43
-
44
-
45
-
46
-
47
-
48
-
49
-
50
-
51
-
52
-
53
-
54
-
55
-
56
-
57
-
58
-
59
-
60
-
61
-
62
-
63
-
64
-
65
-
66
-
67
-
68
-
69
-
70
-
71
-
72
-
73
-
74
-
 75
75 -
 76
76 -
 77
77 -
 78
78 -
 79
79 -
 80
80 -
 81
81 -
 82
82 -
 83
83 -
 84
84 -
 85
85 -
86
-
87
-
88
-
89
-
90
-
91
-
92
-
93
-
94
-
95
-
96
-
97
-
98
-
99
-
100
-
101
-
102
-
103
-
104
-
105
-
106
-
107
 |
 |
