Sony DCR-DVD403 Operating Guide - Page 23
Step 6: Setting the date and time
 |
UPC - 027242670075
View all Sony DCR-DVD403 manuals
Add to My Manuals
Save this manual to your list of manuals |
Page 23 highlights
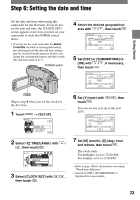
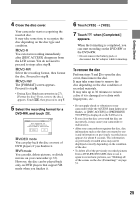
Step 6: Setting the date and time Getting Started Set the date and time when using this camcorder for the first time. If you do not set the date and time, the [CLOCK SET] screen appears every time you turn on your camcorder or slide the POWER switch down. • If you do not use your camcorder for about 3 months, the built-in rechargeable battery gets discharged and the date and time settings may be cleared from the memory. In that case, charge the rechargeable battery and then set the date and time again (p.111). POWER switch 4 Select the desired geographical area with / , then touch . 5 Set [DST] or [SUMMERTIME] to [ON] with / , if necessary, then touch . CLOCK SET -:--:-- AREA26 GMT -5.0 New York , Bogota DST OFF DATE 2005Y JANM 1D 12: 00 AM OK Skip to step 4 when you set the clock for the first time. 1 Touch [SETUP]. 6 Set [Y] (year) with touch . / , then You can set any year up to the year 2079. CLOCK SET -:--:-- AREA26 GMT -5.0 New York , Bogota DST OFF DATE 2005Y JANM 1D 12: 00 AM OK 2 Select TIME/LANGU. with / , then touch . 3 Select [CLOCK SET] with then touch . /, 7 Set [M] (month), [D] (day), hour and minute, then touch . The clock starts. For midnight, set it to 12:00 AM. For midday, set it to 12:00 PM. • Refer to page 106 for information concerning "World time difference." • Instead of [DST], [SUMMERTIME] is displayed for some models. 23
-
 1
1 -
2
-
3
-
4
-
5
-
6
-
7
-
8
-
9
-
10
-
11
-
12
-
13
-
14
-
15
-
16
-
17
-
 18
18 -
 19
19 -
 20
20 -
 21
21 -
 22
22 -
 23
23 -
 24
24 -
 25
25 -
 26
26 -
 27
27 -
 28
28 -
29
-
30
-
31
-
32
-
33
-
34
-
35
-
36
-
37
-
38
-
39
-
40
-
41
-
42
-
43
-
44
-
45
-
46
-
47
-
48
-
49
-
50
-
51
-
52
-
53
-
54
-
55
-
56
-
57
-
58
-
59
-
60
-
61
-
62
-
63
-
64
-
65
-
66
-
67
-
68
-
69
-
70
-
71
-
72
-
73
-
74
-
75
-
76
-
77
-
78
-
79
-
80
-
81
-
82
-
83
-
84
-
85
-
86
-
87
-
88
-
89
-
90
-
91
-
92
-
93
-
94
-
95
-
96
-
97
-
98
-
99
-
100
-
101
-
102
-
103
-
104
-
105
-
106
-
107
-
108
-
109
-
110
-
111
-
112
-
113
-
114
-
115
-
116
-
117
-
118
-
119
-
120
 |
 |
