Sony DCR-DVD403 Operating Guide - Page 37
Recording/playback, To check the remaining battery, To turn off the operation confirmation beep - parts
 |
UPC - 027242670075
View all Sony DCR-DVD403 manuals
Add to My Manuals
Save this manual to your list of manuals |
Page 37 highlights
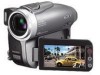
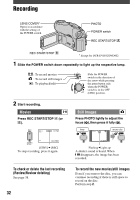
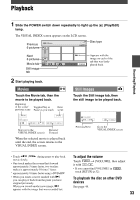
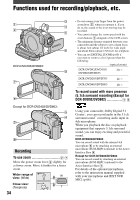
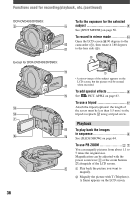
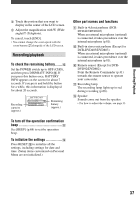
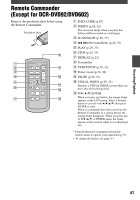
Recording/Playback Touch the portion that you want to display in the center of the LCD screen. Adjust the magnification with W (Wide angle)/T (Telephoto). To cancel, touch [END]. • You cannot change the zoom speed with the zoom buttons alongside of the LCD screen. Recording/playback To check the remaining battery ...... Set the POWER switch up to OFF (CHG), and then press DISP/BATT INFO . If you press this button once, BATTERY INFO appears on the screen for about 7 seconds. If you press and hold the button for a while, this information is displayed for about 20 seconds. Recording capacity (approx.) Remaining battery (approx.) Other part names and functions Built-in 4ch microphone (DCRDVD403/DVD803) When an external microphone (optional) is connected, it takes precedence over the internal microphone (p.81). Built-in stereo microphone (Except for DCR-DVD403/DVD803) When an external microphone (optional) is connected, it takes precedence over the internal microphone (p.81). Remote sensor (Except for DCRDVD92/DVD602) Point the Remote Commander (p.41) towards the remote sensor to operate your camcorder. Recording lamp The recording lamp lights up in red during recording (p.68). Speaker Sounds come out from the speaker. • For how to adjust the volume, see page 33. To turn off the operation confirmation beep See [BEEP] (p.68) to set the operation beep. To initialize the settings Press RESET to initialize all the settings, including settings for date and time. (Setup items customized on Personal Menu are not initialized.) 37
-
 1
1 -
2
-
3
-
4
-
5
-
6
-
7
-
8
-
9
-
10
-
11
-
12
-
13
-
14
-
15
-
16
-
17
-
18
-
19
-
20
-
21
-
22
-
23
-
24
-
25
-
26
-
27
-
28
-
29
-
30
-
31
-
 32
32 -
 33
33 -
 34
34 -
 35
35 -
 36
36 -
 37
37 -
 38
38 -
 39
39 -
 40
40 -
 41
41 -
 42
42 -
43
-
44
-
45
-
46
-
47
-
48
-
49
-
50
-
51
-
52
-
53
-
54
-
55
-
56
-
57
-
58
-
59
-
60
-
61
-
62
-
63
-
64
-
65
-
66
-
67
-
68
-
69
-
70
-
71
-
72
-
73
-
74
-
75
-
76
-
77
-
78
-
79
-
80
-
81
-
82
-
83
-
84
-
85
-
86
-
87
-
88
-
89
-
90
-
91
-
92
-
93
-
94
-
95
-
96
-
97
-
98
-
99
-
100
-
101
-
102
-
103
-
104
-
105
-
106
-
107
-
108
-
109
-
110
-
111
-
112
-
113
-
114
-
115
-
116
-
117
-
118
-
119
-
120
 |
 |
