Sony DCR-DVD403 Operating Guide - Page 46
Step 3: Customizing a, Photomovie, Step 4: Changing the disc title
 |
UPC - 027242670075
View all Sony DCR-DVD403 manuals
Add to My Manuals
Save this manual to your list of manuals |
Page 46 highlights
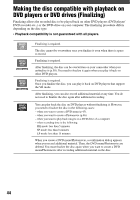
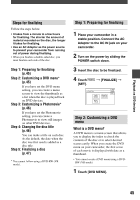
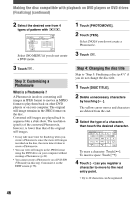
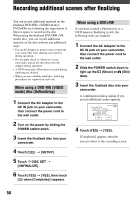
Making the disc compatible with playback on DVD players or DVD drives (Finalizing) (continued) 2 Select the desired one from 4 types of pattern with / . Select [NO MENU] if you do not create a DVD menu. 3 Touch . Step 3: Customizing a Photomovie What is a Photomovie ? A Photomovie involves converting still images in JPEG format to movies in MPEG format to play them back on other DVD players or on your computer. The original still image remains in the JPEG format on the disc. Converted still images are played back in sequence like a slide show. The resolution (pixels) of the converted Photomovie, however, is lower than that of the original still images. • It may take more time for finalizing when you create a Photomovie since the more still images recorded on the disc, the more time it takes to create a Photomovie. • You can view still images in the JPEG format using the DVD drive on your computer without creating a Photomovie (p.48). • You cannot create a Photomovie on a DVD-RW (VR mode) in this step. Customize it on the EDIT screen (p.76). 1 Touch [PHOTOMOVIE]. 2 Touch [YES]. Select [NO] if you do not create a Photomovie. 3 Touch . Step 4: Changing the disc title Skip to "Step 5: Finalizing a disc (p.47)" if you do not change the disc title. 1 Touch [DISC TITLE]. 2 Delete unnecessary characters by touching []. The yellow cursor moves and characters are deleted from the end. 3 Select the type of a character, then touch the desired character. To erase a character: Touch []. To insert a space: Touch []. 4 Touch [] as you register a character to move to the next entry point. • Up to 20 characters can be registered. 46
-
 1
1 -
2
-
3
-
4
-
5
-
6
-
7
-
8
-
9
-
10
-
11
-
12
-
13
-
14
-
15
-
16
-
17
-
18
-
19
-
20
-
21
-
22
-
23
-
24
-
25
-
26
-
27
-
28
-
29
-
30
-
31
-
32
-
33
-
34
-
35
-
36
-
37
-
38
-
39
-
40
-
 41
41 -
 42
42 -
 43
43 -
 44
44 -
 45
45 -
 46
46 -
 47
47 -
 48
48 -
 49
49 -
 50
50 -
 51
51 -
52
-
53
-
54
-
55
-
56
-
57
-
58
-
59
-
60
-
61
-
62
-
63
-
64
-
65
-
66
-
67
-
68
-
69
-
70
-
71
-
72
-
73
-
74
-
75
-
76
-
77
-
78
-
79
-
80
-
81
-
82
-
83
-
84
-
85
-
86
-
87
-
88
-
89
-
90
-
91
-
92
-
93
-
94
-
95
-
96
-
97
-
98
-
99
-
100
-
101
-
102
-
103
-
104
-
105
-
106
-
107
-
108
-
109
-
110
-
111
-
112
-
113
-
114
-
115
-
116
-
117
-
118
-
119
-
120
 |
 |
