Sony DCR-DVD403 Operating Guide - Page 50
Using the Recorded disc (DVD-RW/DVD+RW), Recording additional scenes after finalizing
 |
UPC - 027242670075
View all Sony DCR-DVD403 manuals
Add to My Manuals
Save this manual to your list of manuals |
Page 50 highlights
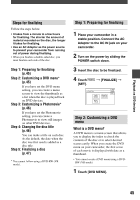
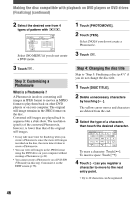
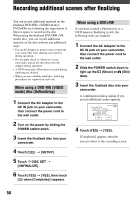
Recording additional scenes after finalizing You can record additional material on the finalized DVD-RWs (VIDEO mode)/ DVD+RWs by following the steps below if there is space to record on the disc. When using the finalized DVD-RW (VR mode) disc, you can record additional material on the disc without any additional steps. • Use an AC Adaptor as power source to prevent your camcorder from running out of power during operation. • Do not apply shock or vibration to your camcorder, and do not disconnect the AC adaptor during operation. • A DVD menu and a Photomovie created during finalizing are deleted. • When you use a double-sided disc, following procedures are required on each side. When using a DVD-RW (VIDEO mode) disc (Unfinalizing) 1 Connect the AC Adaptor to the DC IN jack on your camcorder, then connect the power cord to the wall outlet. 2 Turn on the power by sliding the POWER switch down. 3 Insert the finalized disc into your camcorder. 4 Touch [SETUP]. 5 Touch DISC SET [UNFINALIZE]. 6 Touch [YES] [YES], then touch when [Completed.] appears. When using a DVD+RW If you have created a Photomovie or a DVD menu in finalizing (p.44), the following steps are required. 1 Connect the AC Adaptor to the DC IN jack on your camcorder, then connect the power cord to the wall outlet. 2 Slide the POWER switch down to light up the (Movie) or (Still) lamp. 3 Insert the finalized disc into your camcorder. A confirmation dialog asking if you record additional scenes appears. 4 Touch [YES] [YES]. [Completed.] appears, then the screen returns to the recording screen. 50
-
 1
1 -
2
-
3
-
4
-
5
-
6
-
7
-
8
-
9
-
10
-
11
-
12
-
13
-
14
-
15
-
16
-
17
-
18
-
19
-
20
-
21
-
22
-
23
-
24
-
25
-
26
-
27
-
28
-
29
-
30
-
31
-
32
-
33
-
34
-
35
-
36
-
37
-
38
-
39
-
40
-
41
-
42
-
43
-
44
-
 45
45 -
 46
46 -
 47
47 -
 48
48 -
 49
49 -
 50
50 -
 51
51 -
 52
52 -
 53
53 -
 54
54 -
 55
55 -
56
-
57
-
58
-
59
-
60
-
61
-
62
-
63
-
64
-
65
-
66
-
67
-
68
-
69
-
70
-
71
-
72
-
73
-
74
-
75
-
76
-
77
-
78
-
79
-
80
-
81
-
82
-
83
-
84
-
85
-
86
-
87
-
88
-
89
-
90
-
91
-
92
-
93
-
94
-
95
-
96
-
97
-
98
-
99
-
100
-
101
-
102
-
103
-
104
-
105
-
106
-
107
-
108
-
109
-
110
-
111
-
112
-
113
-
114
-
115
-
116
-
117
-
118
-
119
-
120
 |
 |
