Sony DCR-DVD403 Operating Guide - Page 45
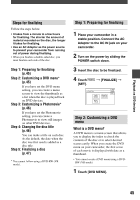
Steps for finalizing, Step 1: Preparing for finalizing, Step 2: Customizing a DVD
 |
UPC - 027242670075
View all Sony DCR-DVD403 manuals
Add to My Manuals
Save this manual to your list of manuals |
Page 45 highlights
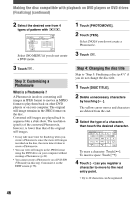
Playback on DVD devices Steps for finalizing Follow the steps below. • It takes from a minute to a few hours for finalizing. The shorter the amount of material recorded on the disc, the longer it takes for finalizing. • Use an AC Adaptor as the power source to prevent your camcorder from running out of power during finalizing. • When you finalize a double-sided disc, you must finalize each side of the disc. Step 1: Preparing for finalizing (p.45) Step 2: Customizing a DVD menu* (p.45) If you have set the DVD menu setting, you can create a menu screen to view the thumbnails as a list when the disc is played back on DVD devices. Step 3: Customizing a Photomovie* (p.46) If you have set the Photomovie setting, you can create a Photomovie to view still images on other DVD devices. Step 4: Changing the disc title (p.46) You can make a title on each disc. As the default, the date when the disc was first used is added as a disc title. Step 5: Finalizing a disc (p.47) * You cannot follow using a DVD-RW (VR mode). Step 1: Preparing for finalizing 1 Place your camcorder in a stable position. Connect the AC Adaptor to the DC IN jack on your camcorder. 2 Turn on the power by sliding the POWER switch down. 3 Insert the disc to be finalized. 4 Touch [SET]. [FINALIZE] Step 2: Customizing a DVD menu What is a DVD menu? A DVD menu is a menu screen that allows you to display the index to check the contents of the disc or to select desired scenes easily. When you create the DVD menu on your camcorder, the first scene of each movie is displayed with date as a thumbnail. • You cannot create a DVD menu using a DVDRW (VR mode). 1 Touch [DVD MENU]. 45
-
 1
1 -
2
-
3
-
4
-
5
-
6
-
7
-
8
-
9
-
10
-
11
-
12
-
13
-
14
-
15
-
16
-
17
-
18
-
19
-
20
-
21
-
22
-
23
-
24
-
25
-
26
-
27
-
28
-
29
-
30
-
31
-
32
-
33
-
34
-
35
-
36
-
37
-
38
-
39
-
 40
40 -
 41
41 -
 42
42 -
 43
43 -
 44
44 -
 45
45 -
 46
46 -
 47
47 -
 48
48 -
 49
49 -
 50
50 -
51
-
52
-
53
-
54
-
55
-
56
-
57
-
58
-
59
-
60
-
61
-
62
-
63
-
64
-
65
-
66
-
67
-
68
-
69
-
70
-
71
-
72
-
73
-
74
-
75
-
76
-
77
-
78
-
79
-
80
-
81
-
82
-
83
-
84
-
85
-
86
-
87
-
88
-
89
-
90
-
91
-
92
-
93
-
94
-
95
-
96
-
97
-
98
-
99
-
100
-
101
-
102
-
103
-
104
-
105
-
106
-
107
-
108
-
109
-
110
-
111
-
112
-
113
-
114
-
115
-
116
-
117
-
118
-
119
-
120
 |
 |
