Sony DCR-DVD403 Operating Guide - Page 79
Dubbing to VCR/DVD devices
 |
UPC - 027242670075
View all Sony DCR-DVD403 manuals
Add to My Manuals
Save this manual to your list of manuals |
Page 79 highlights
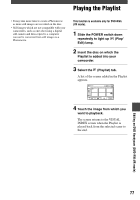
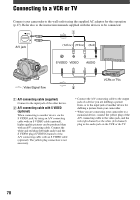
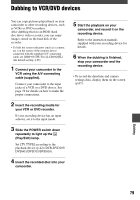
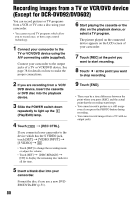
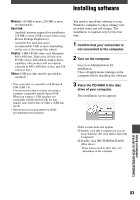
Dubbing to VCR/DVD devices You can copy pictures played back on your camcorder to other recording devices, such as VCRs or DVD recorders. After dubbing them to an HDD (hard disc drive) video recorder, you can enjoy images stored on the hard disk of the recorder. • To hide the screen indicators (such as a counter, etc.) on the screen of the monitor device connected with the supplied A/V connecting cable, set [DISP OUTPUT] to [LCD PANEL] (the default setting, p.68). 1 Connect your camcorder to the VCR using the A/V connecting cable (supplied). Connect your camcorder to the input jacks of a VCR or a DVD device. See page 78 for details on how to make the proper connections. 2 Insert the recording media for your VCR or DVD recorder. If your recording device has an input selector, set it to the input mode. 3 Slide the POWER switch down repeatedly to light up the (Play/Edit) lamp. Set [TV TYPE] according to the playback device (p.42) (DCR-DVD203/ DVD403/DVD703/DVD803). 4 Insert the recorded disc into your camcorder. 5 Start the playback on your camcorder, and record it on the recording device. Refer to the instruction manuals supplied with your recording device for details. 6 When the dubbing is finished, stop your camcorder and the recording device. • To record the date/time and camera settings data, display them on the screen (p.67). Dubbing 79
-
 1
1 -
2
-
3
-
4
-
5
-
6
-
7
-
8
-
9
-
10
-
11
-
12
-
13
-
14
-
15
-
16
-
17
-
18
-
19
-
20
-
21
-
22
-
23
-
24
-
25
-
26
-
27
-
28
-
29
-
30
-
31
-
32
-
33
-
34
-
35
-
36
-
37
-
38
-
39
-
40
-
41
-
42
-
43
-
44
-
45
-
46
-
47
-
48
-
49
-
50
-
51
-
52
-
53
-
54
-
55
-
56
-
57
-
58
-
59
-
60
-
61
-
62
-
63
-
64
-
65
-
66
-
67
-
68
-
69
-
70
-
71
-
72
-
73
-
 74
74 -
 75
75 -
 76
76 -
 77
77 -
 78
78 -
 79
79 -
 80
80 -
 81
81 -
 82
82 -
 83
83 -
 84
84 -
85
-
86
-
87
-
88
-
89
-
90
-
91
-
92
-
93
-
94
-
95
-
96
-
97
-
98
-
99
-
100
-
101
-
102
-
103
-
104
-
105
-
106
-
107
-
108
-
109
-
110
-
111
-
112
-
113
-
114
-
115
-
116
-
117
-
118
-
119
-
120
 |
 |
