Sony DCR-DVD403 Operating Guide - Page 47
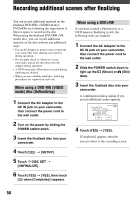
Step 5: Finalizing a disc, Touch [END].
 |
UPC - 027242670075
View all Sony DCR-DVD403 manuals
Add to My Manuals
Save this manual to your list of manuals |
Page 47 highlights
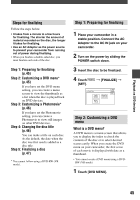
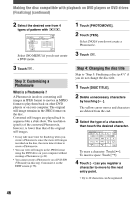
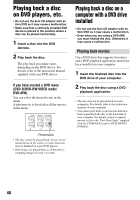
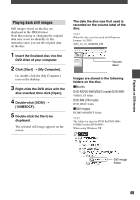
Playback on DVD devices 5 When you have finished entering characters, touch . The disc title changes to the one you entered. 6 Touch [END]. • When you change a disc title already set by other devices, the 21st and subsequent characters are deleted. Step 5: Finalizing a disc 1 Confirm the settings you made in steps from 2 to 4 of the "steps for finalizing" on the LCD screen. 2 Touch . 3 Touch [YES] [YES]. Finalizing starts. • Do not apply shock or vibration to your camcorder, and do not disconnect the AC adaptor during finalizing. When you need to disconnect the AC adaptor, make sure that the power of your camcorder is set to off and disconnect the adaptor after the CHG (charge) lamp goes off. Finalizing restarts when you connect the AC adaptor and turn on your camcorder again. You cannot remove the disc until the finalizing operation is completed. 4 Touch ,when [Completed] appears. When using a DVD-R/DVD-RW (VIDEO mode)/DVD+RW, flashes after finalizing is completed when the POWER switch is set to (Movie) or (Still). Remove the disc from your camcorder. • When you made the setting to enable a creation of a DVD menu on DVD-R/DVD-RW (VIDEO mode)/DVD+RW, then finalize the disc, the DVD menu appears for a few seconds while finalizing the disc. • You cannot view a Photomovie with the DVDR/DVD-RW (VIDEO mode) discs on your camcorder. • After finalizing a disc, the disc indicator and the recording format are displayed as shown below: DVD-R DVD-RW (VIDEO mode) DVD-RW (VR mode) DVD+RW 47
-
 1
1 -
2
-
3
-
4
-
5
-
6
-
7
-
8
-
9
-
10
-
11
-
12
-
13
-
14
-
15
-
16
-
17
-
18
-
19
-
20
-
21
-
22
-
23
-
24
-
25
-
26
-
27
-
28
-
29
-
30
-
31
-
32
-
33
-
34
-
35
-
36
-
37
-
38
-
39
-
40
-
41
-
 42
42 -
 43
43 -
 44
44 -
 45
45 -
 46
46 -
 47
47 -
 48
48 -
 49
49 -
 50
50 -
 51
51 -
 52
52 -
53
-
54
-
55
-
56
-
57
-
58
-
59
-
60
-
61
-
62
-
63
-
64
-
65
-
66
-
67
-
68
-
69
-
70
-
71
-
72
-
73
-
74
-
75
-
76
-
77
-
78
-
79
-
80
-
81
-
82
-
83
-
84
-
85
-
86
-
87
-
88
-
89
-
90
-
91
-
92
-
93
-
94
-
95
-
96
-
97
-
98
-
99
-
100
-
101
-
102
-
103
-
104
-
105
-
106
-
107
-
108
-
109
-
110
-
111
-
112
-
113
-
114
-
115
-
116
-
117
-
118
-
119
-
120
 |
 |
