Sony DCR-DVD403 Operating Guide - Page 51
Deleting all of the scenes on the disc (Formatting
 |
UPC - 027242670075
View all Sony DCR-DVD403 manuals
Add to My Manuals
Save this manual to your list of manuals |
Page 51 highlights
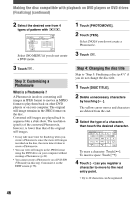
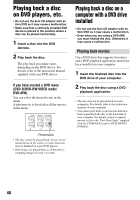
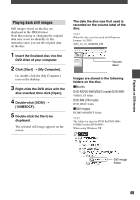
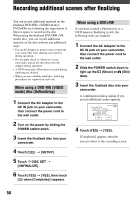
Deleting all of the scenes on the disc (Formatting) Formatting makes the recorded disc new and reusable by deleting all the data recorded on the disc. The recording capacity of the disc is recovered by formatting it. The procedure for formatting differs depending on the disc type. 2 Turn on the power by sliding the POWER switch down. 3 Insert the disc to be formatted into your camcorder. You cannot format this kind of disc. Use a new disc. 4 Touch [FORMAT]. You can format this kind of disc and reuse it. If you have finalized the disc, it is unfinalized. You can format this kind of disc and reuse it. If you have finalized the disc, the previous records on finalizing remain on the disc. You can format this kind of disc and reuse it. DVD-RW Select the recording format, then format the disc. Proceed to step 5. DVD+RW The [FORMAT] screen appears. Proceed to step 6. 5 Select the recording format for a DVD-RW, then touch . For details on a recording format, see page 13. If you have finalized the disc, the previous records on finalizing remain on the disc. • Use an AC adaptor as power source to prevent your camcorder from running out of power during formatting. • Do not apply shock or vibration to your camcorder, and do not disconnect the AC adaptor during formatting. • When you use a double-sided disc, formatting is required on each side. 1 Connect the AC Adaptor to the DC IN jack on your camcorder, then connect the power cord to the wall outlet. 6 Touch [YES] [YES], then touch when [Completed.] appears. • During the Easy Handycam operation (p.27), the screen in step 5 does not appear even if you insert a DVD-RW in your camcorder. Proceed to step 6. • You cannot format a disc that has been protected on other equipments. Cancel the protection with the original equipment, and then format it. Using the Recorded disc (DVD-RW/DVD+RW) 51
-
 1
1 -
2
-
3
-
4
-
5
-
6
-
7
-
8
-
9
-
10
-
11
-
12
-
13
-
14
-
15
-
16
-
17
-
18
-
19
-
20
-
21
-
22
-
23
-
24
-
25
-
26
-
27
-
28
-
29
-
30
-
31
-
32
-
33
-
34
-
35
-
36
-
37
-
38
-
39
-
40
-
41
-
42
-
43
-
44
-
45
-
 46
46 -
 47
47 -
 48
48 -
 49
49 -
 50
50 -
 51
51 -
 52
52 -
 53
53 -
 54
54 -
 55
55 -
 56
56 -
57
-
58
-
59
-
60
-
61
-
62
-
63
-
64
-
65
-
66
-
67
-
68
-
69
-
70
-
71
-
72
-
73
-
74
-
75
-
76
-
77
-
78
-
79
-
80
-
81
-
82
-
83
-
84
-
85
-
86
-
87
-
88
-
89
-
90
-
91
-
92
-
93
-
94
-
95
-
96
-
97
-
98
-
99
-
100
-
101
-
102
-
103
-
104
-
105
-
106
-
107
-
108
-
109
-
110
-
111
-
112
-
113
-
114
-
115
-
116
-
117
-
118
-
119
-
120
 |
 |
