Sony DCR-PC7 Operating Instructions (English and Spanish) - Page 21
Playing back a tape, Reproducción de, cintas
 |
View all Sony DCR-PC7 manuals
Add to My Manuals
Save this manual to your list of manuals |
Page 21 highlights
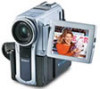
Basic operations / Operaciones básicas Playing back a tape Reproducción de cintas You can monitor the playback picture on the LCD screen or in the viewfinder. (1) Insert the recorded tape with the window facing out. (2) Open the LCD panel. (3) While pressing the small green button on the POWER switch, set it to VTR. The tape transport buttons light up. (4) Press 0 to rewind the tape. (5) Press · to start playback. (6) Adjust the volume using VOLUME +/- and the brightness of the LCD screen using LCD BRIGHT +/-. You can also monitor the picture on a TV screen, after connecting the camcorder to a TV or VCR. La imagen de reproducción puede controlarse en la pantalla LCD o en el visor electrónico. (1) Inserte la cinta grabada con la ventana hacia afuera. (2) Abra el panel LCD. (3) Ajuste el interruptor POWER en VTR mientras pulsa el botón verde pequeño del interruptor. Los botones de transporte de cinta se iluminan. (4) Pulse 0 para rebobinar la cinta. (5) Pulse · para empezar la reproducción. (6) Ajuste el volumen mediante VOLUME +/- y el brillo de la pantalla LCD mediante LCD BRIGHT +/-. La imagen también puede controlarse en una pantalla de televisor después de conectar la videocámara a un televisor o una videograbadora. 1 LCD BRIGHT VOLUME 4 STOP REW PLAY FF PAUSE 3 2 POWER VTR OFF CAMERA PHOTO 5 STOP REW PLAY FF PAUSE To stop playback, press p. To rewind the tape, press 0. To fast-forward the tape rapidly, press ). Using the Remote Commander You can control playback using the supplied Remote Commander. Before using the Remote Commander, insert the size AA (R6) batteries . To display the LCD screen/viewfinder screen indicators Press DISPLAY. To erase the indicators, press again. Pulse p para detener la reproducción. Pulse 0 para rebobinar la cinta. Pulse ) para que la cinta avance rápidamente. Uso del mando a distancia La reproducción puede controlarse con el mando a distancia suministrado. Antes de utilizarlo, inserte las pilas de tamaño AA (R6). Para visualizar los indicadores de pantalla del visor electrónico/pantalla LCD en el televisor Pulse DISPLAY. Vuelva a pulsar este botón para que desaparezcan los indicadores. 21 DCR-PC7.3-858-174-22 (E,S)
-
 1
1 -
2
-
3
-
4
-
5
-
6
-
7
-
8
-
9
-
10
-
11
-
12
-
13
-
14
-
15
-
 16
16 -
 17
17 -
 18
18 -
 19
19 -
 20
20 -
 21
21 -
 22
22 -
 23
23 -
 24
24 -
 25
25 -
 26
26 -
27
-
28
-
29
-
30
-
31
-
32
-
33
-
34
-
35
-
36
-
37
-
38
-
39
-
40
-
41
-
42
-
43
-
44
-
45
-
46
-
47
-
48
-
49
-
50
-
51
-
52
-
53
-
54
-
55
-
56
-
57
-
58
-
59
-
60
-
61
-
62
-
63
-
64
-
65
-
66
-
67
-
68
-
69
-
70
-
71
-
72
-
73
-
74
-
75
-
76
-
77
-
78
-
79
-
80
-
81
-
82
-
83
-
84
-
85
-
86
-
87
-
88
-
89
-
90
-
91
-
92
 |
 |
