Sony DCR-TRV25 Operating Instructions - Page 118
Recording a still image from external equipment, Recording an image from a tape as a still image
 |
View all Sony DCR-TRV25 manuals
Add to My Manuals
Save this manual to your list of manuals |
Page 118 highlights
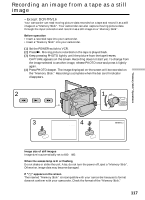
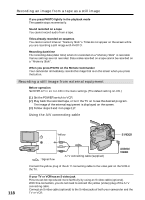
Recording an image from a tape as a still image If you press PHOTO lightly in the playback mode The cassette stops momentarily. Sound recorded on a tape You cannot record audio from a tape. Titles already recorded on cassettes You cannot record titles on "Memory Stick"s. Titles do not appear on the screen while you are recording a still image with PHOTO. Recording date/time The recording data (date/time) when it is recorded on a "Memory Stick" is recorded. Various settings are not recorded. Data codes recorded on a tape cannot be recorded on a "Memory Stick". When you press PHOTO on the Remote Commander Your camcorder immediately records the image that is on the screen when you press the button. Recording a still image from external equipment Before operation Set DISPLAY in to LCD in the menu settings. (The default setting is LCD.) (1) Set the POWER switch to VCR. (2) Play back the recorded tape, or turn the TV on to see the desired program. The image of the external equipment is displayed on the screen. (3) Follow steps 3 and 4 on page 117. Using the A/V connecting cable 118 TV VCR OUT Yellow S VIDEO VIDEO : Signal flow A/V connecting cable (supplied) S VIDEO AUDIO/ VIDEO Connect the yellow plug of the A/V connecting cable to the video jack on the VCR or the TV. If your TV or VCR has an S video jack Pictures can be reproduced more faithfully by using an S video cable (optional). With this connection, you do not need to connect the yellow (video) plug of the A/V connecting cable. Connect an S video cable (optional) to the S video jacks of both your camcorder and the TV or VCR.
-
 1
1 -
2
-
3
-
4
-
5
-
6
-
7
-
8
-
9
-
10
-
11
-
12
-
13
-
14
-
15
-
16
-
17
-
18
-
19
-
20
-
21
-
22
-
23
-
24
-
25
-
26
-
27
-
28
-
29
-
30
-
31
-
32
-
33
-
34
-
35
-
36
-
37
-
38
-
39
-
40
-
41
-
42
-
43
-
44
-
45
-
46
-
47
-
48
-
49
-
50
-
51
-
52
-
53
-
54
-
55
-
56
-
57
-
58
-
59
-
60
-
61
-
62
-
63
-
64
-
65
-
66
-
67
-
68
-
69
-
70
-
71
-
72
-
73
-
74
-
75
-
76
-
77
-
78
-
79
-
80
-
81
-
82
-
83
-
84
-
85
-
86
-
87
-
88
-
89
-
90
-
91
-
92
-
93
-
94
-
95
-
96
-
97
-
98
-
99
-
100
-
101
-
102
-
103
-
104
-
105
-
106
-
107
-
108
-
109
-
110
-
111
-
112
-
 113
113 -
 114
114 -
 115
115 -
 116
116 -
 117
117 -
 118
118 -
 119
119 -
 120
120 -
 121
121 -
 122
122 -
 123
123 -
124
-
125
-
126
-
127
-
128
-
129
-
130
-
131
-
132
-
133
-
134
-
135
-
136
-
137
-
138
-
139
-
140
-
141
-
142
-
143
-
144
-
145
-
146
-
147
-
148
-
149
-
150
-
151
-
152
-
153
-
154
-
155
-
156
-
157
-
158
-
159
-
160
-
161
-
162
-
163
-
164
-
165
-
166
-
167
-
168
-
169
-
170
-
171
-
172
-
173
-
174
-
175
-
176
-
177
-
178
-
179
-
180
-
181
-
182
-
183
-
184
-
185
-
186
-
187
-
188
-
189
-
190
-
191
-
192
-
193
-
194
-
195
-
196
-
197
-
198
-
199
-
200
-
201
-
202
-
203
-
204
-
205
-
206
-
207
-
208
-
209
-
210
-
211
-
212
-
213
-
214
-
215
-
216
-
217
-
218
-
219
-
220
 |
 |
