Sony DCR-TRV25 Operating Instructions - Page 22
Connecting to a wall outlet, Step 1, Preparing the power supply - instructions
 |
View all Sony DCR-TRV25 manuals
Add to My Manuals
Save this manual to your list of manuals |
Page 22 highlights
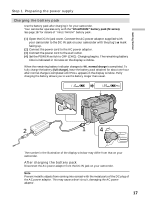
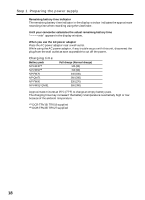
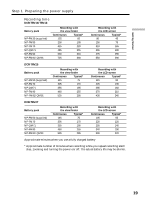
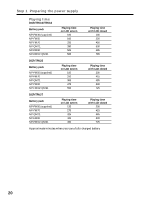
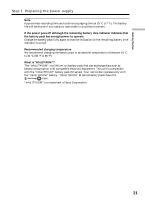
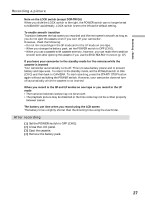
Step 1 Preparing the power supply Connecting to a wall outlet When you use your camcorder for a long time, we recommend that you power it from a wall outlet using the AC power adaptor. (1) Open the DC IN jack cover. Connect the AC power adaptor supplied with your camcorder to the DC IN jack on your camcorder with the plug's v mark facing up. (2) Connect the power cord to the AC power adaptor. (3) Connect the power cord to a wall outlet. 1 2, 3 PRECAUTION The set is not disconnected from the AC power source (wall outlet) as long as it is connected to the wall outlet, even if the set itself has been turned off. Notes •The AC power adaptor can supply power even if the battery pack is attached to your camcorder. •The DC IN jack has "source priority." This means that the battery pack cannot supply any power if the AC power adaptor is connected to the DC IN jack, even when the power cord is not plugged into a wall outlet. Using a car battery Use a Sony Car Battery Adaptor (optional). Refer to the operating instructions of the Car Battery Adaptor for further information. 22
-
 1
1 -
2
-
3
-
4
-
5
-
6
-
7
-
8
-
9
-
10
-
11
-
12
-
13
-
14
-
15
-
16
-
 17
17 -
 18
18 -
 19
19 -
 20
20 -
 21
21 -
 22
22 -
 23
23 -
 24
24 -
 25
25 -
 26
26 -
 27
27 -
28
-
29
-
30
-
31
-
32
-
33
-
34
-
35
-
36
-
37
-
38
-
39
-
40
-
41
-
42
-
43
-
44
-
45
-
46
-
47
-
48
-
49
-
50
-
51
-
52
-
53
-
54
-
55
-
56
-
57
-
58
-
59
-
60
-
61
-
62
-
63
-
64
-
65
-
66
-
67
-
68
-
69
-
70
-
71
-
72
-
73
-
74
-
75
-
76
-
77
-
78
-
79
-
80
-
81
-
82
-
83
-
84
-
85
-
86
-
87
-
88
-
89
-
90
-
91
-
92
-
93
-
94
-
95
-
96
-
97
-
98
-
99
-
100
-
101
-
102
-
103
-
104
-
105
-
106
-
107
-
108
-
109
-
110
-
111
-
112
-
113
-
114
-
115
-
116
-
117
-
118
-
119
-
120
-
121
-
122
-
123
-
124
-
125
-
126
-
127
-
128
-
129
-
130
-
131
-
132
-
133
-
134
-
135
-
136
-
137
-
138
-
139
-
140
-
141
-
142
-
143
-
144
-
145
-
146
-
147
-
148
-
149
-
150
-
151
-
152
-
153
-
154
-
155
-
156
-
157
-
158
-
159
-
160
-
161
-
162
-
163
-
164
-
165
-
166
-
167
-
168
-
169
-
170
-
171
-
172
-
173
-
174
-
175
-
176
-
177
-
178
-
179
-
180
-
181
-
182
-
183
-
184
-
185
-
186
-
187
-
188
-
189
-
190
-
191
-
192
-
193
-
194
-
195
-
196
-
197
-
198
-
199
-
200
-
201
-
202
-
203
-
204
-
205
-
206
-
207
-
208
-
209
-
210
-
211
-
212
-
213
-
214
-
215
-
216
-
217
-
218
-
219
-
220
 |
 |
