Sony DCR-TRV25 Operating Instructions - Page 42
Viewing the recording on TV - cable
 |
View all Sony DCR-TRV25 manuals
Add to My Manuals
Save this manual to your list of manuals |
Page 42 highlights
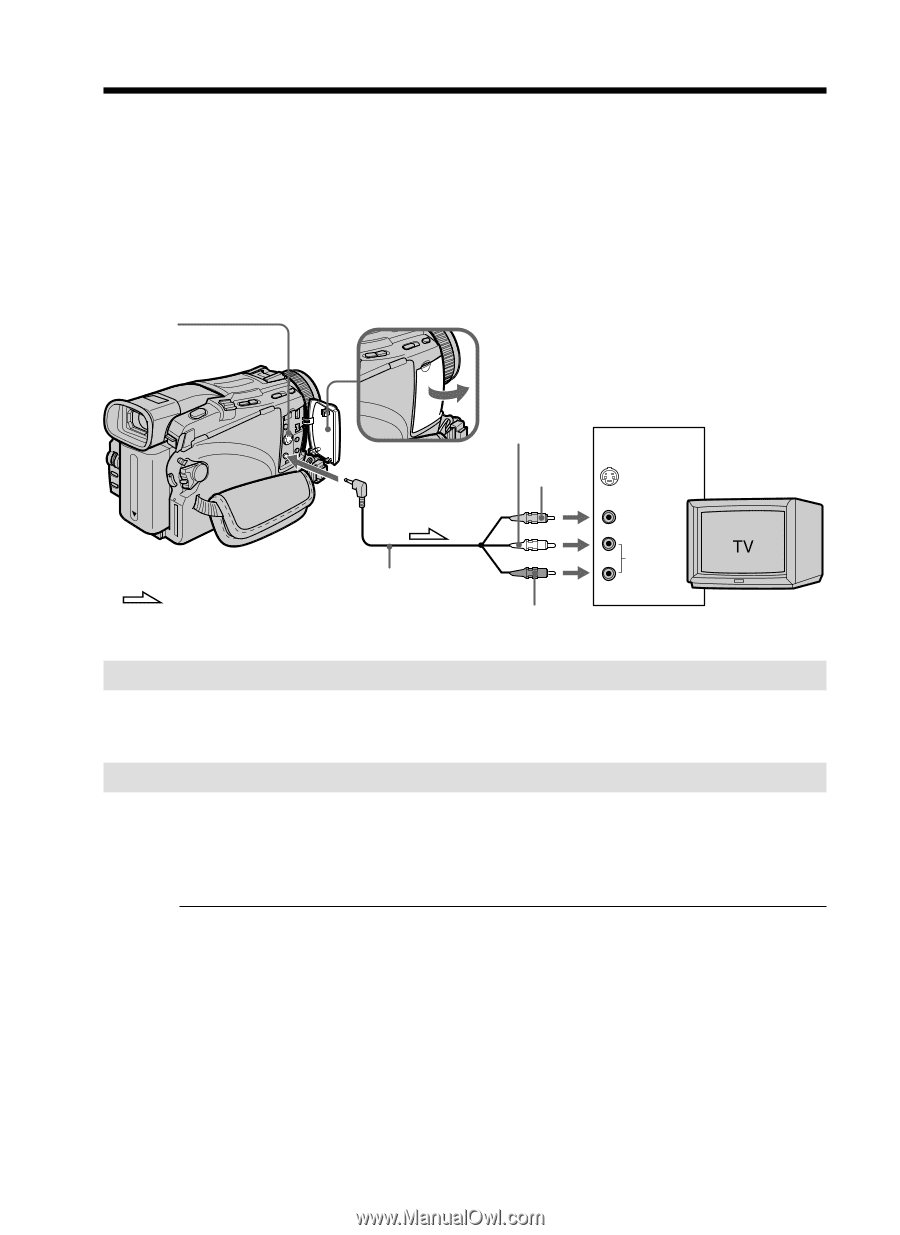
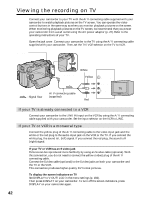
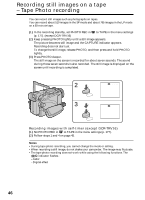
Viewing the recording on TV Connect your camcorder to your TV with the A/V connecting cable supplied with your camcorder to watch playback pictures on the TV screen. You can operate the video control buttons in the same way as when you monitor playback pictures on the screen. When monitoring playback pictures on the TV screen, we recommend that you power your camcorder from a wall outlet using the AC power adaptor (p. 22). Refer to the operating instructions of your TV. Open the jack cover. Connect your camcorder to the TV using the A/V connecting cable supplied with your camcorder. Then, set the TV/VCR selector on the TV to VCR. S VIDEO : Signal flow AUDIO/VIDEO White Yellow IN S VIDEO VIDEO A/V connecting cable (supplied) Red AUDIO If your TV is already connected to a VCR Connect your camcorder to the LINE IN input on the VCR by using the A/V connecting cable supplied with your camcorder. Set the input selector on the VCR to LINE. If your TV or VCR is a monaural type Connect the yellow plug of the A/V connecting cable to the video input jack and the white or the red plug to the audio input jack on the VCR or the TV. If you connect the white plug, the sound is L (left) signal. If you connect the red plug, the sound is R (right) signal. If your TV or VCR has an S video jack Pictures can be reproduced more faithfully by using an S video cable (optional). With this connection, you do not need to connect the yellow (video) plug of the A/V connecting cable. Connect the S video cable (optional) to the S video jacks on both your camcorder and the TV or the VCR. This connection produces higher quality DV format pictures. To display the screen indicators on TV Set DISPLAY to V-OUT/LCD in the menu settings (p. 184). Then press DISPLAY on your camcorder. To turn off the screen indicators, press DISPLAY on your camcorder again. 42
-
 1
1 -
2
-
3
-
4
-
5
-
6
-
7
-
8
-
9
-
10
-
11
-
12
-
13
-
14
-
15
-
16
-
17
-
18
-
19
-
20
-
21
-
22
-
23
-
24
-
25
-
26
-
27
-
28
-
29
-
30
-
31
-
32
-
33
-
34
-
35
-
36
-
 37
37 -
 38
38 -
 39
39 -
 40
40 -
 41
41 -
 42
42 -
 43
43 -
 44
44 -
 45
45 -
 46
46 -
 47
47 -
48
-
49
-
50
-
51
-
52
-
53
-
54
-
55
-
56
-
57
-
58
-
59
-
60
-
61
-
62
-
63
-
64
-
65
-
66
-
67
-
68
-
69
-
70
-
71
-
72
-
73
-
74
-
75
-
76
-
77
-
78
-
79
-
80
-
81
-
82
-
83
-
84
-
85
-
86
-
87
-
88
-
89
-
90
-
91
-
92
-
93
-
94
-
95
-
96
-
97
-
98
-
99
-
100
-
101
-
102
-
103
-
104
-
105
-
106
-
107
-
108
-
109
-
110
-
111
-
112
-
113
-
114
-
115
-
116
-
117
-
118
-
119
-
120
-
121
-
122
-
123
-
124
-
125
-
126
-
127
-
128
-
129
-
130
-
131
-
132
-
133
-
134
-
135
-
136
-
137
-
138
-
139
-
140
-
141
-
142
-
143
-
144
-
145
-
146
-
147
-
148
-
149
-
150
-
151
-
152
-
153
-
154
-
155
-
156
-
157
-
158
-
159
-
160
-
161
-
162
-
163
-
164
-
165
-
166
-
167
-
168
-
169
-
170
-
171
-
172
-
173
-
174
-
175
-
176
-
177
-
178
-
179
-
180
-
181
-
182
-
183
-
184
-
185
-
186
-
187
-
188
-
189
-
190
-
191
-
192
-
193
-
194
-
195
-
196
-
197
-
198
-
199
-
200
-
201
-
202
-
203
-
204
-
205
-
206
-
207
-
208
-
209
-
210
-
211
-
212
-
213
-
214
-
215
-
216
-
217
-
218
-
219
-
220
 |
 |