Sony FWDS42H1 Operating Instructions - Page 74
Aspect, Adjust Screen, Wide Zoom, H Size, H Shift, Reset
 |
UPC - 027242754423
View all Sony FWDS42H1 manuals
Add to My Manuals
Save this manual to your list of manuals |
Page 74 highlights
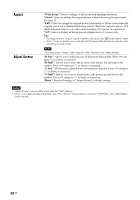
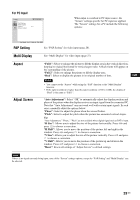
Aspect Adjust Screen "Wide Zoom": Select to enlarge to fill screen with minimum distortion. "Zoom": Select to enlarge the original picture without distorting the aspect ratio. See page 15. "Full": Select to enlarge the original picture horizontally to fill the screen when the original source is 4:3 (Standard definition source). When the original source is 16:9 (High definition source), select this mode to display 16:9 picture in original size. "4:3": Select to display all the pictures in original size to 4:3 aspect ratio.. Tips • To change from one "Aspect" option to another, you can also use on the remote control. • Select "Zoom" to display movies and other DVD content with black bands, using the entire viewable area of the screen. Note You cannot set the "Aspect" while using the "PAP" function or the "Multi Display". "H Size": Allows you to adjust the size of the picture horizontally. Press G/g and press to choose a correction. "H Shift": Allows you to move the position of the picture left and right in the window. Press G/g and press to choose a correction. "V Size": Allows you to adjust the size of the picture vertically. Press F/f and press to choose a correction. "V Shift": Allows you to move the position of the picture up and down in the window. Press F/f and press to choose a correction. "Reset": Resets all settings of "Adjust Screen" to default settings. Notes • "Adjust Screen" is not available while using the "PAP" function. • If there is no signal currently being input, none of the "Screen" settings options, except for "PAP Setting" and "Multi Display" can be selected. 28 GB
-
 1
1 -
2
-
3
-
4
-
5
-
6
-
7
-
8
-
9
-
10
-
11
-
12
-
13
-
14
-
15
-
16
-
17
-
18
-
19
-
20
-
21
-
22
-
23
-
24
-
25
-
26
-
27
-
28
-
29
-
30
-
31
-
32
-
33
-
34
-
35
-
36
-
37
-
38
-
39
-
40
-
41
-
42
-
43
-
44
-
45
-
46
-
47
-
48
-
49
-
50
-
51
-
52
-
53
-
54
-
55
-
56
-
57
-
58
-
59
-
60
-
61
-
62
-
63
-
64
-
65
-
66
-
67
-
68
-
 69
69 -
 70
70 -
 71
71 -
 72
72 -
 73
73 -
 74
74 -
 75
75 -
 76
76 -
 77
77 -
 78
78 -
 79
79 -
80
-
81
-
82
-
83
-
84
-
85
-
86
-
87
-
88
-
89
-
90
-
91
-
92
-
93
-
94
-
95
-
96
-
97
-
98
-
99
-
100
-
101
-
102
-
103
-
104
-
105
-
106
-
107
-
108
-
109
-
110
-
111
-
112
-
113
-
114
-
115
-
116
-
117
-
118
-
119
-
120
-
121
-
122
-
123
-
124
-
125
-
126
-
127
-
128
-
129
-
130
-
131
-
132
-
133
-
134
-
135
-
136
-
137
-
138
-
139
-
140
-
141
-
142
-
143
-
144
-
145
-
146
-
147
-
148
-
149
-
150
-
151
-
152
-
153
-
154
-
155
-
156
-
157
-
158
-
159
-
160
-
161
-
162
-
163
-
164
-
165
-
166
-
167
-
168
-
169
-
170
-
171
-
172
-
173
-
174
-
175
-
176
-
177
-
178
-
179
-
180
-
181
-
182
-
183
-
184
-
185
-
186
-
187
-
188
-
189
-
190
-
191
-
192
-
193
-
194
-
195
-
196
-
197
-
198
-
199
-
200
-
201
-
202
-
203
-
204
-
205
-
206
-
207
-
208
-
209
-
210
-
211
-
212
-
213
-
214
-
215
-
216
-
217
-
218
-
219
-
220
-
221
-
222
-
223
-
224
-
225
-
226
-
227
-
228
-
229
-
230
-
231
-
232
-
233
-
234
-
235
-
236
-
237
-
238
-
239
-
240
-
241
-
242
-
243
-
244
-
245
-
246
-
247
-
248
-
249
-
250
-
251
-
252
-
253
-
254
-
255
-
256
-
257
-
258
-
259
-
260
-
261
-
262
-
263
-
264
-
265
-
266
-
267
-
268
-
269
-
270
-
271
-
272
-
273
-
274
-
275
-
276
-
277
-
278
-
279
-
280
-
281
-
282
-
283
-
284
-
285
-
286
-
287
-
288
-
289
-
290
-
291
-
292
-
293
-
294
-
295
-
296
-
297
-
298
-
299
-
300
-
301
-
302
-
303
 |
 |