Sony FWDS42H1 Operating Instructions - Page 77
Auto Screen Adjust, Auto Shut Off, Overscan, Sync Mode, H/Comp, Video, RGB/COMPONENT IN connector.
 |
UPC - 027242754423
View all Sony FWDS42H1 manuals
Add to My Manuals
Save this manual to your list of manuals |
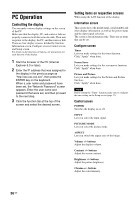
Page 77 highlights
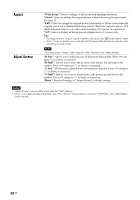
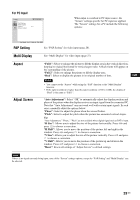
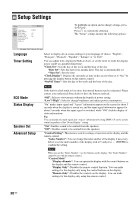
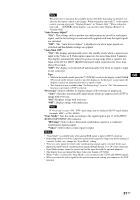
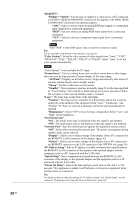
Note When this item is operated, the available modes will differ depending on whether you select by the remote control or the display. When setting this item with on the remote control, you can select only "Display+Remote" or "Remote Only". When setting this item with (ENTER) on the display, you can select only "Display+Remote" or "Display Only". "Auto Screen Adjust" "On": The settings such as picture size and position are saved for each input signal, and the last settings are automatically applied each time the input signals are switched. "Off": The "Auto Screen Adjust" is disabled even when input signals are switched and the default settings are applied. "Auto Shut Off": "On": The display automatically enters the standby mode when a signal is not input to the Video or S Video input connectors for more than about 5 minutes. The display automatically enters the power saving mode when a signal is not input to the DVI or HD15 (RGB/Component) input connectors for more than about 30 seconds. "Off": The display is not turned off automatically even when no signal is input to any connector. Tips • While in the standby mode, press the 1 (POWER) switch on the display or the POWER ON switch on the remote control to turn the display on. In the power saving mode, the display is turned on automatically when a signal is input. • This function is not available when "On-Screen Logo" is set to "On", the screensaver function is activated, or PAP is selected. "Overscan": Selects whether to display images with overscan or underscan. "Auto": Switches automatically signal image which are supposed to be DTV to image with overscan. "On": Displays image with overscan. "Off": Displays image with underscan. Note If "Overscan" is set to "Off," DTV signal image may be displayed like PC signal display. Example: 480P t 720 × 480/60 "Sync Mode": Sets the mode according to the signal input at pin 13 of the HD15 (RGB/COMPONENT) IN connector. "H/Comp": Select when a horizontal synchronous signal or a composite synchronous signal is input. "Video": Select when a video signal is input. Notes • "Sync Mode" is available only when analog RGB signal is input to HD15 connector. • Depending on the level of the composite synchronous signal, the image may not be displayed correctly. In this case, change the "Sync Mode" setting. • There are some inputs for which only synchronizing signals can be selected. In this case, input horizontal/vertical synchronization signals through the pin 13 or 14 of the connectors. • Sync Mode settings cannot be carried out for the input through the optional adaptors. • This display does not support the three value sync format of 576/60p. • When "Video" is selected in "Sync Mode", you can only set the 575/50i and 480/60i signals. • When you select the video signal for the synchronous mode setting, you cannot use the PAP function. GB 31 GB
-
 1
1 -
2
-
3
-
4
-
5
-
6
-
7
-
8
-
9
-
10
-
11
-
12
-
13
-
14
-
15
-
16
-
17
-
18
-
19
-
20
-
21
-
22
-
23
-
24
-
25
-
26
-
27
-
28
-
29
-
30
-
31
-
32
-
33
-
34
-
35
-
36
-
37
-
38
-
39
-
40
-
41
-
42
-
43
-
44
-
45
-
46
-
47
-
48
-
49
-
50
-
51
-
52
-
53
-
54
-
55
-
56
-
57
-
58
-
59
-
60
-
61
-
62
-
63
-
64
-
65
-
66
-
67
-
68
-
69
-
70
-
71
-
 72
72 -
 73
73 -
 74
74 -
 75
75 -
 76
76 -
 77
77 -
 78
78 -
 79
79 -
 80
80 -
 81
81 -
 82
82 -
83
-
84
-
85
-
86
-
87
-
88
-
89
-
90
-
91
-
92
-
93
-
94
-
95
-
96
-
97
-
98
-
99
-
100
-
101
-
102
-
103
-
104
-
105
-
106
-
107
-
108
-
109
-
110
-
111
-
112
-
113
-
114
-
115
-
116
-
117
-
118
-
119
-
120
-
121
-
122
-
123
-
124
-
125
-
126
-
127
-
128
-
129
-
130
-
131
-
132
-
133
-
134
-
135
-
136
-
137
-
138
-
139
-
140
-
141
-
142
-
143
-
144
-
145
-
146
-
147
-
148
-
149
-
150
-
151
-
152
-
153
-
154
-
155
-
156
-
157
-
158
-
159
-
160
-
161
-
162
-
163
-
164
-
165
-
166
-
167
-
168
-
169
-
170
-
171
-
172
-
173
-
174
-
175
-
176
-
177
-
178
-
179
-
180
-
181
-
182
-
183
-
184
-
185
-
186
-
187
-
188
-
189
-
190
-
191
-
192
-
193
-
194
-
195
-
196
-
197
-
198
-
199
-
200
-
201
-
202
-
203
-
204
-
205
-
206
-
207
-
208
-
209
-
210
-
211
-
212
-
213
-
214
-
215
-
216
-
217
-
218
-
219
-
220
-
221
-
222
-
223
-
224
-
225
-
226
-
227
-
228
-
229
-
230
-
231
-
232
-
233
-
234
-
235
-
236
-
237
-
238
-
239
-
240
-
241
-
242
-
243
-
244
-
245
-
246
-
247
-
248
-
249
-
250
-
251
-
252
-
253
-
254
-
255
-
256
-
257
-
258
-
259
-
260
-
261
-
262
-
263
-
264
-
265
-
266
-
267
-
268
-
269
-
270
-
271
-
272
-
273
-
274
-
275
-
276
-
277
-
278
-
279
-
280
-
281
-
282
-
283
-
284
-
285
-
286
-
287
-
288
-
289
-
290
-
291
-
292
-
293
-
294
-
295
-
296
-
297
-
298
-
299
-
300
-
301
-
302
-
303
 |
 |