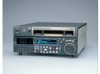
Sony HDWM2000/20 Operation Manual - Page 23
Shot mark AUDIO IN button and AUDIO OUT button
 |
View all Sony HDWM2000/20 manuals
Add to My Manuals
Save this manual to your list of manuals |
Page 23 highlights
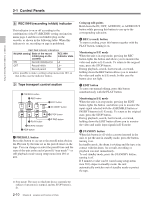
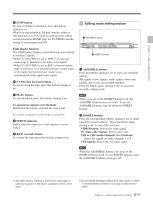
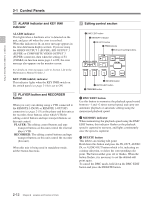
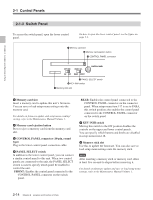
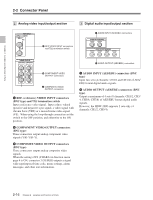
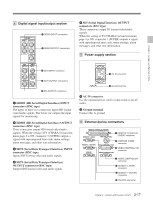
Chapter 2 Location and Function of Parts 4 TRIM buttons Use these buttons to trim an edit point to single-frame precision. Hold down the IN, OUT, AUDIO IN, or AUDIO OUT button, and press one of these buttons. The '+' button advances the corresponding edit point by one frame, and the '-' button sets it back by one frame. Pressing one of these buttons while holding down the PLAY button adjusts the tape speed by +8% or -8% correspondingly. (Capstan override function) 5 Edit point setting buttons IN button and OUT button To set a video IN point or OUT point, hold down the IN button or OUT button and press the ENTRY button. After you have made the setting, pressing the IN button or OUT button displays the video IN point or video OUT point set in time data display area 2. AUDIO IN button and AUDIO OUT button In insert editing, to set an audio IN point or audio OUT point separate from the corresponding video edit point, hold down the AUDIO IN button or AUDIO OUT button, and press the ENTRY button. After you have made the setting, pressing the AUDIO IN button or AUDIO OUT button displays the audio IN point or audio OUT point set in time data display area 2. ENTRY button Use this for setting edit points and so on. • To set a video IN point or OUT point: Hold down the IN button or OUT button, and press this button. • To set an audio IN point or OUT point: Hold down the AUDIO IN button or AUDIO OUT button, and press this button. 6 REVIEW button Use this button to review the editing results after carrying out automatic editing. 7 AUTO (automatic) EDIT button After edit point setting, to carry out automatic editing (recording), press this button, turning it on. If the IN point is not set, the automatic editing is carried out with the point where you pressed this button as the IN point. If you pressed the PREVIEW button to carry out a preview, when the preview ends this button flashes. 8 PREVIEW button After edit point setting, to preview the editing results on the monitor before recording, press this button, turning it on. If the IN point is not set, the preview is carried out with the point where you pressed this button as the IN point. During the preview it is lit, and when the preview ends it flashes. qf Shot mark section 1 LIST button LIST GOOD SHOT MARK REC/ ERASE 2 REC/ERASE indicator 3 MARK button 1 LIST button Use this button to read in and list shot marks. 2 REC/ERASE indicator This lights in the state in which writing, amending, and deleting of shot marks is enabled and flashes while a shot mark is actually being written, amended or deleted. 3 MARK button Hold this button down for 2 seconds or more, to enable writing, amending, and deleting of shot marks. 2-13 Chapter 2 Location and Function of Parts
-
 1
1 -
2
-
3
-
4
-
5
-
6
-
7
-
8
-
9
-
10
-
11
-
12
-
13
-
14
-
15
-
16
-
17
-
 18
18 -
 19
19 -
 20
20 -
 21
21 -
 22
22 -
 23
23 -
 24
24 -
 25
25 -
 26
26 -
 27
27 -
 28
28 -
29
-
30
-
31
-
32
-
33
-
34
-
35
-
36
-
37
-
38
-
39
-
40
-
41
-
42
-
43
-
44
-
45
-
46
-
47
-
48
-
49
-
50
-
51
-
52
-
53
-
54
-
55
-
56
-
57
-
58
-
59
-
60
-
61
-
62
-
63
-
64
-
65
-
66
-
67
-
68
-
69
-
70
-
71
-
72
-
73
-
74
-
75
-
76
-
77
-
78
-
79
-
80
-
81
-
82
-
83
-
84
-
85
-
86
-
87
-
88
-
89
-
90
-
91
-
92
-
93
-
94
-
95
-
96
-
97
-
98
-
99
-
100
-
101
-
102
-
103
-
104
-
105
-
106
-
107
-
108
-
109
-
110
-
111
-
112
-
113
-
114
-
115
-
116
-
117
-
118
-
119
-
120
-
121
-
122
-
123
-
124
-
125
-
126
-
127
-
128
-
129
-
130
-
131
-
132
-
133
-
134
-
135
-
136
-
137
-
138
-
139
-
140
-
141
-
142
-
143
-
144
-
145
-
146
-
147
-
148
-
149
-
150
-
151
-
152
-
153
-
154
-
155
-
156
 |
 |
