Sony HVRM35U Product Manual (HVR-M35U Operating Manuals) - Page 7
TIMER switch, REPEAT, AUDIO MONITOR SELECT switch, CH-1/2, CH-3/4, speaker/phones LEVEL control knob
 |
View all Sony HVRM35U manuals
Add to My Manuals
Save this manual to your list of manuals |
Page 7 highlights
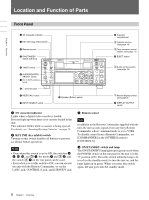
Chapter 1 Overview Notes • When the ON/STANDBY lamp is out, this switch does not operate. Press the "|" (ON) marked side of the POWER switch on the rear panel before operating the ON/STANDBY switch. For details on the POWER switch, see "POWER (main power) switch" on page 17. • When the KEY INH switch 2 is set to ON, the ON/ STANDBY switch does not operate. Set the KEY INH switch to OFF to enable the ON/STANDBY switch. e TIMER switch Use this switch to select Auto Repeat or recording when using an external AC timer (not supplied). REPEAT: When power is supplied to the unit, the tape rewinds to its beginning automatically and playback starts. When one of the following items on the tape are detected, auto repeat playback starts automatically. - Index signals - An unrecorded portion - A portion recorded in a format set by other than [AUTO] in [HDV/DV SEL] of the [IN/OUT REC] menu - Tape end Auto Repeat also functions if you set this switch to REPEAT during playback or rewind. For details on Auto Repeat, see "Auto Repeat (CUSTOM REPEAT)" on page 43 and "CUSTOM REPEAT" in the "VTR SET" menu on page 80. OFF: Auto Repeat or timer recording is disabled. REC: Recording begins the moment the power is connected to the unit. Note The setting of this switch still activates the unit even when the KEY INH switch 2 is set to ON. f AUDIO MONITOR SELECT switch For 4-channel audio output, use this switch to select the audio channel to be output via the MONITOR AUDIO jack on the rear panel of the unit, as well as from the i (phones) jack 8 and the Speaker qa. CH-1/2: channels 1/2 only MIX: channels 1/2 and channels 3/4 CH-3/4: channels 3/4 only Notes • During audio dubbing, if you want to listen to the sound recorded on the tape, set this switch to CH-1/2; if you want to listen to the sound being dubbed, set the switch to CH-3/4. (Only channels 3 and 4 can be used to dub.) To check the sound to be dubbed before dubbing, set this switch to CH-3/4, then press the AUDIO DUB button while the unit is in the stop mode. Then you can listen to the sound of the channels used to dub (channels 3 and 4) for a short period of time. For details on audio dubbing, see page 65. Also refer to the instructions for the "AUDIO DUB (A2) 1" button on page 11. • The setting of this switch is also effective for 4channel audio HDV signal output. • When the audio mode is 2-channel and this switch is set to CH-3/4, no sound is emitted whether the format is HDV or DV. • When this switch is set to MIX, the sound of the mixed level of the pair of channel 1 and 3 and that of channels 2 and 4 is output. g 5/i (speaker/phones) LEVEL control knob Controls the volume of the speaker qa on the bottom plate of the unit as well as that of the headphones connected to the i (phones) jack 8. • The volume of the speaker and headphones are set together. The volumes cannot be set separately. • By changing the setting of [SPEAKER/BEEP] in [OTHERS] (page 84), you can switch the speaker audio output on and off. h i (phones) jack Connect stereo headphones for monitoring sound during recording or playback. The audio signals you want to monitor can be selected with the AUDIO MONITOR SELECT switch 6. When headphones are connected, no sound is produced from the built-in speaker. (Continued) 7 Chapter 1 Overview
-
 1
1 -
 2
2 -
 3
3 -
 4
4 -
 5
5 -
 6
6 -
 7
7 -
 8
8 -
 9
9 -
 10
10 -
 11
11 -
 12
12 -
13
-
14
-
15
-
16
-
17
-
18
-
19
-
20
-
21
-
22
-
23
-
24
-
25
-
26
-
27
-
28
-
29
-
30
-
31
-
32
-
33
-
34
-
35
-
36
-
37
-
38
-
39
-
40
-
41
-
42
-
43
-
44
-
45
-
46
-
47
-
48
-
49
-
50
-
51
-
52
-
53
-
54
-
55
-
56
-
57
-
58
-
59
-
60
-
61
-
62
-
63
-
64
-
65
-
66
-
67
-
68
-
69
-
70
-
71
-
72
-
73
-
74
-
75
-
76
-
77
-
78
-
79
-
80
-
81
-
82
-
83
-
84
-
85
-
86
-
87
-
88
-
89
-
90
-
91
-
92
-
93
-
94
-
95
-
96
-
97
-
98
-
99
-
100
-
101
-
102
-
103
-
104
-
105
-
106
-
107
-
108
-
109
-
110
-
111
-
112
 |
 |
