TEAC W-1200 Owners Manual English Francais Espanol - Page 11
Using the remote control, Precautions for use, Installing batteries, When to replace batteries
 |
View all TEAC W-1200 manuals
Add to My Manuals
Save this manual to your list of manuals |
Page 11 highlights
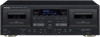
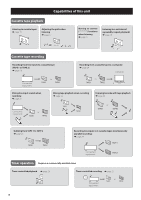
ENGLISH Using the remote control M MIC connector and mic LEVEL knob When using a mic to record, insert the mic cable plug into this connector and turn the knob to a suitable level (page 21). oo This unit does not support stereo mics. Use a mono mic. oo When a mic is connected, the tape playback level is lowered slightly. When the mic is disconnected, the playback level will return to normal. N REC LEVEL (recording level) knob Use to adjust the recording level. O PHONES jack/LEVEL knob Plug headphones into this jack to use them with this unit. Sound will be output from the LINE OUT jacks even when headphones are plugged in here. Use the LEVEL knob to the left to adjust the headphone volume. VV CAUTION While wearing headphones, do not connect or disconnect them or turn the unit on or off. Doing so could result in a sudden loud noise that could harm your hearing. P TIMER switch Use this switch to set the timer setting mode (record, off or play). Leave this switch in the OFF position for normal use. To use timer playback/recording, connect a commercially-available timer to this unit (page 26). Q NOISE REDUCTION switch This function reduces hiss during tape playback. oo It only functions during playback. oo Using this during playback of tapes recorded with Dolby B noise reduction will reduce hiss. This cannot be used when recording to achieve a noise reduction effect like Dolby B. Precautions for use VV Misuse of batteries could cause them to rupture or leak, which might result in fire, injury or the staining of nearby materials. Please carefully read and observe the precautions on page 3. oo When using the remote control, point it toward the remote control signal receiver on the main unit from a distance of 5 m (16 ft) or less. Do not place obstructions between the main unit and the remote control. oo The remote control might not work if the remote control signal receiver on the unit is exposed to direct sunlight or bright light. If this occurs, try moving the unit. oo Beware that use of this remote control could cause the unintentional operation of other devices that can be controlled by infrared rays. Installing batteries Remove the cover from the back of the remote control and insert two AA batteries with their ¥/^ oriented as shown in the case. Replace the cover. When to replace batteries If the distance required between the remote and the main unit decreases or if the unit stops responding to the remote buttons, replace both batteries with new ones. Dispose of the used batteries according to the instructions on them or requirements set by your local municipality. 11
-
 1
1 -
2
-
3
-
4
-
5
-
 6
6 -
 7
7 -
 8
8 -
 9
9 -
 10
10 -
 11
11 -
 12
12 -
 13
13 -
 14
14 -
 15
15 -
 16
16 -
17
-
18
-
19
-
20
-
21
-
22
-
23
-
24
-
25
-
26
-
27
-
28
-
29
-
30
-
31
-
32
-
33
-
34
-
35
-
36
-
37
-
38
-
39
-
40
-
41
-
42
-
43
-
44
-
45
-
46
-
47
-
48
-
49
-
50
-
51
-
52
-
53
-
54
-
55
-
56
-
57
-
58
-
59
-
60
-
61
-
62
-
63
-
64
-
65
-
66
-
67
-
68
-
69
-
70
-
71
-
72
-
73
-
74
-
75
-
76
-
77
-
78
-
79
-
80
-
81
-
82
-
83
-
84
-
85
-
86
-
87
-
88
-
89
-
90
-
91
-
92
-
93
-
94
-
95
-
96
 |
 |
