Vivitar DVR 830XHD Camera Manual - Page 32
Self Timer
 |
View all Vivitar DVR 830XHD manuals
Add to My Manuals
Save this manual to your list of manuals |
Page 32 highlights
2. Push the OK joystick button Right for the Date Stamp options submenu to appear: On, Off 3. Push the OK joystick button Up/Down to highlight and select the Date Stamp option you desire. 4. Press the OK button to confirm and save your choice. 5. Press the Menu button to exit the menu and revert back to the Camera capture mode. 6. If enabled, the icon for the Date Stamp choice appears on the right side of the LCD. Self Timer This feature allows you to set up the camera so that you can also be included in the shot. It is best to use a tripod or place the camera on a flat and sturdy surface. 1. Push the OK joystick button Up/Down to select the Self Timer mode. 31
-
 1
1 -
2
-
3
-
4
-
5
-
6
-
7
-
8
-
9
-
10
-
11
-
12
-
13
-
14
-
15
-
16
-
17
-
18
-
19
-
20
-
21
-
22
-
23
-
24
-
25
-
26
-
 27
27 -
 28
28 -
 29
29 -
 30
30 -
 31
31 -
 32
32 -
 33
33 -
 34
34 -
 35
35 -
 36
36 -
 37
37 -
38
-
39
-
40
-
41
-
42
-
43
-
44
-
45
-
46
-
47
-
48
-
49
-
50
-
51
-
52
-
53
-
54
-
55
-
56
-
57
-
58
-
59
-
60
-
61
-
62
-
63
-
64
-
65
-
66
-
67
-
68
-
69
-
70
-
71
-
72
-
73
-
74
-
75
-
76
-
77
-
78
-
79
-
80
-
81
-
82
-
83
-
84
 |
 |

31
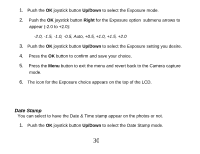
2.
Push the
OK
joystick button
Right
for the Date Stamp options submenu to
appear:
On, Off
3.
Push the
OK
joystick button
Up/Down
to highlight and select the Date Stamp
option you desire.
4.
Press the
OK
button to confirm and save your choice.
5.
Press the
Menu
button to exit the menu and revert back to the Camera capture
mode.
6.
If enabled, the icon for the Date Stamp choice appears on the right side of the
LCD.
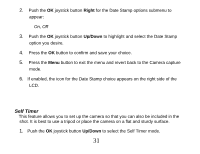
Self Timer
This feature allows you to set up the camera so that you can also be included in the
shot. It is best to use a tripod or place the camera on a flat and sturdy surface.
1.
Push the
OK
joystick button
Up/Down
to select the Self Timer mode.