Xerox 8560DN User Guide - Page 97
Random Light Stripes, Troubleshooting, Print Quality Problems, Eliminate Light Stripes, Basic
 |
UPC - 095205733280
View all Xerox 8560DN manuals
Add to My Manuals
Save this manual to your list of manuals |
Page 97 highlights
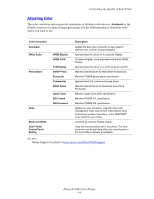
Random Light Stripes Light Stripes Test Solving Print-Quality Problems Possible Cause Solution Light stripes appear randomly on the test page when one or more color bars is missing. To prevent random light stripes from appearing on the page: 1. On the control panel, select Troubleshooting, and then press the OK button. 2. Select Print Quality Problems, and then press the OK button. 3. Select Eliminate Light Stripes, and then press the OK button. 4. Perform the Basic, Advanced, and Jet Substitution procedures as indicated in the steps below. Basic 1. Select Basic, and then press the OK button. 2. Once the Basic procedure is completed, repeat the procedure to eliminate remaining light stripes. If the problem continues, select the Advanced option. Advanced 1. Select Advanced, and then press the OK button. 2. Follow the instructions to select the missing jet's color and number. See the Light Stripes Test page to determine the color and jet number of the missing jet. If the problem continues, select the Jet Substitution Mode to substitute a jet for the malfunctioning jet causing the light stripe. Jet Substitution Mode 1. Select Jet Substitution Mode, and then press the OK button. 2. Follow the control panel prompts to select the color and malfunctioning jet number indicated on the Light Stripes Test page. Note: When the Jet Substitution Mode is activated, a dot appears next to the number of each substituted jet. Substituted jets may continue to display missing colors since the Light Stripes Test page ignores the Jet Substitution mode. Jet substitution only works during regular printing. See also: Online Support Assistant at www.xerox.com/office/8560Psupport Phaser® 8560 Color Printer 4-8
-
 1
1 -
2
-
3
-
4
-
5
-
6
-
7
-
8
-
9
-
10
-
11
-
12
-
13
-
14
-
15
-
16
-
17
-
18
-
19
-
20
-
21
-
22
-
23
-
24
-
25
-
26
-
27
-
28
-
29
-
30
-
31
-
32
-
33
-
34
-
35
-
36
-
37
-
38
-
39
-
40
-
41
-
42
-
43
-
44
-
45
-
46
-
47
-
48
-
49
-
50
-
51
-
52
-
53
-
54
-
55
-
56
-
57
-
58
-
59
-
60
-
61
-
62
-
63
-
64
-
65
-
66
-
67
-
68
-
69
-
70
-
71
-
72
-
73
-
74
-
75
-
76
-
77
-
78
-
79
-
80
-
81
-
82
-
83
-
84
-
85
-
86
-
87
-
88
-
89
-
90
-
91
-
 92
92 -
 93
93 -
 94
94 -
 95
95 -
 96
96 -
 97
97 -
 98
98 -
 99
99 -
 100
100 -
 101
101 -
 102
102 -
103
-
104
-
105
-
106
-
107
-
108
-
109
-
110
-
111
-
112
-
113
-
114
-
115
-
116
-
117
-
118
-
119
-
120
-
121
-
122
-
123
-
124
-
125
-
126
-
127
-
128
-
129
-
130
-
131
-
132
-
133
-
134
-
135
-
136
-
137
-
138
-
139
-
140
-
141
-
142
-
143
-
144
-
145
-
146
-
147
-
148
-
149
-
150
-
151
-
152
-
153
-
154
-
155
-
156
-
157
-
158
-
159
 |
 |
