Xerox 8560MFP System Administrator Guide - Page 24
Protocol Control, HTTP, TCP/IP
 |
UPC - 095205428841
View all Xerox 8560MFP manuals
Add to My Manuals
Save this manual to your list of manuals |
Page 24 highlights
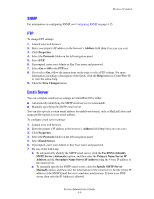
Protocol Control Protocol Control This section includes: ■ HTTP on page 3-6 ■ TCP/IP on page 3-6 ■ Port 9100 on page 3-7 ■ LPR on page 3-8 ■ IPP on page 3-8 ■ SNMP on page 3-9 ■ Email Server on page 3-9 ■ MaiLinX Remote Printing on page 3-10 ■ MaiLinX Alerts on page 3-11 See also: Discovery Protocols on page 2-5 All network protocols, including network printing, printing services, printer discovery, and management protocols can be enabled or disabled on the printer. If a protocol is enabled, you can set configuration parameters. Note: To secure protocols, disable any protocols you are not using. This prevents unauthorized access through applications that use these protocols. For example, if you want to use IPP for a secure printing channel, disable the other printing protocols, Port 9100 and LPR. HTTP By default, HTTP is enabled. For information on disabling HTTP, contact Xerox Technical Support at www.xerox.com/support. See also: About HTTP, HTTPS, and SSL/TLS on page 4-3 TCP/IP To change TCP/IP settings: 1. Launch your web browser. 2. Enter your printer's IP address in the browser's Address field (http://xxx.xxx.xxx.xxx). 3. Click Properties. 4. Select the Protocols folder on the left navigation panel. 5. Select TCP/IP. 6. Enter your Admin or Key User name and password, if prompted. 7. In the BOOTP/DHCP box, select one of the following: ■ On: The printer issues BOOTP and DHCP requests on startup. ■ Off: The printer does not issue BOOTP or DHCP requests on startup. System Administrator Guide 3-6
-
 1
1 -
2
-
3
-
4
-
5
-
6
-
7
-
8
-
9
-
10
-
11
-
12
-
13
-
14
-
15
-
16
-
17
-
18
-
 19
19 -
 20
20 -
 21
21 -
 22
22 -
 23
23 -
 24
24 -
 25
25 -
 26
26 -
 27
27 -
 28
28 -
 29
29 -
30
-
31
-
32
-
33
-
34
-
35
-
36
-
37
-
38
-
39
-
40
-
41
-
42
-
43
-
44
-
45
-
46
-
47
-
48
-
49
-
50
-
51
-
52
-
53
-
54
-
55
-
56
-
57
-
58
-
59
-
60
-
61
-
62
-
63
-
64
-
65
-
66
-
67
-
68
-
69
-
70
-
71
-
72
-
73
-
74
-
75
-
76
-
77
-
78
-
79
-
80
-
81
-
82
-
83
-
84
-
85
-
86
-
87
-
88
-
89
-
90
-
91
-
92
-
93
-
94
-
95
-
96
-
97
-
98
 |
 |
