Yamaha RX-V2500 Owner's Manual - Page 8
CONTROLS AND FUNCTIONS, Front panel - optimizer mic part number
 |
View all Yamaha RX-V2500 manuals
Add to My Manuals
Save this manual to your list of manuals |
Page 8 highlights
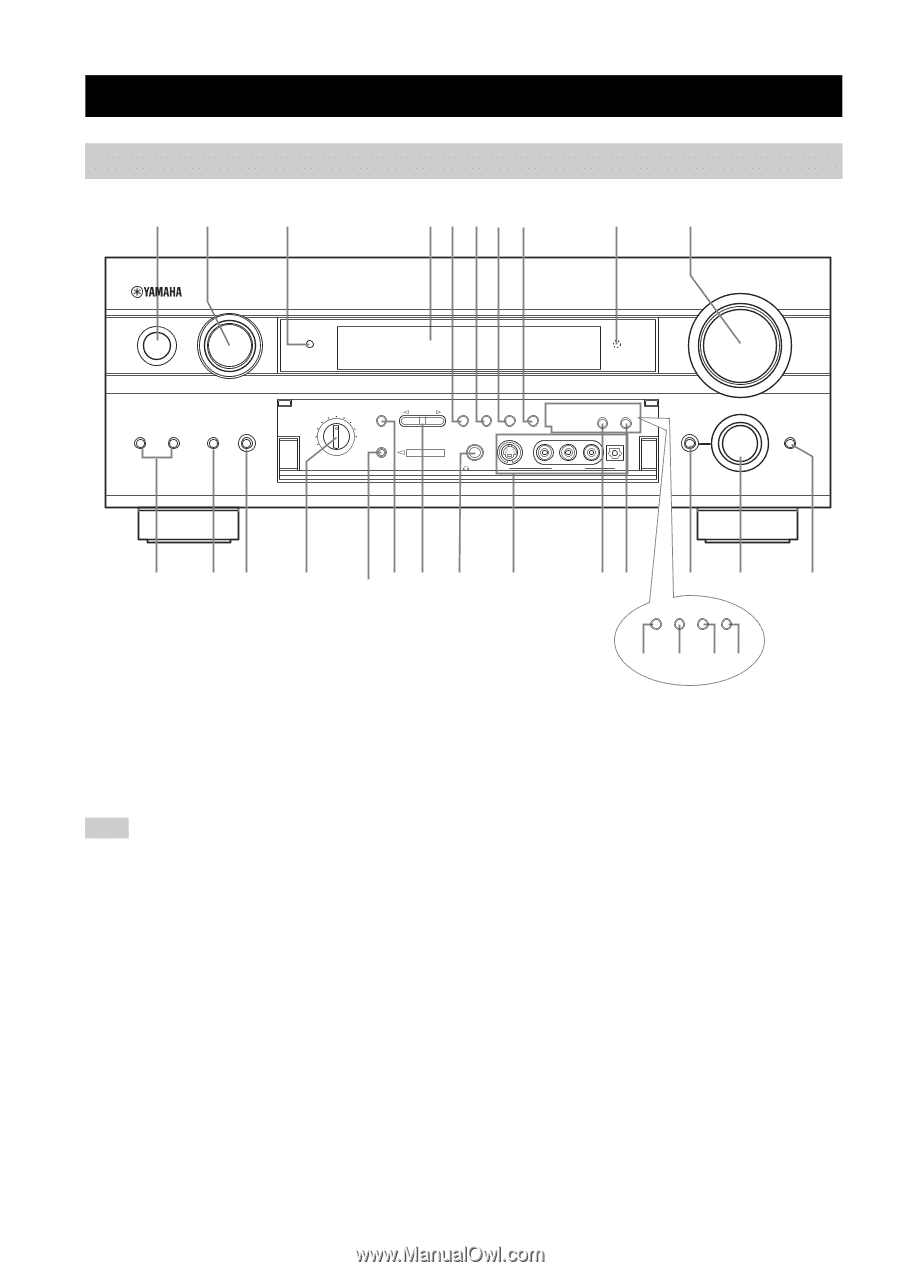
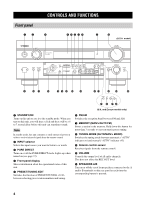
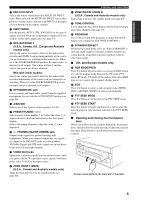
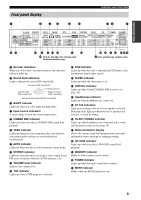
CONTROLS AND FUNCTIONS CONTROLS AND FUNCTIONS Front panel 12 3 45678 9 STANDBY /ON INPUT PURE DIRECT 0 (U.S.A. model) VOLUME SPEAKERS A B MULTI CH INPUT INPUT MODE SOURCE/ REMOTE DVD MD/TAPE DTV CD-R A/B/C/D/E CBL/SAT TUNER VCR 1 CD DVR/ VCR2 REC OUT/ZONE 2 OPTIMIZER MIC PRESET/ TUNING PRESET /TUNING TUNING FM/AM MEMORY MODE ZONE ON/OFF MAIN ZONE 2 EDIT MAN'L/AUTO FM AUTO/MAN'L MONO SILENT CINEMA S VIDEO VIDEO L AUDIO R OPTICAL YPAO PHONES VIDEO AUX TONE CONTROL PROGRAM STRAIGHT EFFECT A BC D EF G H I JK LM N RDS MODE /FREQ EON PTY SEEK MODE START O P QR (U.K. and Europe models only) 1 STANDBY/ON Turns on this unit or sets it to the standby mode. When you turn on this unit, you will hear a click and there will be a 6 to 7 second delay before this unit can reproduce sound. Note In standby mode, this unit consumes a small amount of power in order to receive infrared-signals from the remote control. 2 INPUT selector Selects the input source you want to listen to or watch. 3 PURE DIRECT Turns on or off the PURE DIRECT mode. Lights up when turned on (see page 37). 4 Front panel display Shows information about the operational status of this unit. 5 PRESET/TUNING EDIT Switches the function of PRESET/TUNING l / h between selecting preset station numbers and tuning. 6 FM/AM Switches the reception band between FM and AM. 7 MEMORY (MAN'L/AUTO FM) Stores a station in the memory. Hold down this button for more than 3 seconds to start automatic preset tuning. 8 TUNING MODE (AUTO/MAN'L MONO) Switches the tuning mode between automatic ("AUTO" indicator on) and manual ("AUTO" indicator off). 9 Remote control sensor Receives signals from the remote control. 0 VOLUME Controls the output level of all audio channels. This does not affect the REC OUT level. A SPEAKERS A/B Turn on or off the set of front speakers connected to the A and/or B terminals on the rear panel at each time the corresponding button is pressed. 4
-
 1
1 -
2
-
 3
3 -
 4
4 -
 5
5 -
 6
6 -
 7
7 -
 8
8 -
 9
9 -
 10
10 -
 11
11 -
 12
12 -
 13
13 -
14
-
15
-
16
-
17
-
18
-
19
-
20
-
21
-
22
-
23
-
24
-
25
-
26
-
27
-
28
-
29
-
30
-
31
-
32
-
33
-
34
-
35
-
36
-
37
-
38
-
39
-
40
-
41
-
42
-
43
-
44
-
45
-
46
-
47
-
48
-
49
-
50
-
51
-
52
-
53
-
54
-
55
-
56
-
57
-
58
-
59
-
60
-
61
-
62
-
63
-
64
-
65
-
66
-
67
-
68
-
69
-
70
-
71
-
72
-
73
-
74
-
75
-
76
-
77
-
78
-
79
-
80
-
81
-
82
-
83
-
84
-
85
-
86
-
87
-
88
-
89
-
90
-
91
-
92
-
93
-
94
-
95
-
96
-
97
-
98
-
99
-
100
-
101
-
102
-
103
-
104
-
105
-
106
-
107
-
108
-
109
-
110
-
111
-
112
 |
 |