Acer G330 Configuration Guide - Page 91
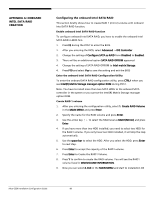
Configuring the onboard LSI SATA RAID, APPENDIX B: ONBOARD, LSI SATA RAID CREATION - altos specification
 |
UPC - 750519177044
View all Acer G330 manuals
Add to My Manuals
Save this manual to your list of manuals |
Page 91 highlights
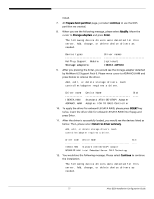
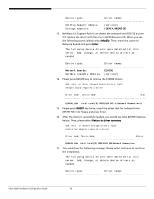
APPENDIX B: ONBOARD LSI SATA RAID CREATION Configuring the onboard LSI SATA RAID This section briefly shows how to create RAID 1 (mirror) volume with onboard LSI SATA RAID function. Enable onboard SATA RAID function To configure onboard LSI SATA RAID, you have to enable the onboard LSI SATA RAID in BIOS first. 1. Press F2 during the POST to enter the BIOS. 5. After you entering the BIOS, select Advanced -> IDE Controller 6. Change the setting of Configure SATA as RAID form Disabled to Enabled. 7. There will be an additional option SATA RAID OPROM appeared. 8. Change the setting of SATA RAID OPROM to LSI. 2. Press F10 and select Yes to save the setting and exit the BIOS Enter the onboard SATA RAID Configuration Utility When you see the Intel Embedded Server RAID Technology information shows on the screen during the POST, press Ctrl-E to enter the Embedded RAID Configuration Utility. Loading onboard SATA RAID default setting 1. Select Objects from Management menu. 2. Select Adapter from Objects. The selectable adapter will be listed. 3. Press Enter on the adapter and the adapter setting will be shown on the screen. You can change the setting from this menu. 4. Select Factory Default and YES to load the default settings. 5. Exit the configuration utility and press + + to reboot the server. Create RAID 1 volume 1. Select Configuration from Management Menu. 2. Select New Configuration from the Configuration menu and select YES to continue. An array selection window displays the devices connected to the current controller. 3. Press the arrow keys to choose specific physical drives and press spacebar to associate the selected drive with the current array. The indicator for selected drive change from READY to ONLINE 4. Add 2 drives to current array and press to finish creating current array. 5. Press Enter again to select array to configure. 81 Altos G330 Installation Configuration Guide
-
 1
1 -
2
-
3
-
4
-
5
-
6
-
7
-
8
-
9
-
10
-
11
-
12
-
13
-
14
-
15
-
16
-
17
-
18
-
19
-
20
-
21
-
22
-
23
-
24
-
25
-
26
-
27
-
28
-
29
-
30
-
31
-
32
-
33
-
34
-
35
-
36
-
37
-
38
-
39
-
40
-
41
-
42
-
43
-
44
-
45
-
46
-
47
-
48
-
49
-
50
-
51
-
52
-
53
-
54
-
55
-
56
-
57
-
58
-
59
-
60
-
61
-
62
-
63
-
64
-
65
-
66
-
67
-
68
-
69
-
70
-
71
-
72
-
73
-
74
-
75
-
76
-
77
-
78
-
79
-
80
-
81
-
82
-
83
-
84
-
85
-
 86
86 -
 87
87 -
 88
88 -
 89
89 -
 90
90 -
 91
91 -
 92
92 -
 93
93 -
 94
94 -
 95
95
 |
 |
