Brother International DCP 8045D Network Users Manual - English - Page 66
Creating a Network Print Server (NDS Queue Server) using Novell NWADMIN and BRAdmin Professional utility
 |
UPC - 012502610335
View all Brother International DCP 8045D manuals
Add to My Manuals
Save this manual to your list of manuals |
Page 66 highlights
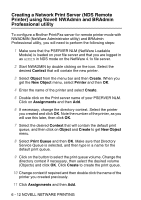
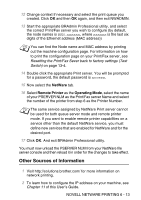
e Your queue name will appear in the TREE and Context that you specified. Select the queue and click on Add. The queue name will then be transferred to the Service Print Queues Window. You will be able to see the TREE and Context information along with the queue name information in this Window. f Click on the Close button. Your Brother Print/Fax server will now log into the appropriate NetWare server. Now exit the BRAdmin Professional utility. You are ready to print. Creating a Network Print Server (NDS Queue Server) using Novell NWADMIN and BRAdmin Professional utility If you do not wish to use the Brother BRAdmin Professional utility application solely to configure your NetWare file server, use the following instructions for configuration using the NWADMIN application in conjunction with the BRAdmin Professional utility. 1 Make sure that you are logged in as ADMIN in NDS mode on the NetWare 4.1x (or later) file server and start the NWADMIN application. 2 Select desired Context that will contain the Printer and then click on Object from the menu bar and then Create. When you get the New Object menu, select Printer and then OK. 3 Enter the name of the printer and select Create. 4 Select the desired Context that will contain the default print queue, and then click on Object and Create to get the New Object menu. 5 Select Print Queue and then OK. Make sure that Directory Service Queue is selected and then type in a name for the default print queue. 6 Click on the button to select the print queue volume. Change the directory context if necessary, then select the desired volume (from Available Objects) and click OK. Click Create to create the print queue. NOVELL NETWARE PRINTING 6 - 9
-
 1
1 -
2
-
3
-
4
-
5
-
6
-
7
-
8
-
9
-
10
-
11
-
12
-
13
-
14
-
15
-
16
-
17
-
18
-
19
-
20
-
21
-
22
-
23
-
24
-
25
-
26
-
27
-
28
-
29
-
30
-
31
-
32
-
33
-
34
-
35
-
36
-
37
-
38
-
39
-
40
-
41
-
42
-
43
-
44
-
45
-
46
-
47
-
48
-
49
-
50
-
51
-
52
-
53
-
54
-
55
-
56
-
57
-
58
-
59
-
60
-
 61
61 -
 62
62 -
 63
63 -
 64
64 -
 65
65 -
 66
66 -
 67
67 -
 68
68 -
 69
69 -
 70
70 -
 71
71 -
72
-
73
-
74
-
75
-
76
-
77
-
78
-
79
-
80
-
81
-
82
-
83
-
84
-
85
-
86
-
87
-
88
-
89
-
90
-
91
-
92
-
93
-
94
-
95
-
96
-
97
-
98
-
99
-
100
-
101
-
102
-
103
-
104
-
105
-
106
-
107
-
108
-
109
-
110
-
111
-
112
-
113
-
114
-
115
-
116
-
117
-
118
-
119
-
120
-
121
-
122
-
123
-
124
-
125
-
126
-
127
-
128
-
129
-
130
-
131
-
132
-
133
-
134
-
135
-
136
-
137
-
138
-
139
-
140
-
141
-
142
-
143
-
144
-
145
-
146
-
147
-
148
-
149
-
150
-
151
-
152
-
153
-
154
-
155
-
156
-
157
-
158
-
159
-
160
-
161
-
162
-
163
-
164
-
165
-
166
-
167
-
168
-
169
-
170
-
171
-
172
-
173
-
174
-
175
-
176
 |
 |
