Brother International MFC 7440N Software Users Manual - English - Page 28
Secure Print, Printer Function, Quick Print Setup, Macro, Header-Footer Print, Toner Save Mode - printer manual
 |
UPC - 012502620631
View all Brother International MFC 7440N manuals
Add to My Manuals
Save this manual to your list of manuals |
Page 28 highlights
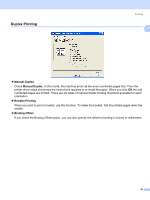
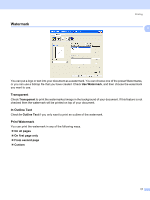
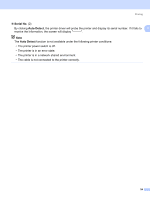
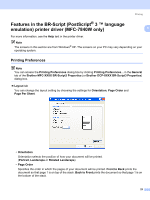
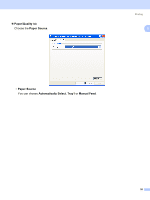
Printing „ Secure Print Secure documents are documents that are password protected when they are sent to the machine. Only 1 the people who know the password will be able to print them. Since the documents are secured at the machine, you must enter the password using the control panel of the machine to print them. To send a secured document: a Select Secure Print from the Printer Function menu and check Secure Print. b Enter your password, user name and job name and click OK. c You must print the secured documents from the control panel of the machine. (See Secure Key on page 5.) To delete a secured document: You need to use the control panel of the machine to delete a secured document. (See Secure Key on page 5.) „ Quick Print Setup The feature allows you to quickly choose driver settings by clicking a tasktray icon. You can turn the quick print setting on or off. By placing a check in the selection boxes for the following functions you can choose which will be available in the quick print setting. • Multiple Page • Manual Duplex • Toner Save Mode • Paper Source • Media Type „ Macro You can save a page of a document as a macro to printer memory. You can also execute the saved macro (you can use the saved macro as an overlay on any document). This will save time and increase printing speed for often used information such as forms, company logos, letterhead formats or invoices. „ Header-Footer Print When this feature is enabled, it will print the date and time on your document from your computer's system clock and the PC login user name or the text you entered. By clicking Setting, you can customize the information. • ID Print If you select Login User Name, your PC login user name will print. If you select Custom and enter the text in the Custom edit box, the text you entered will print. 21
-
 1
1 -
2
-
3
-
4
-
5
-
6
-
7
-
8
-
9
-
10
-
11
-
12
-
13
-
14
-
15
-
16
-
17
-
18
-
19
-
20
-
21
-
22
-
 23
23 -
 24
24 -
 25
25 -
 26
26 -
 27
27 -
 28
28 -
 29
29 -
 30
30 -
 31
31 -
 32
32 -
 33
33 -
34
-
35
-
36
-
37
-
38
-
39
-
40
-
41
-
42
-
43
-
44
-
45
-
46
-
47
-
48
-
49
-
50
-
51
-
52
-
53
-
54
-
55
-
56
-
57
-
58
-
59
-
60
-
61
-
62
-
63
-
64
-
65
-
66
-
67
-
68
-
69
-
70
-
71
-
72
-
73
-
74
-
75
-
76
-
77
-
78
-
79
-
80
-
81
-
82
-
83
-
84
-
85
-
86
-
87
-
88
-
89
-
90
-
91
-
92
-
93
-
94
-
95
-
96
-
97
-
98
-
99
-
100
-
101
-
102
-
103
-
104
-
105
-
106
-
107
-
108
-
109
-
110
-
111
-
112
-
113
-
114
-
115
-
116
-
117
-
118
-
119
-
120
-
121
-
122
-
123
-
124
-
125
-
126
-
127
-
128
-
129
-
130
-
131
-
132
-
133
-
134
-
135
-
136
-
137
-
138
-
139
-
140
-
141
-
142
-
143
-
144
-
145
-
146
-
147
-
148
-
149
-
150
-
151
-
152
-
153
-
154
-
155
-
156
-
157
-
158
-
159
-
160
-
161
-
162
-
163
-
164
-
165
-
166
-
167
-
168
-
169
-
170
-
171
-
172
-
173
-
174
-
175
-
176
-
177
-
178
-
179
-
180
-
181
-
182
-
183
-
184
-
185
-
186
-
187
-
188
-
189
-
190
-
191
-
192
-
193
-
194
-
195
-
196
-
197
-
198
-
199
 |
 |