Brother International MFC 7440N Network Users Manual - English - Page 62
How to con the print server settings using Web Based Management (web browser), Status Monitor - default admin password
 |
UPC - 012502620631
View all Brother International MFC 7440N manuals
Add to My Manuals
Save this manual to your list of manuals |
Page 62 highlights
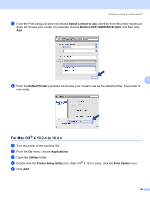
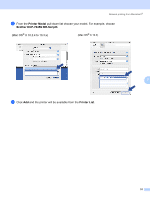
Web Based Management How to configure the print server settings using Web Based Management (web browser) 8 A standard web browser can be used to change your print server settings using the HTTP (Hyper Text Transfer Protocol). Note To use a web browser, you will need to know the IP address or node name of the print server. a Start your web browser. b Type "http://printer's IP address/" into your browser. (where "printer's IP address" is the printer's IP address or the node name) „ For example: http://192.168.1.2/ (if the printer's IP address is 192.168.1.2.) http://BRN123456765432/ (if the printer's node name is BRN123456765432.) Note • If you have edited the hosts file on your computer or are using a Domain Name System (DNS), you can 8 also enter the DNS name of the print server. As the print server supports TCP/IP and NetBIOS names, you can also enter the NetBIOS name of the print server. The NetBIOS name can be seen in the Network Configuration List. To learn how to print the Network Configuration List, see Printing the Network Configuration List on page 28. The NetBIOS name assigned is the first 15 characters of the node name and by default it will appear as "BRNxxxxxxxxxxxx". • For Macintosh® users, you can have easy access to the Web Based Management System by clicking the machine icon on Status Monitor screen. For more information, see the Software User's Guide on the CDROM. c Click Network Configuration. d Enter a user name and a password. The default User Name is "admin" and the default password is "access". e Click OK. f You can now change the printer server settings. Note If you have changed the protocol settings, restart the printer after clicking Submit to activate the configuration. 54
-
 1
1 -
2
-
3
-
4
-
5
-
6
-
7
-
8
-
9
-
10
-
11
-
12
-
13
-
14
-
15
-
16
-
17
-
18
-
19
-
20
-
21
-
22
-
23
-
24
-
25
-
26
-
27
-
28
-
29
-
30
-
31
-
32
-
33
-
34
-
35
-
36
-
37
-
38
-
39
-
40
-
41
-
42
-
43
-
44
-
45
-
46
-
47
-
48
-
49
-
50
-
51
-
52
-
53
-
54
-
55
-
56
-
 57
57 -
 58
58 -
 59
59 -
 60
60 -
 61
61 -
 62
62 -
 63
63 -
 64
64 -
 65
65 -
 66
66 -
 67
67 -
68
-
69
-
70
-
71
-
72
-
73
-
74
-
75
-
76
-
77
-
78
-
79
-
80
-
81
-
82
-
83
-
84
-
85
-
86
-
87
-
88
 |
 |
