Brother International NX-450Q Users Manual - English - Page 26
the bobbin winder seat, the thread may
 |
View all Brother International NX-450Q manuals
Add to My Manuals
Save this manual to your list of manuals |
Page 26 highlights
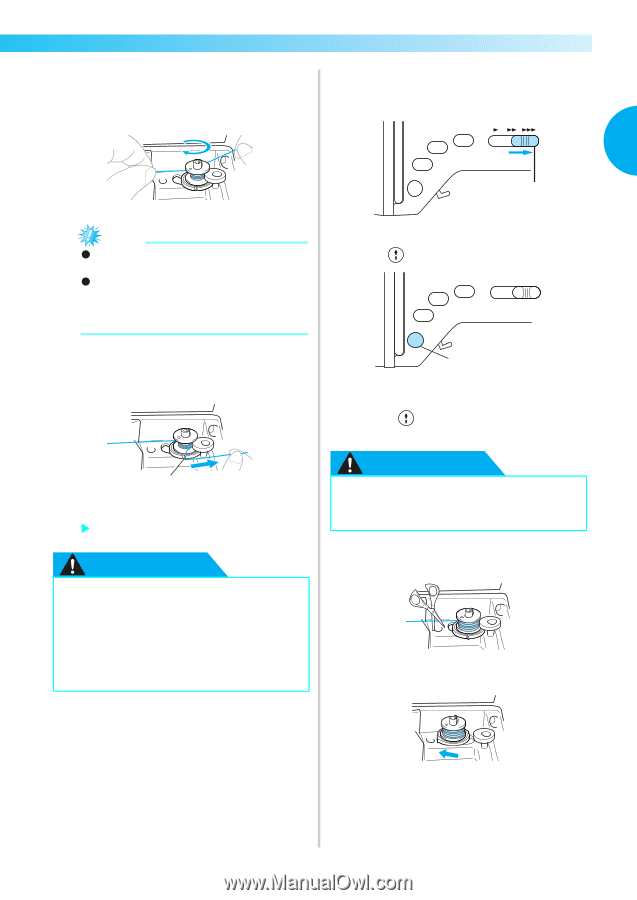
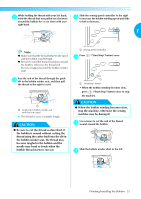
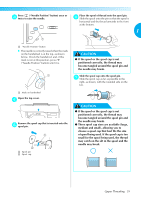
While holding the thread with your left hand, k wind the thread that was pulled out clockwise around the bobbin five or six times with your right hand. Slide the sewing speed controller to the right m to increase the bobbin winding speed and slide to left to decrease. 1 1 Note z Make sure that the thread between the spool and the bobbin is pulled tight. z Be sure to wind the thread clockwise around the bobbin, otherwise the thread will become wrapped around the bobbin winder shaft. a Sewing speed controller Press n ("Start/Stop" button) once. Pass the end of the thread through the guide l slit in the bobbin winder seat, and then pull the thread to the right to cut it. 1 a Guide slit in bobbin winder seat (with built-in cutter) X The thread is cut to a suitable length. CAUTION ● Be sure to cut the thread as described. If the bobbin is wound without cutting the thread using the cutter built into the slit in the bobbin winder seat, the thread may become tangled in the bobbin and the needle may bend or break when the bobbin thread starts to run out. 1 a "Start/Stop" button • When the bobbin winding becomes slow, press ("Start/Stop" button) once to stop the machine. CAUTION ● When the bobbin winding becomes slow, stop the machine, otherwise the sewing machine may be damaged. Use scissors to cut the end of the thread o wound around the bobbin. Slide the bobbin winder shaft to the left. p Winding/Installing the Bobbin 25
-
 1
1 -
2
-
3
-
4
-
5
-
6
-
7
-
8
-
9
-
10
-
11
-
12
-
13
-
14
-
15
-
16
-
17
-
18
-
19
-
20
-
 21
21 -
 22
22 -
 23
23 -
 24
24 -
 25
25 -
 26
26 -
 27
27 -
 28
28 -
 29
29 -
 30
30 -
 31
31 -
32
-
33
-
34
-
35
-
36
-
37
-
38
-
39
-
40
-
41
-
42
-
43
-
44
-
45
-
46
-
47
-
48
-
49
-
50
-
51
-
52
-
53
-
54
-
55
-
56
-
57
-
58
-
59
-
60
-
61
-
62
-
63
-
64
-
65
-
66
-
67
-
68
-
69
-
70
-
71
-
72
-
73
-
74
-
75
-
76
-
77
-
78
-
79
-
80
-
81
-
82
-
83
-
84
-
85
-
86
-
87
-
88
-
89
-
90
-
91
-
92
-
93
-
94
-
95
-
96
-
97
-
98
-
99
-
100
-
101
-
102
-
103
-
104
-
105
-
106
-
107
-
108
-
109
-
110
-
111
-
112
-
113
-
114
-
115
-
116
-
117
-
118
-
119
-
120
-
121
-
122
-
123
-
124
-
125
-
126
-
127
-
128
-
129
-
130
-
131
-
132
-
133
-
134
-
135
-
136
-
137
-
138
-
139
-
140
-
141
-
142
-
143
-
144
-
145
-
146
-
147
-
148
-
149
-
150
-
151
-
152
-
153
-
154
-
155
 |
 |